Two Lights One Switch, Why One Light isn’t Working?
It can be frustrating when one light in a room controlled by a single switch stops working, especially if the other light is still functioning properly. This common electrical issue can often be resolved by understanding some basic electrical wiring and troubleshooting techniques.
While it is always a good idea to consult a licensed electrician for any electrical repairs or installations, it can be helpful to have a basic understanding of how to troubleshoot and resolve issues like this on your own.
In this article, we will go over some steps you can take to identify and fix the problem when one light controlled by a switch that also controls another light is not working.
You'll Learn About
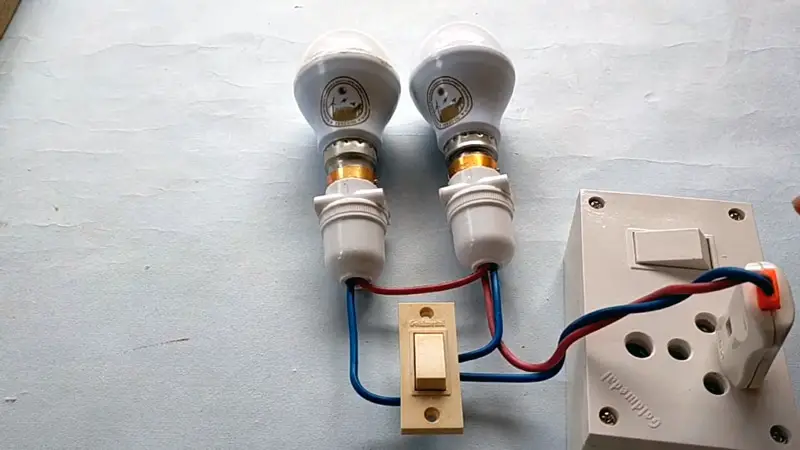
Two Lights One Switch Only One Works, Why?
It sounds like you have a switch loop wiring setup, where the power is coming into the light fixture and the switch is controlling the power to the light by interrupting the hot (black) wire. In this case, the white wire that is connected to the silver screw at the light fixture is the switched hot wire and the red wire is the always-hot wire.
To troubleshoot the issue with one of the lights not working, you should first verify that the circuit breaker for the circuit is in the ON position and that there is power at the switch. If there is power at the switch, then you should check the wiring at the light fixture to make sure that all the wires are connected properly.
If the wiring at the light fixture is correct, then you should check the switch itself to see if it is functioning properly. If the switch is faulty, then you will need to replace it. If the wiring at the light fixture and the switch are both correct, then the issue may be with the light itself.
If you are not comfortable working with electrical wiring, it is always best to call a licensed electrician to help with repairs or installations. Working with electricity can be dangerous, and it is important to follow proper safety precautions and guidelines to avoid injury or damage.
How to Identify the Problem?
To identify the problem with a switch loop wiring setup where one of the lights is not working, you should follow these steps:
- Verify that the circuit breaker for the circuit is in the ON position and that there is power at the switch. If there is no power at the switch, the circuit breaker may be tripped or there may be a problem with the main electrical service.
- Inspect the wiring at the light fixture to make sure that all the wires are connected properly. If the wiring at the light fixture is not correct, it may be the cause of the problem.
- Test the switch with a voltage tester to verify that it is functioning properly. If the switch is not functioning, it may be the cause of the problem.
- If the wiring at the light fixture and the switch are both correct, check the light itself to see if it is working properly. It may be that the light bulb is burned out or the fixture itself is faulty.
- If none of these steps identify the problem, it may be a problem with the wiring between the switch and the light fixture, or a problem with a different part of the electrical system. In this case, it is best to call a licensed electrician to diagnose and fix the problem.
It is important to note that when identifying and troubleshooting electrical problems, it is always best to use caution and follow proper safety guidelines to avoid injury or damage.
Troubleshoot The Switch
To troubleshoot the switch, you will need to first remove the switch cover and inspect the wiring connections. Make sure that all the wires are connected securely and that there are no loose or damaged wires. If everything looks fine, then you can use a voltage tester to verify that the switch is functioning properly.
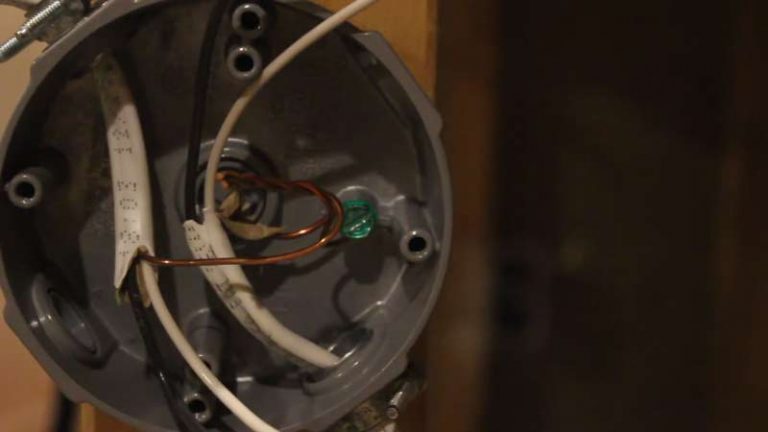
Inspect the Wiring Connections
Troubleshooting a switch loop wiring setup for a light fixture that is not working is to remove the cover of the switch and inspect the wiring connections. This involves removing the screws that hold the cover in place and carefully removing the cover to access the wires inside.
Once the cover is removed, visually inspect the wires to make sure they are securely connected to the switch and that there is no damage or fraying on the wires. If there is any damage or lose connections, they should be fixed before moving on to the next step.
Verify With a Voltage Tester
Once the wiring connections have been inspected and are determined to be secure and undamaged, the next step is to test the switch with a voltage tester to verify that it is functioning properly.
A voltage tester is a device that is used to determine if there is an electrical current flowing through a wire or circuit. To test the switch, you would touch the voltage tester to the wires connected to the switch.
If the voltage tester indicates that there is no current flowing through the switch, it indicates that the switch is not functioning properly and needs to be replaced.
Replace if Faulty
If the switch is found to be faulty as a result of the voltage test in step 2, it needs to be replaced. This can be done by turning off the power to the circuit at the breaker, removing the wires from the old switch, and connecting them to the new switch.
Once the wires are connected, the switch can be secured in place and the circuit power can be turned back on.
It is important to note that if you are not comfortable working with electrical wiring, it is always best to call a licensed electrician to help with repairs or installations. Working with electricity can be dangerous, and it is important to follow proper safety precautions and guidelines to avoid injury or damage.
Consider Other Potential Issues
If you have checked the circuit breaker, verified power at the switch, and checked the wiring at the light fixture and the switch, but the light is still not functioning, then there may be an issue with the light fixture itself.
- It is possible that the light fixture is faulty or has a loose connection that is preventing it from functioning properly.
- In addition, the issue may be related to the wiring in the circuit itself. If the wiring is damaged or has been improperly installed, it can cause issues with the function of the lights.
- If you suspect that the wiring may be the issue, it is important to consult a licensed electrician to properly diagnose and fix the problem.
Remember to always follow proper safety precautions when working with electrical wiring and to seek the help of a licensed professional if you are unsure or uncomfortable with the work.
Things You Need to Check While Troubleshooting
Here are some additional tips to consider when troubleshooting an issue with one light not working when controlled by a switch that also controls another light:
Check The Bulb
Before attempting to troubleshoot the wiring or the switch, make sure that the bulb in the light that is not working is functioning properly. Try replacing the bulb with a new one to see if that resolves the issue.
Check For Loose Connections
If the wiring at the light fixture or the switch appears to be secure, but the light is still not working, it is possible that there is a loose connection somewhere in the circuit. You can try gently wiggling the wires to see if that resolves the issue.
Check The Circuit Breaker Panel
If the circuit breaker for the circuit that the lights are on is tripped, it can cause one or both of the lights to stop functioning. Make sure that the circuit breaker is in the ON position.
Check For Damaged Wiring
If you suspect that the issue may be related to damaged wiring in the circuit, it is important to consult a licensed electrician to diagnose and fix the problem. Damaged wiring can be a serious safety hazard and should not be attempted to be repaired by someone who is not trained and experienced in electrical work.
Follow Proper Safety Precautions
When working with electrical wiring, it is important to follow proper safety precautions to avoid injury or damage. This includes turning off the power to the circuit at the circuit breaker, wearing protective gear, and being careful not to touch any exposed wires.
Conclusion
In conclusion, when one light controlled by a switch that also controls another light is not working, there are a few steps you can take to troubleshoot and resolve the issue.
- First, check the circuit breaker to ensure that power is not shut off to the circuit.
- Then, verify power at the switch by testing for voltage with a voltage tester.
- Next, check the wiring at the light fixture for any loose or disconnected wires.
If the issue is not with the wiring or the switch, then the light fixture itself or the wiring in the circuit may be the problem. If you are unsure or uncomfortable with any of these steps, it is always best to seek the help of a licensed electrician. Remember to always follow proper safety precautions when working with electricity to avoid injury or damage.
If one light isn’t working in a two-light setup, the issue could be a faulty bulb, loose wiring, or a damaged switch. Start by checking the bulb and connections before moving on to the switch or wiring. For more electrical troubleshooting tips, explore our guide on whether you need a neutral wire for 240V. If you’re dealing with wiring projects, our tips on extending stove wire and using 6/3 aluminum wire for a range can be helpful.
![Splice 10/3 Wire [is Easy to Do]](https://fixitinthehome.com/wp-content/uploads/2023/02/Splice-10_3-Wire-768x432.webp)