How to Convert 4 Wire to 3 Wire Light Fixture?
If you’re looking to install a new light fixture or upgrade an existing one, you may run into a situation where you need to convert a 4 wire light fixture to a 3 wire electrical system in your home. This is often necessary when you have a 4 wire light fixture that is designed for a 3 wire electrical system, or when you want to replace a light fixture that has separate switching for a fan and light combination.
In either case, connecting a 4 wire light fixture to a 3 wire system involves some basic electrical work, and it’s important to follow proper safety precautions to avoid any accidents or injuries. In this article, we’ll provide step-by-step instructions for converting a 4 wire light fixture to a 3 wire setup, as well as some tips and considerations to keep in mind.
You'll Learn About
Step‑by‑Step: Converting a 4‑Wire Light Fixture to a 3‑Wire
Important — Safety Notice
- Electrical work can be dangerous. If you are not fully comfortable or licensed, hire a qualified electrician. Local electrical codes vary; follow them. Do not proceed unless the circuit is de‑energized and verified.
- Always turn off the correct breaker at the main panel and use a reliable voltage tester to confirm power is off. Use appropriate personal protective equipment (PPE).
Tools & Materials Needed
- Non‑contact voltage tester and/or multimeter
- Screwdrivers (flat and Phillips)
- Wire strippers and wire cutters
- Needle‑nose pliers
- Wire nuts (proper size) and electrical tape
- Insulating (PVC) tape or colored tape for marking conductors
- Cable clamps and cable connectors (if required)
- Grounding screw or pigtail wire (if needed)
- Flashlight or headlamp
- Optional: lockout/tagout for the breaker
Prerequisites & Code Considerations
- Confirm the wiring colors and function in your region — colors and rules differ by country.
- Many modern codes require a neutral in the switch box. Converting wiring may make the switch box non‑compliant if a neutral is needed for future devices (dimmers, motion sensors). Check local code before altering.
- If a neutral is required at the switch for code compliance, do not remove it from the circuit — consult an electrician.
Quick: What is 4‑wire vs 3‑wire in this context?
- 4‑wire cable typically includes: Hot (line), Neutral, Switched Hot (to fixture), and Ground — or in some setups, an extra conductor used for multi‑switch or fan/light combos.
- 3‑wire cable typically has: Hot (line), Neutral, and Ground — or Hot, Switched Hot, and Neutral depending on how it’s used.
- Important: don’t assume color = function. Always test and trace conductors.
Preparation — Turn Off Power & Verify
- Turn off the breaker that controls the circuit at the main panel. If uncertain, turn off the main breaker.
- Use a non‑contact voltage tester on all conductors in the fixture box and switch box to confirm they are dead.
- Test the tester on a known live circuit to confirm it works, then re‑test the fixture wires.
- Put a tag or tape on the breaker to prevent someone from turning it back on while you work.
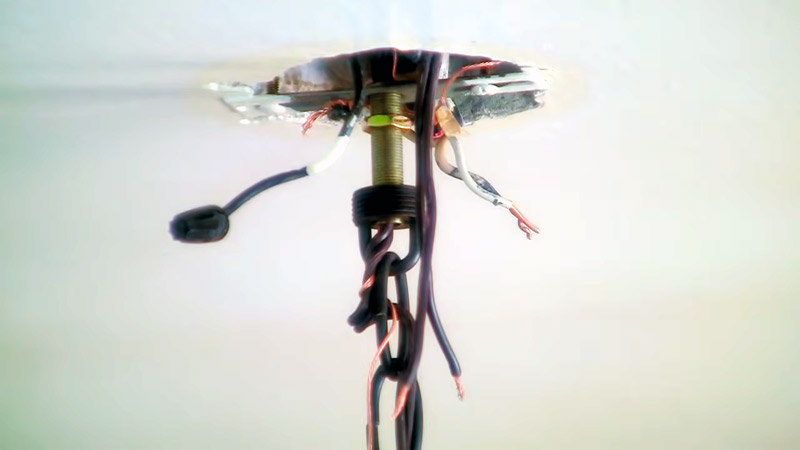
Step 1 — Remove Fixture and Inspect Wiring
- Remove the fixture cover and detach the fixture from the ceiling or wall per manufacturer instructions.
- Carefully pull the fixture and cable into the work area so you can see the house wiring.
- Note how many conductors are present in the cable(s) entering the box and how they’re connected.
- Take photos with your phone for reference before disconnecting anything.
Step 2 — Identify and Label Conductors
- Identify which conductor is the line (hot) feeding the box — often connected to other hots in a wirenut bundle.
- Identify the switched hot (the conductor that goes to the fixture’s hot lead and is controlled by the switch).
- Identify the neutral bundle (usually whites in the U.S.; may be different in other countries).
- Identify the ground (bare or green).
- Label each conductor with tape (e.g., “LINE”, “SWITCHED”, “NEUTRAL”, “GROUND”) so you don’t mix them up.
Step 3 — Decide How to Convert (Common Scenarios)
Use the scenario that matches what you discovered:
Scenario A — The fixture cable includes a spare conductor you want to remove (e.g., 4th conductor unused)
- If one conductor is truly unused and not required, you can safely cap and stow it in the box, then refit the fixture using the three active conductors.
Scenario B — The switch loop was wired using the neutral or an extra conductor and you need a conventional hot/neutral arrangement
- If the 4‑wire was used to run both fan and light separately or for a 3‑way switch, conversion may require re‑routing or reassigning conductors. This is more complex and may require running new cable or changing the switch. Consider calling an electrician.
Step 4 — Perform the Conversion (Typical: Remove One Conductor or Reassign)
The steps below describe a typical conversion where one conductor is unused or being retired. Adjust as needed for your exact wiring.
- With power confirmed off, disconnect the fixture leads from the house wires one at a time.
- If one conductor is unused and insulated, cap it with an appropriately sized wire nut and tuck it into the box. Do not cut it short leaving exposed copper.
- If converting from a 4‑wire where the extra conductor was used as a switched hot or for a second circuit, determine whether you need to reassign a conductor. If you do reassign (for example re‑use a red conductor as neutral or hot), mark it clearly with tape to indicate its new purpose — but note re‑using conductors can violate local code and is not recommended unless you understand the implications.
- Connect fixture neutral to the house neutral bundle (secure with wire nut).
- Connect fixture hot to the switched hot conductor (wire nut) or to the hot as required by the switch configuration.
- Ensure all ground conductors are connected together and to the fixture grounding screw or green lead. If the fixture has no ground, attach a pigtail to the box or mounting strap if the box is metal and grounded.
Step 5 — Cap, Secure, and Insulate Unused Conductors
- Any unused conductor must be insulated and capped with a wire nut; then pushed neatly into the box. Do not leave exposed copper.
- If you re‑purposed a conductor, mark it with colored tape at both ends (switch and fixture) to show its new role.
- Make sure the box is not overcrowded; oversized boxes or box fill rules may apply — check code.
Step 6 — Reinstall Fixture and Restore Power for Testing
- Re‑mount the fixture per manufacturer instructions, ensuring no wires are pinched.
- Restore power at the breaker.
- Test the fixture operation with the switch. Confirm the light turns on/off properly and that there is no buzzing or other abnormal behavior.
- Use a multimeter to verify voltages if you suspect a problem (measure hot to neutral when switched on, hot to ground, etc.).
Final Checks & Compliance
- Confirm all connections are tight and secure, wire nuts fully cover exposed conductors, and grounds are connected.
- Replace the cover plate and ensure the box is accessible (do not bury junctions behind permanent finishes).
- Verify box fill and other local code requirements are met. If you altered conductor functions, update any documentation for future owners or electricians.
Troubleshooting & If Something Feels Wrong
- If the fixture doesn’t work after reconnecting, turn the breaker off again before troubleshooting.
- If you find more complex wiring (multifunction fan/light, multi‑switch, 3‑way/4‑way switching, shared neutrals), stop and contact a licensed electrician.
- If you see signs of overheating, melted insulation, burn marks, or aluminum wiring, do not proceed and call a professional.
When to Call an Electrician
- You are unsure which conductor is which after testing.
- The switch box lacks a neutral and code requires one for future devices.
- The circuit is part of a multi‑wire branch circuit with shared neutrals (these can be dangerous if not handled correctly).
- You encounter aluminum wiring or damaged insulation.
Appendix — Typical Color Conventions (But Always Test)
- United States (common): Hot (black/red), Neutral (white), Ground (bare/green)
- Europe / IEC: Brown (live), Blue (neutral), Green/Yellow (earth)
These are typical conventions only. Always identify each conductor by testing — do not rely on color alone.
The “Ghost Conductor” Audit: why that extra wire is more than “just a spare”
What is a “ghost conductor” and why it matters
A “ghost conductor” is an unused or repurposed conductor bundled with live conductors that can show phantom/ghost voltage by capacitive coupling. That apparent voltage can fool high-impedance meters, cause LED/driver ghosting, and create confusion or a latent safety hazard for anyone who works on the cable later. Treat any unused conductor as potentially energized until you prove otherwise with proper tests.
Quick field test every DIYer should do
Step-by-step test you can show in an article or video:
- Turn the breaker off and verify with a non-contact tester.
- Confirm the circuit is dead with a low-impedance tester (a solenoid/“Wiggy”) or a digital meter set to measure under load — not only a high-Z DMM.
- Attach a resistive load appropriate for your mains (for example, a 60–100 W incandescent lamp or a purpose-built test load rated for your voltage) between the suspect conductor and neutral/ground. If the measured voltage collapses under load, it’s a phantom voltage. If it remains, the conductor is truly carrying real voltage and must be treated as live.
- Document the test with photos or a short clip (meter reading before/after and the load in place) and include the meter type and load used.
Smart-switch & future-proof checklist
Before capping or removing a conductor, consider future devices: many smart switches, sensors, and timers require a neutral at the switch. Rather than discarding a spare conductor, repurpose it as a documented future neutral or low-voltage control pair. Mark both ends clearly with colored tape and a short note (e.g., “FUTURE NEUTRAL – 2025-10-11”) so the next electrician knows why it’s present.
Multi-wire branch circuit (MWBC) audit — the hidden shared-neutral problem
Check whether the 4-wire run is part of a multi-wire branch circuit (two hots sharing a neutral). Altering or removing conductors in an MWBC without correct handle-tied or common-trip breaker arrangements can create neutral overloads and dangerous conditions. If you suspect an MWBC (two hots on different phases, neutrals tied together, unusual bundling), stop and call a licensed electrician.
Make the invisible visible: document, mark, and package for the next electrician
Create a short owner’s log for every conversion job:
- Take a clear “before” photo showing the wires and wirenuts.
- Label each conductor at both ends (e.g.,
LINE,SWITCH,NEUTRAL,CAP). - Record the date, circuit/breaker number, and any tests performed (meter model, load used, outcome).
- Store the log and photos with the house files or attach inside the fixture box (in a sealed plastic pouch) so future workers see the history immediately.
Documenting this small audit raises your article’s authority, reduces risk for future repairs, and gives readers a practical, expert step that most DIY guides miss.
Tips And Considerations
When converting a 4 wire light fixture to a 3 wire, there are a few important tips and considerations to keep in mind:
Make Sure The Wires Are Properly Secured And Not Frayed
It’s important to ensure that all of the wires are securely connected and not frayed or damaged in any way. If the wires are frayed or damaged, they may not make a proper connection, which could lead to problems with the light fixture.
Double-Check All Connections To Ensure They Are Correct
Before you turn the circuit power back on, it’s a good idea to double-check all of the connections to ensure that they are correct. This will help prevent any accidents or injuries that could result from improper connections.
Consider Hiring A Licensed Electrician If You Are Uncertain About Any Part Of The Process
If you’re not confident in your ability to convert a 4 wire light fixture to a 3 wire, or if you have any doubts about the safety of the process, it’s a good idea to consider hiring a licensed electrician. An electrician will have the knowledge and experience to safely and properly convert the light fixture, and can also help diagnose any issues that may arise.
Familiarize Yourself With The Wiring In Your Home
Before you begin any electrical work, it’s a good idea to familiarize yourself with the wiring in your home. This will help you understand how your electrical system is set up and where the different wires are located, which can make the process of converting a 4 wire light fixture to a 3 wire much easier.
Use The Correct Tools
Make sure you have the right tools for the job, including a wire stripper, wire connectors or wire nuts, and a voltage tester. These tools will help you safely and effectively connect the wires from the 4 wire and 3 wire light fixtures.
Test The Light Fixture Before Installing It
After you’ve connected the wires from the 3 wire light fixture to the corresponding wires from the 4 wire light fixture, it’s a good idea to test the light fixture before installing it. This will help ensure that the light fixture is functioning properly and that all of the connections are secure.
Use Caution When Working With Electricity
Always be cautious when working with electricity, and follow proper safety precautions to reduce the risk of injury. This includes wearing protective gear, such as gloves and safety glasses, and following all instructions carefully.
By following these tips, you can help ensure a safe and successful conversion of your 4 wire light fixture to a 3 wire.
Conclusion
Converting a 4 wire light fixture to a 3 wire involves some basic electrical work and it’s important to follow proper safety precautions to avoid any accidents or injuries. By following the steps outlined in this article, you should be able to successfully convert your 4 wire light fixture to a 3 wire.
This includes turning off the circuit power, identifying the wires in both the 4 wire and 3 wire light fixtures, disconnecting the wires from the 4 wire light fixture, and connecting the ground, neutral, and live wires from the 3 wire light fixture to the corresponding wires from the 4 wire light fixture.
It’s also important to make sure the wires are properly secured and not frayed, and to double-check all connections to ensure they are correct. If you’re uncertain about any part of the process, it’s a good idea to consider hiring a licensed electrician for assistance.
By following these steps and considering these tips, you can safely and successfully convert your 4 wire light fixture to a 3 wire.