Silicone vs Plumber’s Putty for Garbage Disposal? The #1 Mistake to Avoid
You’re ready to install your powerful new garbage disposal, a key step in upgrading your kitchen’s functionality. You have the unit, the tools, and the instructions. But then you face a deceptively simple choice that has huge consequences for the longevity of your installation: what do you use to seal the drain flange to the sink? The classic choice is plumber’s putty, but modern silicone sealants are now a common alternative. This decision is more than just a matter of preference; choosing the wrong sealant can lead to frustrating leaks, permanent stains on your beautiful countertops, and the hassle of having to redo the entire installation.
Making the correct choice between silicone and plumber’s putty is the single most critical step to ensure a durable, watertight seal for your garbage disposal. The material of your sink, the need for a permanent bond, and your willingness to wait for a sealant to cure are all crucial factors. This guide will walk you through the pros and cons of each, helping you avoid the number one mistake that can compromise your entire project.
You'll Learn About
Understanding the Classic Choice: What is Plumber’s Putty?
For decades, plumber’s putty has been the go-to material for creating a watertight seal under sink drains and faucet bases. It is a soft, pliable, clay-like compound that is designed to remain soft for a very long time. This pliability is its greatest strength.
When you tighten the garbage disposal’s mounting flange, the putty compresses to fill any microscopic gaps between the flange and the sink surface. The excess simply squeezes out and can be easily wiped away. Because it doesn’t harden, it makes future removal of the disposal a straightforward process. However, this classic solution has significant drawbacks in modern kitchens.
The Downside of Plumber’s Putty
The primary ingredient in traditional plumber’s putty is an oil-based substance. While this keeps it from drying out, it’s also its biggest flaw. This oil can leach into porous sink and countertop materials over time, leaving a permanent, unsightly stain.
If you have a granite, marble, quartz, or any other natural stone or composite sink, using standard plumber’s putty is a critical error. The stain it creates cannot be removed and will permanently mar the appearance of your expensive fixture. While stain-free putties exist, they don’t offer the same adhesive strength and durability as the modern alternative.
The Modern Solution: Silicone Sealant
Silicone sealant is a completely different type of product. It’s a flexible, waterproof adhesive that comes in a tube and is applied with a caulk gun. Unlike putty, which just fills a gap, silicone creates a strong, durable bond between the drain flange and the sink.
This adhesive quality provides a superior, long-lasting seal that is impervious to water and household cleaners. For garbage disposals, which generate constant vibrations during use, this strong bond is a significant advantage. It helps ensure the seal remains intact despite the daily stress, preventing leaks that might develop over time with a putty seal.
The Critical Decision: Silicone or Plumber’s Putty for Your Garbage Disposal?
The choice between these two sealants ultimately comes down to your sink’s material and your long-term goals. For most modern kitchen setups, silicone is the superior and safer option. The risk of staining expensive countertops and sinks is too high to justify the use of traditional oil-based putty.
Furthermore, the adhesive properties of silicone provide a more robust and reliable seal for an appliance that is subject to constant movement and vibration. While putty has been a trusted product for generations of plumbers, its limitations make it a risky choice for today’s diverse range of kitchen materials.
When is Plumber’s Putty Still Acceptable?
The only scenario where plumber’s putty is a safe and acceptable choice is with a stainless steel or porcelain sink where the surrounding countertop is not a porous material. In these cases, the oil from the putty cannot stain the non-porous surface. It remains easy to work with and allows for simple removal if you need to service the disposal later.
Why Silicone is Almost Always the Better Choice
Silicone offers a “set it and forget it” solution. It creates a flexible, 100% waterproof seal that will not crack, shrink, or stain. Given that many homeowners are investing in stone or composite sinks, using silicone eliminates the risk of costly damage. The peace of mind that comes from a durable, permanent seal is well worth the extra steps required for its application.
| Feature | Plumber’s Putty | 100% Silicone Sealant |
|---|---|---|
| Best For | Stainless steel & porcelain sinks only | All sink materials, especially granite, quartz & composite |
| Seal Type | Compression seal, remains pliable | Adhesive, flexible, waterproof bond |
| Durability | Good, but can dry out and crack over many years | Excellent, long-lasting, and remains flexible |
| Staining Risk | High risk on porous materials (granite, marble, etc.) | None |
| Curing Time | None; can use sink immediately | Requires 12-24 hours to fully cure before use |
| Ease of Application | Very easy; roll into a rope and apply by hand | Requires a caulk gun; can be messy if not careful |
| Ease of Removal | Very easy; scrapes away cleanly | Difficult; must be cut and scraped away |
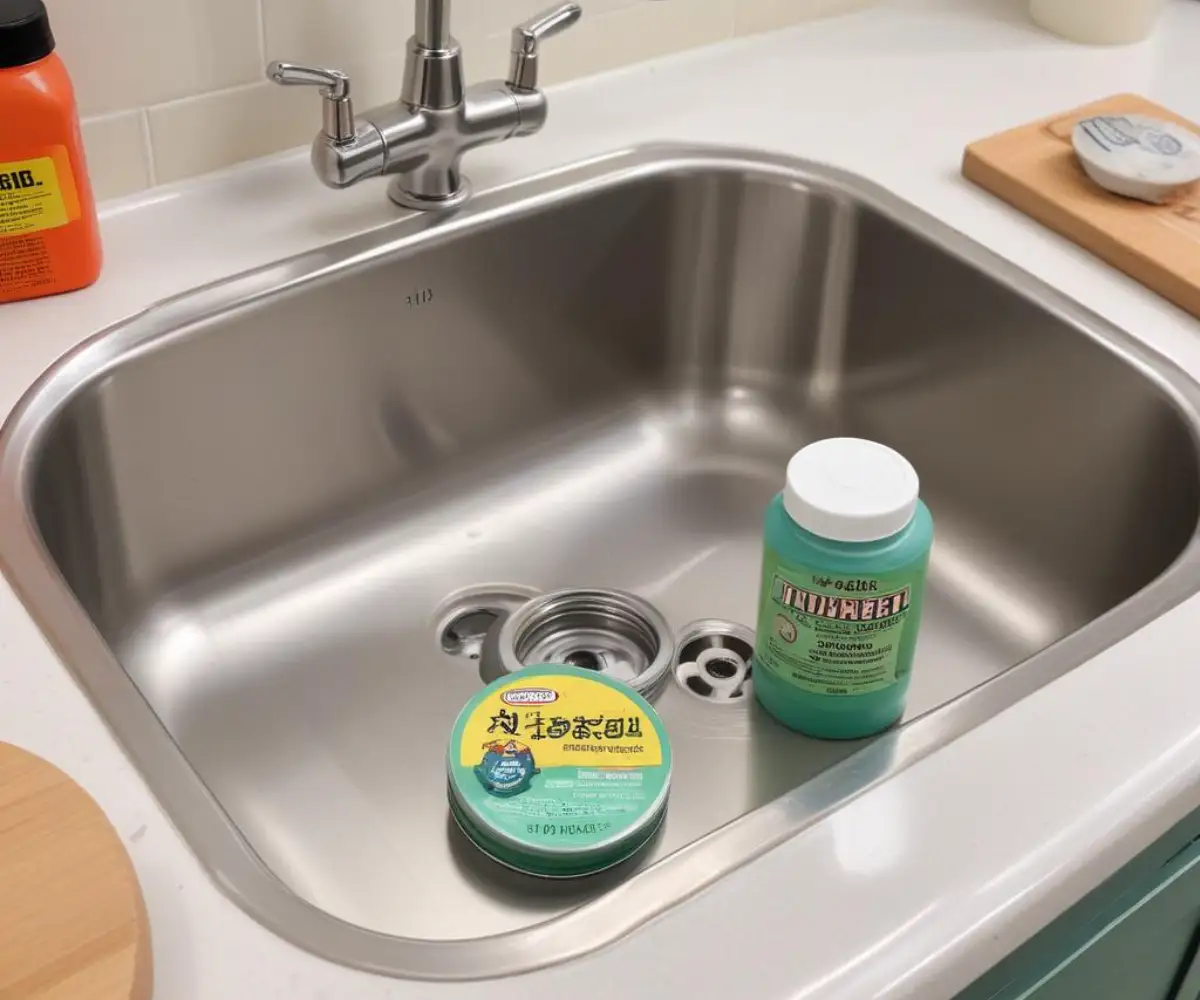
Step-by-Step Guide: Installing Your Disposal Flange with Silicone
Using silicone requires a bit more care than putty, but following these steps will ensure a perfect, leak-free installation. The most important part of this process is patience; you must allow the silicone to cure properly.
Step 1: Clean and Prepare the Surfaces
This is a critical first step. Thoroughly clean the sink’s drain opening and the underside of the new garbage disposal flange. Use rubbing alcohol on a clean cloth to remove any soap scum, grease, or manufacturing residue. The surfaces must be completely clean and dry for the silicone to adhere properly.
Step 2: Apply a Bead of Silicone
Using a caulk gun, apply a continuous, even bead of 100% silicone sealant to the underside of the drain flange. The bead should be about 1/4-inch thick and applied consistently all the way around.
Step 3: Set the Flange and Apply Pressure
Carefully insert the flange into the sink’s drain hole. Press down firmly and evenly to create a preliminary seal and to begin squeezing out some of the excess silicone.
Step 4: Wipe Away the Excess
From inside the sink, use a paper towel or a plastic putty knife to wipe away the excess silicone that has squeezed out around the edge of the flange. For a perfectly clean finish, you can use a finger dipped in mineral spirits to smooth the edge, then wipe away the residue.
Step 5: Install the Mounting Assembly
From underneath the sink, install the gaskets and mounting ring onto the flange as per the manufacturer’s instructions. As you tighten the screws on the mounting assembly, more silicone will be squeezed out. Be sure to wipe this excess away from under the sink as well.
Step 6: The Most Important Step – Let It Cure!
This is the number one mistake people make when using silicone. You must wait for the silicone to cure completely before installing the disposal unit and running any water. Most silicone sealants require at least 12 to 24 hours to fully cure. Check the instructions on the silicone tube for the specific curing time. Rushing this step will compromise the seal and cause leaks.
Common Installation Mistakes and How to Avoid Them
A successful installation lies in the details. Avoiding these common pitfalls will save you time and frustration.
Using the Wrong Product: Never use regular plumber’s putty on a stone or composite sink. If you choose to use putty, ensure it is a “stain-free” formula specifically designed for porous surfaces. However, for the best result, 100% silicone is recommended.
Inadequate Surface Preparation: Any dirt, moisture, or old putty residue will prevent a proper seal. Take the extra five minutes to meticulously clean and dry both the sink and the flange.
Rushing the Curing Process: As mentioned, this is the most critical error when using silicone. Do not run any water or install the heavy disposal unit until the silicone has fully cured. Doing so will break the bond and guarantee a leak.
Using Too Little Sealant: Be generous with your application of putty or silicone. It’s better to have too much squeeze out that you can wipe away than to have a small gap in your seal that will cause a slow drip.
Answering Your Top Questions
Here are answers to some of the most frequently asked questions about sealing a garbage disposal.
Can I use silicone instead of the rubber gasket that came with the disposal?
No. The sealant (whether putty or silicone) is used between the metal flange and the top surface of the sink. The gaskets provided by the manufacturer are used underneath the sink as part of the mounting assembly and are essential for a secure installation.
How do I remove old plumber’s putty or silicone?
Old plumber’s putty will often be dry and brittle. It can usually be scraped away easily with a plastic putty knife. Old silicone is more difficult to remove. You’ll need to carefully cut along the edges with a utility knife and then use a scraper or a silicone remover solvent to get rid of the residue.
What specific type of silicone should I use?
You should use 100% silicone sealant that is rated for kitchens and baths. These formulas are waterproof and often contain mildew inhibitors. Avoid acrylic or latex caulk, as they do not offer the same flexibility or durability needed for this application.
The Final Verdict for a Leak-Proof Sink
When installing a garbage disposal, the debate between plumber’s putty and silicone has a clear winner for modern kitchens. While plumber’s putty is acceptable for non-porous stainless steel sinks, silicone sealant is the superior choice for virtually every other situation.
Its powerful adhesive bond creates a durable, flexible, and long-lasting waterproof seal that stands up to the vibrations of the disposal. Most importantly, it completely eliminates the risk of permanently staining expensive granite, marble, or composite sinks. Home maintenance can be challenging, and it’s easy to wonder about issues like what happens if I forgot to winterize my lawn mower, but choosing the right sealant is a simple step you can take to prevent future problems in the kitchen. Just remember the golden rule: allow the silicone to fully cure before proceeding. This patience will be rewarded with a professional, leak-free installation that will last for years to come.
Dealing with noisy home appliances can also be a headache, similar to hearing a radon fan that is loud when cold, so ensuring your disposal is installed correctly from the start prevents one more potential issue. For larger home improvement projects, like the extensive work involved in deciding to lower a basement floor by 6 inches, attention to detail with materials is just as crucial. By choosing silicone, you’re using the best material for the job, ensuring your kitchen upgrade is both beautiful and functional.