Essential Steps for Lowering a Basement Floor 6 Inches
That cramped, dark basement with ceilings that feel just a bit too low is a story many homeowners know. You see the potential for a vibrant living space, a home gym, or an extra bedroom, but the limited headroom makes it feel unusable and unwelcoming. For many, the dream of a finished basement stalls right there, caught between a low ceiling and the high cost of a full home addition.
What if the solution was just six inches below your feet? Lowering your basement floor by a mere six inches can be a transformative project. It can turn a borderline space into a comfortable, code-compliant, and valuable part of your home.
This project might seem daunting, but understanding the process, costs, and key considerations can demystify it. This comprehensive guide will walk you through everything you need to know about gaining that crucial half-foot of vertical space.
You'll Learn About
Why Just 6 Inches Can Make a World of Difference
It might not sound like much, but six inches of additional ceiling height is often the critical difference between a cramped storage area and a legitimate, habitable living space. This small change can have a massive impact on both the usability and the value of your home.
Many building codes require a minimum ceiling height of seven feet for a space to be considered habitable. A basement with a 6-foot-8-inch ceiling falls short, but gaining six inches pushes it over that crucial threshold, legally allowing you to convert it into a bedroom, family room, or even a rental unit.
The Psychological and Financial Boost
The feeling of a space changes dramatically with more headroom. Low ceilings can feel oppressive and claustrophobic, while higher ceilings create a sense of openness and comfort. This psychological boost makes the basement a more inviting and pleasant place to spend time.
Beyond comfort, adding legal, finished square footage to your home is one of the most effective ways to increase its market value. A finished basement with proper ceiling height offers a significant return on investment, making this project as financially savvy as it is practical.
Is Lowering Your Basement Floor by 6 Inches the Right Move?
Before you pick up a sledgehammer, it’s essential to determine if this project is feasible for your home. Lowering a basement floor is a major construction project that directly interacts with your home’s foundation. A thorough evaluation by a professional is not just recommended; it’s a critical first step.
This is not a DIY project. One mistake could compromise the structural integrity of your entire home, leading to catastrophic and expensive damage. Always consult with a structural engineer and a qualified foundation contractor before proceeding.
Key Considerations Before You Start
A professional will assess several critical factors to ensure the project can be done safely:
- Foundation Type and Depth: The most important factor is the depth of your foundation’s footings. The general rule is that you cannot excavate below the bottom of the footings without compromising the structural support they provide. A six-inch drop is often possible if the existing concrete slab sits high enough above the bottom of the footings.
- Soil Conditions: The type of soil around and under your home can affect the stability of the foundation during and after the excavation. An engineer will evaluate the soil to determine the right approach.
- Water Table: Knowing the level of the local water table is crucial. Digging deeper can increase the risk of hydrostatic pressure and water infiltration, requiring robust waterproofing solutions.
- Utilities and Plumbing: Your basement floor contains plumbing drains, and there may be electrical or gas lines buried in or just below the slab. These will need to be located and likely relocated, adding to the project’s complexity and cost.
The Process: How Pros Lower a Basement Floor by 6 Inches
Once a structural engineer has approved the project, the work begins. While every project is unique, the general process for a six-inch drop typically follows a clear sequence of steps executed by a professional crew.
This process is labor-intensive and requires specialized equipment to break and remove tons of concrete and soil from beneath your home. It’s a loud, dusty, and disruptive job that underscores why professional expertise is essential.
Method 1: The “Simple” Slab Replacement
For a modest drop of six inches, the most common method is a straightforward slab removal and replacement, assuming the foundation footings are deep enough. This avoids the much more complex process of underpinning.
The steps are as follows:
- Demolition: The existing concrete floor is broken up using jackhammers. The debris is then removed from the basement, often by hand in wheelbarrows or via conveyor belts.
- Excavation: With the slab gone, the crew excavates the exposed soil and gravel to the required depth. For a finished six-inch gain, this may mean digging down 10-12 inches to account for the new base layers and concrete thickness.
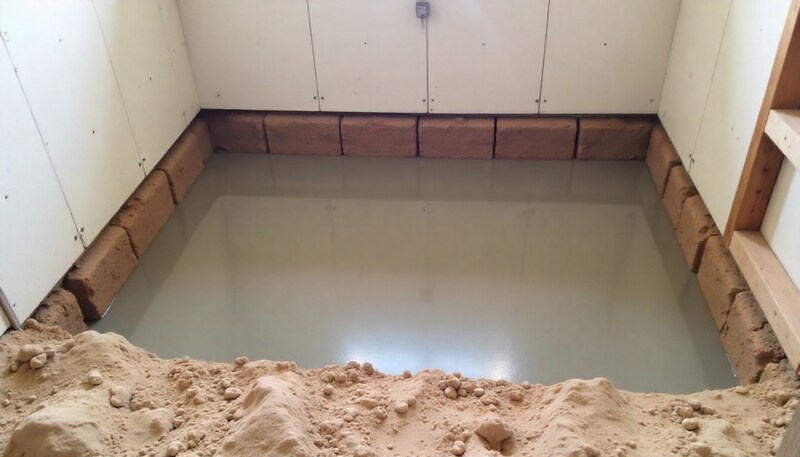
- Preparation: A new base of crushed gravel is laid and compacted to create a stable subfloor. A vapor barrier is installed over the gravel to prevent moisture from wicking up from the ground.
- Pouring the New Slab: New concrete is poured to form the new, lower floor. This is carefully leveled and finished to create a smooth, durable surface.
Will You Need Underpinning or Bench Footing?
The terms “underpinning” and “bench footing” often come up in discussions about lowering basements. These are methods used when the excavation needs to go deeper than the existing foundation footings, which is a far more complex and costly scenario.
For a six-inch drop, you can often avoid these methods. However, if an engineer finds your footings are too shallow, one of these techniques will be necessary to ensure your home remains properly supported. While a 12-inch excavation often requires these advanced techniques, a 6-inch drop might not.
Budgeting for Your Project: A Realistic Cost Breakdown
The cost to lower a basement floor can vary widely based on your location, the size of your basement, accessibility, and the specific structural requirements of your home. A six-inch drop is significantly less expensive than a deeper excavation that requires underpinning.
Below is a table outlining the potential costs and the factors that influence them. These are estimates, and you should always get multiple detailed quotes from qualified contractors.
| Service / Item | Estimated Cost Range (for a 1,000 sq. ft. basement) | Key Factors Influencing Cost |
|---|---|---|
| Structural Engineer’s Report | $500 – $2,000 | Complexity of the foundation, need for soil testing. |
| Building Permits | $300 – $1,500 | Local municipal fees and requirements. |
| Slab Demolition & Debris Removal | $3,000 – $7,000 | Slab thickness, ease of access for debris removal. |
| Excavation | $4,000 – $10,000 | Soil type (rocky soil costs more), hand digging vs. machinery. |
| Plumbing & Drain Relocation | $2,000 – $8,000+ | Amount of plumbing that needs to be moved, complexity of the system. |
| Gravel Base & Vapor Barrier | $1,500 – $3,000 | Area of the basement, quality of materials. |
| New Concrete Slab Pour | $5,000 – $12,000 | Concrete prices in your area, slab thickness, finishing requirements. |
| Total Estimated Range | $16,300 – $43,500+ | Project scope, location, and contractor choice. |
DIY vs. Hiring a Professional: A Critical Decision
The temptation to save money by taking on a home improvement project yourself is understandable. However, when it comes to altering the area around your home’s foundation, the risks of a DIY approach are immense and far outweigh any potential savings.
This is a job that requires deep expertise in structural engineering, excavation, and concrete work. The consequences of a mistake are not just cosmetic; they can endanger your home and family.
The Overwhelming Risks of a DIY Approach
Attempting to lower your own basement floor can lead to disastrous outcomes. You could crack your foundation walls, cause the house to settle unevenly, or create new pathways for water and radon gas to enter your home. The potential for personal injury during the demolition and excavation process is also extremely high.
Furthermore, this work requires permits and must pass inspections. Unpermitted, improperly done work will have to be torn out and redone by professionals, costing you far more in the long run. It will also create significant problems when you try to sell your home.
Why a Professional Is Always Worth It
Hiring a team of insured and licensed professionals provides peace of mind and ensures the job is done correctly and safely. A reputable contractor will handle all aspects of the project, from securing the necessary permits and engineering plans to managing the crew and passing final inspections.
They have the right equipment, the necessary experience, and the critical understanding of how to execute the project without compromising your home’s structure. If a project seems overwhelming, sometimes it’s better to explore simpler creative ideas for low ceilings before committing to a major excavation.
Frequently Asked Questions (FAQs)
It’s natural to have questions about a project of this scale. Here are answers to some of the most common inquiries homeowners have about lowering their basement floor.
How long does it take to lower a basement floor by 6 inches?
For an average-sized basement, the process typically takes 3 to 6 weeks. This timeline can be affected by permit approvals, inspection schedules, and any unforeseen complications, such as hitting unexpected rock or dealing with complex plumbing rerouting.
Will this process create a lot of dust and noise?
Yes, absolutely. The demolition of the concrete slab is extremely loud and creates a significant amount of concrete dust. Professionals will take measures to contain the dust, but you should be prepared for a period of disruption in your home.
What about waterproofing and radon?
Breaking open the concrete slab provides an excellent opportunity to upgrade your home’s water and soil gas defenses. It is highly recommended to install a new interior drainage system (like a weeping tile and sump pump) before the new slab is poured. A high-quality, properly sealed vapor barrier is also essential for preventing both moisture and radon gas from entering the basement.
Unlocking Your Basement’s True Potential
A low-ceiling basement doesn’t have to be a lost cause. The decision to lower your basement floor by 6 inches can be the key that unlocks a vast new area of comfortable, usable, and valuable living space. It’s a project that transforms not just the basement, but the entire functionality of your home.
While it is a complex and significant investment, the rewards are equally substantial. The journey from a cramped, dark space to a bright, open, and legally habitable room starts with a professional consultation.
By understanding the process, respecting the structural importance of the work, and hiring the right experts, you can safely and effectively reclaim the hidden potential lurking just beneath your feet.