Caulk Before or After Staining? The #1 Mistake That Ruins Wood Finishes
You’ve spent hours, maybe even days, meticulously preparing your wood project. Whether it’s new baseboards, a custom bookshelf, or elegant window trim, you’re on the home stretch. The wood is sanded to a perfect smoothness, and you can already envision the rich, beautiful color of the stain bringing it to life. But then you see it: a tiny gap in a joint, a slight crack where the wood meets the wall. Your first instinct is to grab a tube of caulk and fill it before you stain. Stop right there. This single decision, made with the best of intentions, is the number one mistake that can permanently ruin an otherwise flawless wood finish. It’s the critical difference between a professional-grade result and a DIY disaster that screams “amateur.”
The debate of whether to caulk before or after staining is a common one, but the answer is surprisingly definitive among professionals. Applying caulk at the wrong stage of the finishing process can lead to unsightly blemishes, mismatched colors, and a final product that looks patched and incomplete. In this comprehensive guide, we will break down the science behind why this happens, outline the professional protocol for a perfect finish every time, and help you avoid the common pitfalls that trip up even experienced DIYers. We’ll give you the exact steps to take, the right materials to use, and the confidence to finish your project with the seamless, high-end look it deserves.
You'll Learn About
The Million-Dollar Question: Why Can’t You Just Stain Over Caulk?
The core of the issue lies in a fundamental misunderstanding of how wood stain and caulk actually work. They are two completely different materials designed for completely different purposes, and they do not play well together. Attempting to force them to cooperate is a recipe for frustration and a finish you’ll regret.
The Science of Stain and Caulk: An Unfortunate Mismatch
Wood stain is not a surface coating like paint. Its job is to penetrate the porous fibers of the wood, carrying pigment deep into the material to change its color from within. The success of a stain job depends entirely on this absorption. A beautiful, even stain color is the result of uniform penetration across the wood’s surface.
Caulk, on the other hand, is a flexible sealant. It is specifically engineered to be non-porous and water-resistant, creating an impenetrable barrier over gaps and cracks. Common caulks, like acrylic latex or silicone, are designed to block things from passing through them. When you apply stain over a bead of caulk, the stain has nowhere to go. It cannot penetrate the non-porous surface, so it simply sits on top, unable to be absorbed. This is the root cause of the finishing failure.
The Visual Nightmare: What Stained Caulk Actually Looks Like
When you try to apply stain over a caulk line, the results are immediate and disastrous. The stain will either bead up and wipe right off, or it will dry into a faint, discolored film that looks nothing like the surrounding wood. You are left with a stark, often shiny line that highlights the very gap you were trying to hide. The caulk remains its original color—usually bright white or clear—creating a jarring visual interruption in the flow of the wood grain and color.
This creates an effect that is impossible to fix without starting over completely. No amount of extra stain will ever force the caulk to accept the color. The result is a project that looks permanently unfinished, drawing the eye directly to the flaw and undermining all the hard work you put into the preparation and construction.
The Professional Protocol: Why You Must Caulk AFTER Staining
The correct order of operations, endorsed by woodworkers and professional finishers, is unambiguous: prepare, stain, seal with a topcoat, and only then apply your caulk. This sequence ensures that each material can perform its job correctly without interfering with the others. Following this process guarantees a clean, seamless, and durable finish.
Step 1: The Perfect Stain Job (The Foundation)
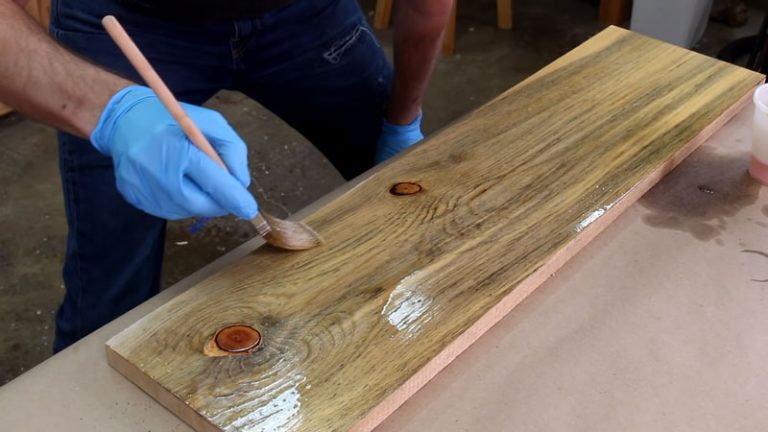
Before you even think about caulk, your focus must be on achieving a flawless stain application. This begins with meticulous surface preparation. Ensure the wood is sanded smooth and is completely free of dust and debris. For soft or blotch-prone woods like pine, applying a pre-stain wood conditioner is a crucial step to ensure the stain absorbs evenly.
Apply your chosen stain according to the manufacturer’s directions, wiping away any excess to achieve the desired color. Once the stain is completely dry, you must apply your protective topcoat, such as polyurethane or lacquer. This topcoat not only protects the wood and the stain but also creates a sealed, stable surface upon which the caulk can properly adhere. It is critical to let the topcoat fully cure before moving on. Rushing this step can lead to the caulk not bonding correctly or even damaging the fresh finish.
Step 2: Choosing the Right Caulk (Your Secret Weapon)
With your wood stained and sealed, the next step is selecting the right caulk. This is not the time to grab any old tube of white painter’s caulk from your toolbox. For stained wood, your goal is to make the caulk line as invisible as possible. The key is to use a high-quality, flexible caulk that is specifically designed to be color-matched to your final wood finish.
Many manufacturers offer a wide range of colored caulks that correspond to common wood stain colors like oak, cherry, walnut, and mahogany. Bringing a sample of your stained wood to the store can help you find a near-perfect match. For a truly professional finish, the right caulk makes all the difference.
| Caulk Type | Stainability | Paintability | Flexibility | Best Use Case for Stained Wood Trim |
|---|---|---|---|---|
| Acrylic Latex Caulk | Very Poor (Repels stain) | Excellent | Good | Best used when the trim will ultimately be painted, not stained. |
| Siliconized Acrylic Caulk | Very Poor (Repels stain) | Good | Very Good | Ideal choice. Look for pre-colored versions that match your stain color for a seamless finish after staining is complete. |
| 100% Silicone Caulk | None (Nothing sticks to it) | None | Excellent | Avoid for wood trim. Its shiny finish and inability to be painted or stained make it unsuitable for cosmetic applications. |
| “Stainable” Caulk/Filler | Poor to Fair | Good | Varies | Use with extreme caution. These rarely absorb stain like real wood, often resulting in a noticeable color mismatch. Test on scrap first. |
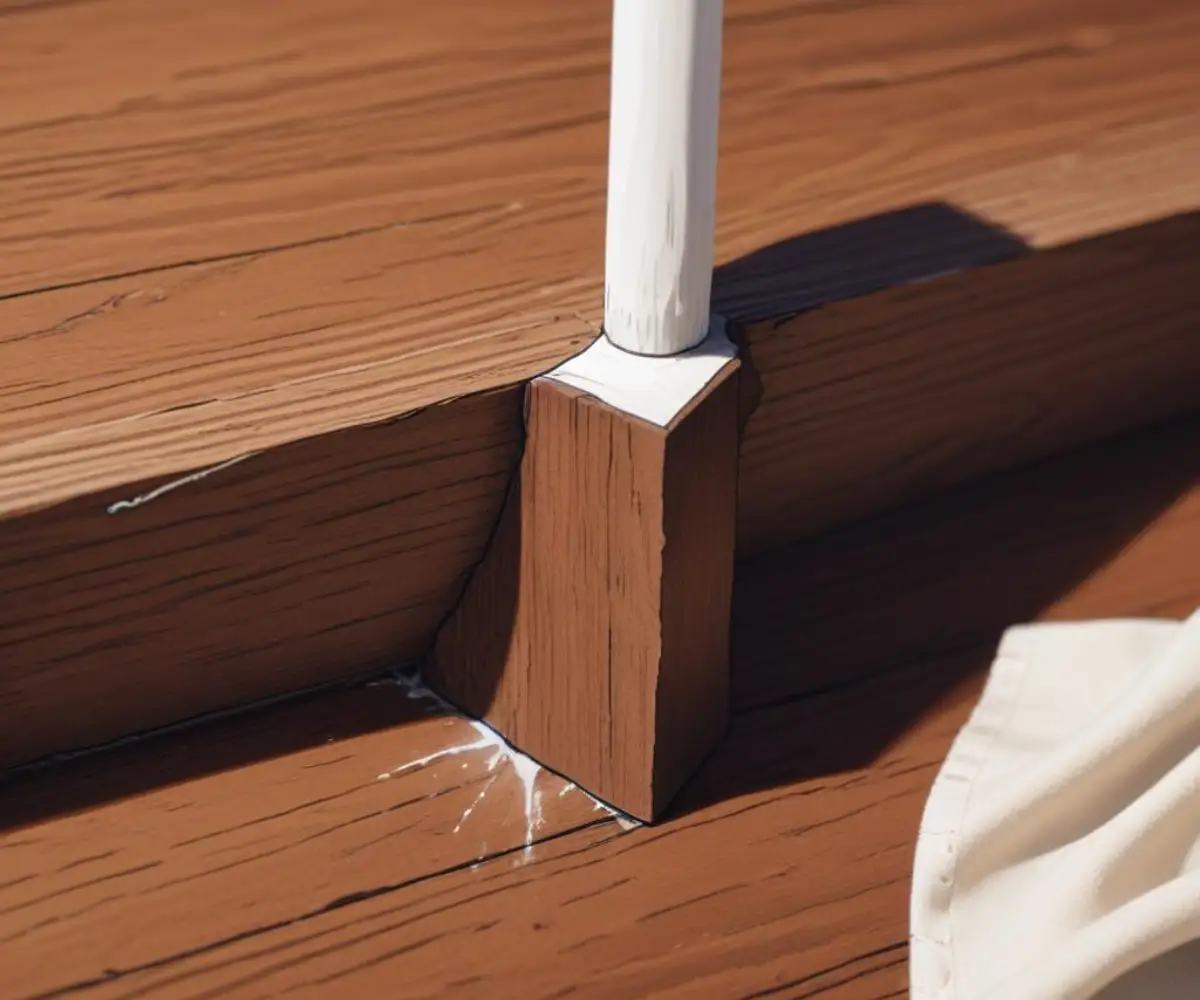
Step 3: Flawless Caulk Application for an Invisible Finish
Application technique is just as important as product selection. Start by cutting a very small hole at a 45-degree angle on the tip of the caulk tube. Your goal is to apply a fine, consistent bead—just enough to fill the gap and no more. Over-applying caulk creates a mess that’s difficult to clean up without smearing it onto the finished wood surface.
Apply steady pressure to the caulking gun and move at a consistent speed along the joint. Immediately after applying the bead, “tool” the caulk by running a damp finger or a caulk finishing tool lightly along the line. This presses the caulk firmly into the gap and creates a smooth, concave surface. Have a wet rag and a dry rag ready to clean up any excess from the wood surface and your finger as you go. For exceptionally crisp lines, you can apply painter’s tape along both sides of the joint before caulking, and remove it immediately after tooling.
Are There *Any* Exceptions? The “Caulk Before” Scenarios
While the “caulk after staining” rule is the gold standard for achieving a beautiful stained wood finish, there are a couple of specific scenarios where the order might change. However, these are exceptions and not the rule, and it’s important to understand the context.
The “Stainable Wood Filler” Distinction
It’s vital to distinguish between caulk and stainable wood filler. Wood filler is a paste-like substance designed to fill nail holes, gouges, and cracks *in the wood itself*. True stainable wood fillers are made with wood fibers and are designed to be porous, allowing them to absorb stain. These products must be applied before staining.
However, do not confuse this with products sometimes labeled as “stainable caulk.” These are typically latex-based and, while they may accept some pigment, they will almost never absorb stain in the same way as the surrounding wood. The result is often a filled area that is still noticeably different in color and texture. Always test these products on a scrap piece of wood before committing to your main project.
When You Plan to Paint Over Everything Anyway
The only major exception to the rule is when your final finish is paint, not stain. If you are installing trim, such as the popular and versatile 1×4 for baseboard, and you intend to paint it, then you should always caulk before priming and painting. In this case, the caulk fills the gaps, and the primer and paint create a uniform, seamless surface over both the wood and the caulk. This is the standard practice for all painted trim work.
Real-World Disasters: Learning from Common Caulking & Staining Mistakes
Understanding the theory is one thing, but seeing the results of common mistakes can drive the point home. Avoiding these pitfalls is key to achieving a professional look and not having to deal with a permanent eyesore.
Mistake #1: Using the Wrong Type of Caulk
One of the most frequent errors is grabbing a tube of standard white or 100% silicone caulk. Applying a stark white caulk against beautifully stained wood is jarring and cheapens the look of the entire project. Using silicone is even worse; its glossy finish and resistance to anything sticking to it make it impossible to camouflage. A bad caulk choice can be as frustrating and visually offensive as a bad countertop installation, where a single flawed seam ruins the entire aesthetic.
Mistake #2: Applying Caulk to Uncured Stain or Topcoat
Patience is a virtue in woodworking. If you apply caulk before the stain and, more importantly, the topcoat have fully cured, you risk disaster. The solvents in the caulk can react with the uncured finish, causing it to smear, discolor, or soften. Furthermore, the caulk may not adhere properly to the tacky surface, leading to premature cracking and failure down the line.
Mistake #3: Choosing a Poorly Matched Caulk Color
Even when following the correct procedure, selecting the wrong color caulk can undermine your efforts. A caulk that is too light, too dark, or has the wrong undertone will be just as noticeable as an uncaulked gap. Take the time to compare caulk colors to a sample of your *dried* and *top-coated* stained wood, as the color can change slightly during the finishing process.
Your Step-by-Step Guide to a Flawless Finish
To eliminate any confusion, here is a simple, step-by-step checklist for both staining and painting projects. Follow these procedures exactly for a perfect result every time.
The “Stain First” Method (Recommended for Stained Wood)
1. Complete Wood Preparation: Sand the wood surface until it is perfectly smooth. Clean away all dust with a tack cloth or vacuum.
2. Apply Stain: Apply a pre-stain wood conditioner if needed, followed by your chosen wood stain according to the manufacturer’s instructions.
3. Apply Topcoat: Once the stain is completely dry, apply at least two coats of a protective sealer like polyurethane, sanding lightly between coats.
4. Allow for Full Curing: This is the most important step. Wait for the topcoat to cure completely, which could take anywhere from 24 hours to several days depending on the product and conditions.
5. Caulk the Gaps: Apply a thin, even bead of color-matched siliconized acrylic caulk to any gaps or joints.
6. Tool and Clean: Immediately tool the bead with a damp finger and clean up any excess with a wet rag for a perfect, invisible seam.
The “Paint Over” Method (For Painted Finishes)
1. Install and Prepare Wood: Install the wood trim and fill any nail holes with wood filler. Sand the filler smooth once dry.
2. Apply Caulk: Apply a bead of paintable acrylic latex caulk to all gaps and seams. Tool and clean the bead for a smooth finish.
3. Prime the Surface: Once the caulk is fully cured, apply a coat of high-quality primer to the wood and the caulk lines.
4. Paint to Finish: Apply two coats of your desired paint color for a seamless, monolithic look.
The Final Verdict: Patience and Process Over Shortcuts
In the world of wood finishing, shortcuts almost always lead to regrets. The temptation to fill gaps before staining is understandable, but the science and the visual results are clear: for a high-quality stained finish, you must always caulk after the stain and topcoat are fully cured. This method requires more patience, but it is the only way to ensure the caulk line blends seamlessly with the finished wood.
By following the correct order of operations, selecting a color-matched caulk, and using proper application techniques, you can achieve an invisible repair that enhances, rather than detracts from, your beautiful woodwork. Understanding the right process is key to solving home improvement challenges, whether it’s finishing trim or figuring out why there are water drops on the bottom of my gutter. Embrace the professional process, and your projects will have the flawless, high-end finish you’ve been aiming for.