Your Kitchen Sink Facing a Wall Is a Design Flaw (Here’s How to Fix It)
For decades, the classic kitchen design featured a sink positioned neatly under a window. This wasn’t just for aesthetics; it was a practical choice providing natural light for tasks and a pleasant view to make chores less tedious. But in modern homes, apartments, and renovated spaces, a kitchen sink facing a wall is an increasingly common reality. Many homeowners feel this setup is a design compromise, leaving them staring at a blank surface while washing dishes.
This layout can feel claustrophobic, dark, and uninspired. Without a view, the functional area around the sink can become a dead space in your kitchen’s overall design, a place you want to leave as quickly as possible. The good news is that a wall-facing sink isn’t a design death sentence; it’s a blank canvas brimming with potential.
You'll Learn About
The Hidden Downsides of a Wall-Facing Sink
The problem with a sink facing a wall goes beyond just the lack of a view. It introduces several functional and aesthetic challenges that can impact your daily kitchen routine. Understanding these issues is the first step toward transforming the space into one that is both beautiful and highly functional.
One of the most common complaints is the feeling of being closed-in. Staring at a solid wall from inches away can make the simple act of washing vegetables feel confining. This is often compounded by poor lighting, as the wall can cast a shadow over the sink basin, making it difficult to see what you’re doing and creating a gloomy atmosphere. Beyond aesthetics, there are practical concerns about protecting the wall itself from constant water splashes, which can lead to damage, mold, or staining over time if not properly addressed.
Transforming Your Sink Wall: From Drab to Fab
Instead of viewing the wall behind your sink as a limitation, see it as an opportunity for a major design statement. With the right strategies, you can make this small but crucial area a focal point of your kitchen. The key is to address the core issues: lack of light, visual interest, and functionality. By layering solutions, you can create a sink area that is bright, engaging, and a joy to use.
This transformation doesn’t necessarily require a complete overhaul. Simple, strategic additions can have a massive impact. From clever lighting tricks to statement-making materials and smart storage, you can turn this perceived design flaw into one of your kitchen’s most celebrated features. The goal is to create a space that draws you in, rather than one you’re eager to turn away from.
Let There Be Light: Smart Lighting Solutions
Effective task lighting is non-negotiable for a sink facing a wall. Without the natural light from a window, this area can become a dark corner. The solution is a layered lighting approach. Start with under-cabinet LED strips, which provide direct, shadow-free illumination onto the sink and countertop. They are energy-efficient, easy to install, and make a dramatic difference in visibility.
To add a decorative touch and further brighten the space, consider installing a pair of stylish wall sconces on either side of the sink area. This not only adds more light but also creates a sense of symmetry and purpose. For a more modern or dramatic look, a single, well-placed pendant light can serve as both a task light and a beautiful design element.
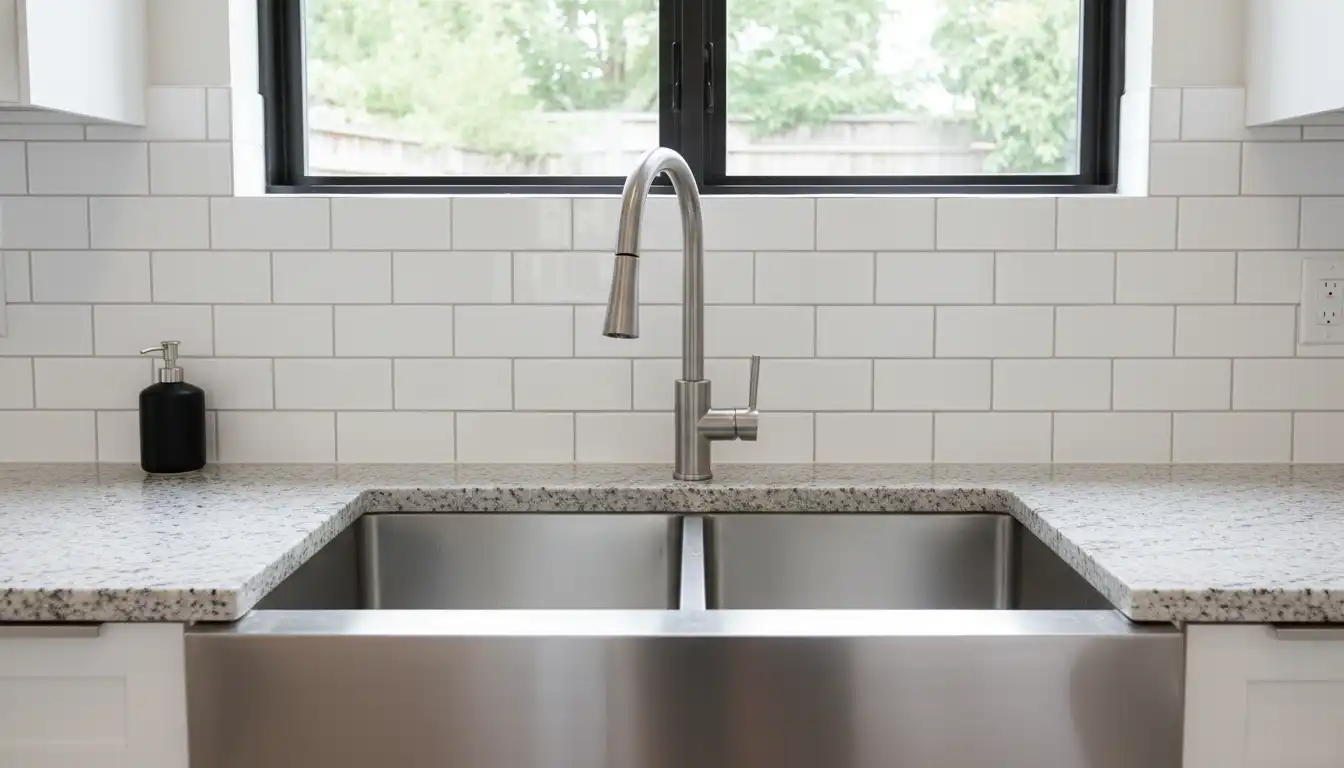
The Backsplash Breakthrough: More Than Just Protection
The wall behind your sink is prime real estate for a stunning backsplash. A backsplash serves the practical purpose of protecting your wall from water, but its aesthetic impact is far more significant. This is your chance to inject personality, color, and texture into the kitchen. Choose a material with a glossy or reflective finish to help bounce light around the space, making it feel brighter and more open.
Consider materials like glass tiles, polished ceramic, or even a sheet of stainless steel for a sleek, professional look. A bold, patterned tile can turn the wall into a piece of art, providing something beautiful to look at while you work. The right backsplash not only solves a practical problem but also becomes the centerpiece of your sink area. When selecting a style, think about how it complements your overall design scheme, such as pairing classic subway tile with the soft, timeless look of White Dove cabinets for a flawless finish.
A well-chosen backsplash is essential for both function and style. The table below compares popular materials to help you make the best choice for your kitchen.
| Material | Pros | Cons | Average Cost (Per Sq. Ft.) |
|---|---|---|---|
| Ceramic Tile | Affordable, durable, wide variety of colors and styles, easy to clean. | Grout lines can be difficult to keep clean and may stain over time. | $10 – $40 |
| Glass Tile | Reflects light, making the space feel brighter; non-porous and resistant to stains and mold. | Can be more expensive; installation can be tricky and may show adhesive imperfections. | $20 – $100 |
| Stainless Steel | Very durable, heat-resistant, easy to clean, provides a modern, professional look. | Can be prone to scratches and dents; shows fingerprints and water spots easily. | $25 – $75 |
| Natural Stone (Marble, Granite) | Luxurious and unique appearance with natural veining; durable and long-lasting. | Porous and requires regular sealing to prevent stains; can be expensive. | $30 – $150+ |
Creating a “Window” Illusion: Mirrors and Open Shelving
If you can’t have a real window, you can create the illusion of one. Hanging a mirror on the wall behind the sink is a brilliant and effective trick. A mirror will capture and reflect light from other sources in the kitchen, instantly making the area feel brighter and more expansive. It also adds depth, tricking the eye into perceiving more space than there actually is.
Another excellent strategy is to install open shelving. A set of floating shelves mounted above the sink provides a place to display attractive dishes, glassware, or small decorative plants. This approach adds visual interest and a sense of openness that cabinets can’t offer. Be mindful to style the shelves thoughtfully to avoid a cluttered look; less is often more.
Functional Flair: Smart Storage and Accessories
Enhance the utility of your sink wall with clever storage solutions. A wall-mounted rail system with hooks can be used to hang frequently used utensils, mugs, or even small herb pots. This not only keeps your countertop clear but also adds a layer of visual texture and interest to the wall.
Consider a wall-mounted dish rack that allows dishes to drip directly into the sink, saving counter space and streamlining the cleanup process. Even a simple, elegant wall-mounted soap dispenser can elevate the look and feel of the sink area. These small, functional additions contribute to a space that is organized, efficient, and thoughtfully designed.
Ergonomics and Layout: Is Your Sink Positioned for Comfort?
Beyond decoration, the physical placement and specifications of your sink are critical for comfort and usability, especially in a wall-facing setup. Proper ergonomics can prevent back and shoulder strain, making daily kitchen tasks far more pleasant. This is an aspect of kitchen design that is often overlooked but has a significant impact on your long-term comfort.
The ideal sink depth, for example, depends on your height. A sink that is too deep will cause you to hunch over, while one that is too shallow may lead to more splashing. Most modern sinks range from 8 to 10 inches deep, which is a comfortable depth for the average user. Similarly, the choice between a single and double basin sink, or even an apron sink versus an undermount model, affects how you interact with the space. The faucet’s reach and height are also crucial; a gooseneck faucet with a pull-down sprayer provides maximum flexibility and makes it easier to clean large pots without hitting the back wall.
Countertop space on either side of the sink is equally important. Aim for at least 18-24 inches of clear counter space on one side for placing dirty dishes and the same amount on the other for a drying rack. This creates a logical workflow from dirty to clean. This detailed ergonomic planning ensures your sink area is not just visually appealing but also a highly efficient and comfortable workspace, integrating seamlessly into the broader layout of a kitchen facing the front of the house or any other orientation.
Frequently Asked Questions
Is it outdated to have a kitchen sink facing a wall?
Not at all. While sinks under windows are traditional, modern kitchen design prioritizes functionality and the best use of space. A sink against a wall is a common feature in many contemporary layouts, especially in apartments or open-concept homes where exterior wall space is limited. The key is to make the space intentional and well-designed.
How do I protect my wall from water damage behind the sink?
A proper backsplash is the best defense. Materials like tile, glass, or solid surface panels are waterproof and create a barrier between the water and your wall. Ensure that the area where the backsplash meets the countertop is sealed with a high-quality, mold-resistant silicone caulk to prevent any water from seeping through.
What is the easiest DIY update for the wall behind my sink?
Peel-and-stick tiles are an excellent DIY-friendly option. They offer the look of real tile without the need for grout or specialized tools. Another simple but effective update is to paint the wall with high-quality, scrubbable semi-gloss or satin paint and add a set of stylish floating shelves for decoration and storage.
Conclusion: Your Wall is an Opportunity, Not a Problem
A kitchen sink facing a wall is far from a design flaw. With a thoughtful approach that combines smart lighting, a beautiful backsplash, and functional accessories, you can transform this often-neglected area into a stunning and practical focal point. By addressing both the aesthetics and the ergonomics of the space, you create a kitchen that is not only visually impressive but also a true pleasure to work in. Embrace the wall as your canvas and unlock the hidden potential in your kitchen design.