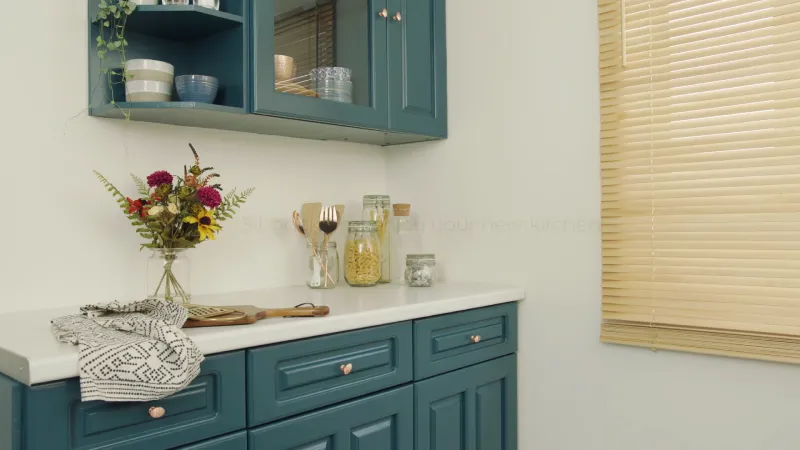
How to Paint Kitchen Cabinets?
Painting kitchen cabinets can be a transformative and cost-effective way to give your kitchen a fresh and updated look. Whether you prefer a traditional approach using brushes and rollers, a more efficient spray painting method, or the rustic charm of chalk paint, each technique offers its own unique benefits.
By understanding the step-by-step process involved in these three popular methods – the Traditional Brush and Roller Method, the Spray Painting Method, and the Chalk Paint Method – you can choose the one that suits your preferences and achieve stunning results.
From preparing the cabinets to applying coats of paint and adding finishing touches, this guide will walk you through each method, allowing you to embark on your kitchen cabinet painting project with confidence and creativity.
You'll Learn About
Methods to Paint Your Kitchen Cabinets
Here are three methods you can use to paint your kitchen cabinets:
Traditional Brush and Roller Method
- Remove the cabinet doors and hardware, and clean the surfaces to be painted.
- Sand the cabinet surfaces lightly to create a smooth base for the paint. Wipe away any dust.
- Apply a primer coat to help the paint adhere better and provide a consistent base.
- Once the primer is dry, use a brush or roller to apply a coat of paint to the cabinet surfaces. Start with the backside of the cabinet doors, then move to the front and edges.
- Allow the paint to dry completely, and then apply a second coat if necessary. Let it dry thoroughly before reattaching the doors and hardware.
Spray Painting Method
- Prepare the cabinets by removing doors, drawers, and hardware. Clean and sand the surfaces as mentioned earlier.
- Cover the surrounding area with drop cloths or plastic sheets to protect from overspray.
- Use high-quality spray paint specifically designed for cabinets. Follow the manufacturer’s instructions for setup and use.
- Hold the spray can or gun about 8-12 inches away from the cabinet surfaces and apply a thin, even coat of paint. Work in a well-ventilated area or wear a mask to avoid inhaling fumes.
- Allow the paint to dry completely, and then apply additional coats as needed. Ensure each coat is dry before applying the next one.
- Once the paint is thoroughly dry, reattach the doors, drawers, and hardware.
Chalk Paint Method
- Clean the cabinet surfaces thoroughly and remove any grease or grime.
- Chalk paint usually doesn’t require sanding or priming, but if your cabinets have a glossy finish, you may lightly sand them to enhance adhesion.
- Use a brush or roller to apply the chalk paint in thin, even coats. Allow each coat to dry completely before applying the next.
- After the final coat dries, you can distress the cabinets using sandpaper or a damp cloth for a more rustic look (optional).
- To protect the finish, apply a clear wax or polyurethane sealer, following the manufacturer’s instructions.
- Once the sealer is dry, reinstall the doors, drawers, and hardware.
Remember, whichever method you choose, proper surface preparation, patience, and attention to detail are essential for achieving a professional-looking paint finish on your kitchen cabinets.
Traditional Brush and Roller Method
Here’s a detailed explanation of each step involved in the traditional brush and roller method for painting kitchen cabinets:
Step 1: Remove the cabinet doors and hardware, and clean the surfaces to be painted.
- Start by removing the cabinet doors, drawers, and any hardware such as knobs, handles, or hinges. This will make it easier to paint the cabinets without getting paint on the hardware.
- Clean the cabinet surfaces thoroughly to remove any grease, dirt, or residue. You can use a mild detergent or a degreaser along with a sponge or cloth to ensure the surfaces are clean and free of any contaminants.
Step 2: Sand the cabinet surfaces lightly to create a smooth base for the paint. Wipe away any dust.
- Lightly sanding the cabinet surfaces helps create a smooth and even base for the paint to adhere to. Use fine-grit sandpaper (around 120-220 grit) and sand in the direction of the wood grain.
- After sanding, wipe away any dust using a tack cloth or a damp cloth. It’s important to remove all the sanding residue to achieve a clean surface for painting.
Step 3: Apply a primer coat to help the paint adhere better and provide a consistent base.
- Primer serves as a preparatory layer that enhances adhesion and helps the paint bond to the cabinets more effectively.
- Choose a high-quality primer suitable for your cabinet material and the type of paint you’ll be using. Apply the primer evenly using a brush or roller, ensuring full coverage on all surfaces.
- Allow the primer to dry completely as per the manufacturer’s instructions. This typically takes a few hours, but it’s best to refer to the specific product’s guidelines.
Step 4: Once the primer is dry, use a brush or roller to apply a coat of paint to the cabinet surfaces. Start with the backside of the cabinet doors, then move to the front and edges.
- Select a paint designed for cabinets or trim, as these types of paints are typically more durable and resistant to wear and tear.
- Dip the brush or load the roller with paint, and apply a thin and even coat to the cabinet surfaces. Begin with the backside of the cabinet doors and then move on to the front and edges.
- Use smooth and consistent strokes, working in the direction of the wood grain for a more uniform finish. Take care to avoid drips or heavy brush marks by using light, controlled movements.
Step 5: Allow the paint to dry completely, and then apply a second coat if necessary. Let it dry thoroughly before reattaching the doors and hardware.
- Follow the drying time indicated on the paint can, typically a few hours. It’s essential to allow the first coat to dry fully before proceeding.
- Assess the coverage and overall appearance of the first coat. If needed, apply a second coat of paint for better color saturation and to ensure a more professional finish.
- Once the final coat is applied, allow the cabinets to dry thoroughly for the recommended drying time before reattaching the doors, drawers, and hardware. This ensures that the paint fully cures and hardens before use.
By following these steps carefully, you can achieve a beautifully painted finish for your kitchen cabinets using the traditional brush and roller method.
Spray Painting Method
Here’s a detailed explanation of each step involved in the spray painting method for painting kitchen cabinets:
Step 1: Prepare the cabinets by removing doors, drawers, and hardware. Clean and sand the surfaces as mentioned earlier.
- Start by removing the cabinet doors, drawers, and any hardware such as knobs, handles, or hinges. This will ensure that you can paint the cabinets evenly without getting paint on the hardware.
- Clean the cabinet surfaces thoroughly to remove any grease, dirt, or residue. You can use a mild detergent or a degreaser along with a sponge or cloth to ensure the surfaces are clean and free of any contaminants.
- Lightly sand the cabinet surfaces using fine-grit sandpaper (around 120-220 grit) to create a smooth base for the paint to adhere to. Sanding helps remove any existing finish or imperfections and provides better adhesion for the spray paint.
Step 2: Cover the surrounding area with drop cloths or plastic sheets to protect from overspray.
- Before you start spraying, it’s important to protect the surrounding area from overspray. Cover countertops, floors, and any nearby furniture with drop cloths or plastic sheets to prevent paint from getting on unintended surfaces.
Step 3: Use high-quality spray paint specifically designed for cabinets. Follow the manufacturer’s instructions for setup and use.
- Choose a high-quality spray paint that is specifically formulated for cabinets or furniture. These paints are designed to provide a durable and smooth finish.
- Read and follow the manufacturer’s instructions on the spray paint can regarding setup, shaking the can, and any specific application techniques. Different spray paints may have varying instructions, so it’s essential to follow them for optimal results.
Step 4: Hold the spray can or gun about 8-12 inches away from the cabinet surfaces and apply a thin, even coat of paint. Work in a well-ventilated area or wear a mask to avoid inhaling fumes.
- Hold the spray can or gun at a consistent distance of about 8-12 inches from the cabinet surfaces. This allows for proper coverage and helps prevent paint drips or pooling.
- Begin spraying in a smooth and sweeping motion, moving across the cabinet surfaces evenly and consistently. Aim for thin and even coats of paint, avoiding heavy application to prevent drips or runs.
- Ensure you work in a well-ventilated area or wear a mask to protect yourself from inhaling paint fumes.
Step 5: Allow the paint to dry completely, and then apply additional coats as needed. Ensure each coat is dry before applying the next one.
- Follow the drying time specified on the spray paint can. It’s essential to allow the first coat to dry fully before applying additional coats.
- Assess the coverage and overall appearance of the first coat. If needed, apply additional coats of paint, allowing each coat to dry completely before applying the next one. Multiple thin coats are preferable to one thick coat for a smoother finish.
Step 6: Once the paint is thoroughly dry, reattach the doors, drawers, and hardware.
- After the final coat of paint is applied and fully dried, carefully reattach the cabinet doors, drawers, and hardware.
- Take care not to scratch or damage the freshly painted surfaces during the reinstallation process.
By following these steps carefully, you can achieve a professional-looking finish for your kitchen cabinets using the spray painting method.
Chalk Paint Method
Here’s a detailed explanation of each step involved in the chalk paint method for painting kitchen cabinets:
Step 1: Clean the cabinet surfaces thoroughly and remove any grease or grime.
- Start by cleaning the cabinet surfaces using a mild detergent or a degreaser. Remove any grease, dirt, or grime that may be present on the cabinets. This will ensure that the paint adheres properly to the surface.
Step 2: Chalk paint usually doesn’t require sanding or priming, but if your cabinets have a glossy finish, you may lightly sand them to enhance adhesion.
- Chalk paint is known for its ability to adhere to various surfaces without the need for extensive sanding or priming. However, if your cabinets have a glossy or highly smooth finish, it can be beneficial to lightly sand them with fine-grit sandpaper (around 120-220 grit). This will create a slightly rougher surface for the paint to grip onto, improving adhesion.
Step 3: Use a brush or roller to apply the chalk paint in thin, even coats. Allow each coat to dry completely before applying the next.
- Dip a brush or load a roller with chalk paint and apply it to the cabinet surfaces. Work in thin and even coats, ensuring full coverage.
- Use smooth and consistent strokes, following the direction of the wood grain if applicable. Chalk paint is known for its forgiving nature, so you can experiment with different brush strokes to achieve the desired texture or finish.
- Allow each coat to dry completely before applying the next. The drying time will depend on the specific brand and type of chalk paint you’re using, so refer to the manufacturer’s instructions for guidance.
Step 4: After the final coat dries, you can distress the cabinets using sandpaper or a damp cloth for a more rustic look (optional).
- If you desire a more distressed or aged appearance, you can distress the chalk paint by lightly sanding the edges and corners of the cabinets. Use fine-grit sandpaper or a sanding block to gently remove some of the paint layers, exposing the underlying wood or base layers.
- Alternatively, you can achieve a similar effect by using a damp cloth to gently rub away the paint in specific areas, revealing the underlying layers.
Step 5: To protect the finish, apply a clear wax or polyurethane sealer, following the manufacturer’s instructions.
- Chalk paint typically requires a protective topcoat to seal and protect the painted surface. You can choose between a clear wax or a polyurethane sealer, depending on the level of sheen and durability you desire.
- Follow the manufacturer’s instructions for applying the chosen sealer. This usually involves using a brush or cloth to evenly apply the sealer over the painted surface. Ensure that the sealer is dry before proceeding to the next step.
Step 6: Once the sealer is dry, reinstall the doors, drawers, and hardware.
- After the sealer has fully dried, carefully reattach the cabinet doors, drawers, and hardware.
- Take care not to scratch or damage the freshly painted surfaces during the reinstallation process.
By following these steps carefully, you can achieve a charming and rustic finish for your kitchen cabinets using the chalk paint method.
Conclusion
Painting kitchen cabinets is a rewarding and transformative project that can breathe new life into your kitchen. Whether you opt for the traditional brush and roller method, the efficient spray painting technique, or the charming rusticity of chalk paint, each method offers its own unique advantages.
By following the step-by-step instructions provided for each method, you can achieve professional-looking results and create a kitchen space that reflects your personal style.
Remember, proper surface preparation, including cleaning and sanding, is crucial to ensure the paint adheres well and lasts longer. Applying thin, even coats of paint and allowing sufficient drying time between coats is essential for achieving a smooth and flawless finish.
Whichever method you choose, always prioritize safety by working in a well-ventilated area, wearing appropriate protective gear, and following the manufacturer’s instructions for the chosen paint and tools.
With patience, attention to detail, and a little creativity, you can transform your kitchen cabinets into stunning focal points that enhance the overall aesthetic appeal of your kitchen.
So, grab your brushes, spray cans, or chalk paint and embark on this exciting journey of kitchen cabinet painting to revitalize your space and create a kitchen you’ll love to spend time in.
Painting kitchen cabinets can transform your space. Start by cleaning and sanding the surfaces, then apply a high-quality primer and paint. For more DIY tips, check out our guides on sanding under cabinets and mineral spirits vs TSP. If you’re tackling other projects, like framing windows side by side, proper preparation ensures a professional finish.