How to Lubricate Attic Fan?
Lubricating your attic fan is an important step in maintaining its proper function and ensuring that it continues to provide proper ventilation and energy efficiency for your home. Attic fans can start to make squeaking or grinding noises when they are in need of lubrication, which can indicate that the motor bearings are starting to wear down.
By taking the time to lubricate your attic fan, you can help extend its lifespan and ensure that it continues to operate smoothly and quietly. In this guide, we will walk you through the steps for how to lubricate your attic fan safely and effectively.
You'll Learn About
Preparation
Before you begin lubricating your attic fan, it is important to take a few safety precautions to protect yourself and ensure that the process goes smoothly. First, make sure to turn off the power to the fan by switching off the circuit breaker or unplugging it.
This will prevent the fan from starting unexpectedly and causing any injuries. It is also a good idea to wear protective gear, such as gloves and eyewear, to protect your hands and eyes from any debris or oil that may come into contact with them.
In addition to safety precautions, it is important to gather the necessary tools and materials before you start. You will need non-detergent electric motor oil, which is specifically designed for use in electric motors and will not leave any residue that could interfere with the fan’s operation.
You will also need rags or other cleaning materials to wipe down the motor bearings and surrounding area, as well as a ladder or other means of accessing the fan if it is not within easy reach. Having all of these items on hand before you begin will make the process go more smoothly and efficiently.
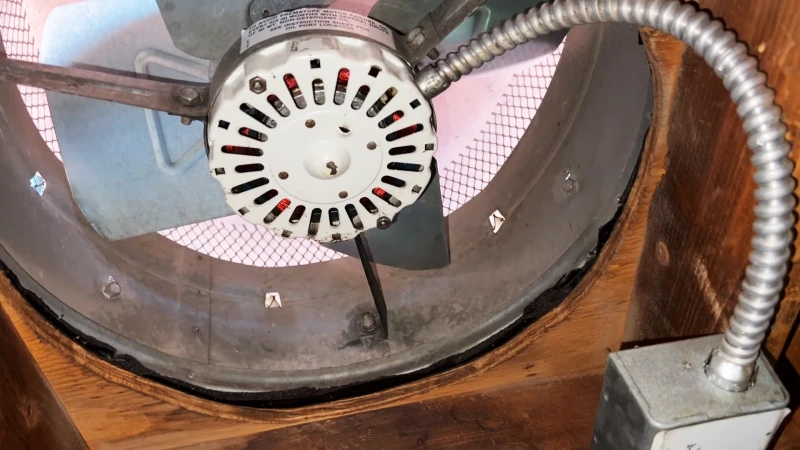
Locate and Clean the Motor Bearings
The first step in lubricating your attic fan is to locate and clean the motor bearings. These bearings are responsible for supporting the shaft of the motor and allowing it to rotate smoothly, and they are typically located in the center of the fan where the shaft goes. You may need to use a ladder or other means of accessing the fan in order to reach the bearings.
Once you have located the motor bearings, it is important to clean off any dirt or debris that may have accumulated on them or in the surrounding area. This can be done using a rag and an all-purpose cleaner. Be sure to clean the bearings and the surrounding area thoroughly to ensure that the lubrication will be able to reach the bearings effectively.
It is also a good idea to inspect the bearings for any visible damage or wear. If the bearings show signs of significant wear or damage, it may be necessary to replace them rather than simply lubricating them. In this case, it is best to consult with a professional technician or the manufacturer of the fan for guidance.
Apply Lubrication
Once the motor bearings are clean and ready for lubrication, it is time to apply the oil. Depending on the design of your fan, there may be an oil hole specifically designed for this purpose. If this is the case, simply fill the oil hole with a small amount (1-2 ounces) of non-detergent electric motor oil.
If your fan does not have an oil hole, you will need to apply the oil directly to the bearings.
If the bearings are sealed and do not have an oil hole, you will need to use a needle or similar tool to carefully inject the oil into the bearing. It is important to be very careful when doing this to avoid damaging the bearing or causing any spills.
Use a small amount of oil and apply it slowly, allowing it to fully absorb into the bearing before adding more. Be sure to use non-detergent electric motor oil specifically designed for use in electric motors.
Other types of oil may not be suitable and could cause problems with the fan’s operation.
Test the Fan
After you have applied the lubrication, it is important to test the fan to ensure that it is operating smoothly and quietly. To do this, simply turn the power back on to the fan and observe its operation. If the fan is running smoothly and quietly, the lubrication was successful and you can move on to any additional maintenance or cleaning as needed.
If the fan is still making noises or otherwise not functioning properly after lubrication, it is possible that the problem is not with the bearings or that the lubrication was not effective. In this case, it may be necessary to seek additional assistance or to consider replacing the fan or its components. If you are unsure of what to do, it is a good idea to consult with a professional technician or the manufacturer of the fan for guidance.
Additional Steps
If, after lubricating your attic fan, you find that the problem persists or if you encounter any difficulties during the process, it may be necessary to seek professional assistance or consider replacing the fan or its components. A professional technician will have the knowledge and experience to identify and fix any issues that may be causing problems with the fan’s operation.
In addition to seeking professional help, it is also a good idea to make sure that you are performing regular maintenance on your attic fan, including lubrication, to help extend its lifespan and ensure that it continues to operate smoothly and efficiently. By taking the time to properly maintain your attic fan, you can save money on costly repairs or replacements in the long run and enjoy the benefits of proper ventilation and energy efficiency in your home.
Final Thoughts
If the squeaking has returned after you oiled the motor bearings, it is possible that the problem is not with the bearings themselves but with some other component of the motor.
It is also possible that the oil you used was not effective at lubricating the bearings or that the problem is more severe than simple bearing wear and will require more extensive repair or replacement of the motor.
Lubricating your attic fan is essential to keep it running smoothly and quietly. Use a high-quality lubricant on the motor bearings and fan blades, and ensure the fan is clean before applying. Regular maintenance can extend the life of your attic fan.
While maintaining your attic fan, consider other HVAC tasks. For example, learning how to drain a dehumidifier through a wall can improve indoor air quality. Additionally, understanding why air conditioners are so expensive can help you make informed decisions about your HVAC investments. For more tips, check out our guide on resetting a Midea air conditioner remote.