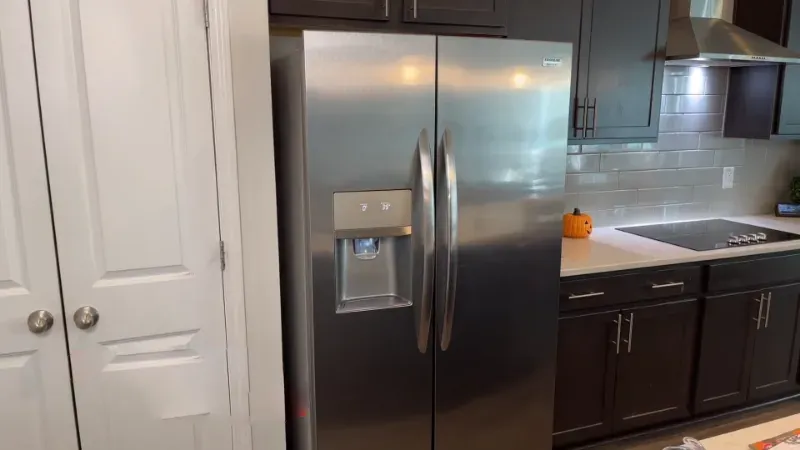
GE Side by Side Refrigerator Defrost Problems and Solutions
GE side-by-side refrigerators are a popular choice among homeowners due to their spacious interiors, convenient design, and reliable performance. However, like all refrigerators, they can sometimes experience issues, particularly with the defrosting process.
Defrosting is an important function for the proper operation of a refrigerator as it helps to prevent the buildup of frost and ice, which can affect the cooling efficiency and increase energy consumption.
In this article, we will discuss the most common GE side-by-side refrigerator defrost problems, their causes, and how to resolve them. Whether you are a homeowner or a professional repair technician, this information will help you diagnose and fix defrost problems quickly and effectively.
You'll Learn About
GE Side-by-Side Refrigerator Defrost Problem
If a GE side-by-side refrigerator is not defrosting, there could be several reasons for the issue. It is important to check the defrost timer, inspect the defrost heater, test the defrost thermostat, and check the defrost sensor and control board.
Some GE refrigerators don’t have an automatic defrost mode, so the owner will have to manually start the defrost process. It is also possible that the defrost control board has failed and is not allowing the refrigerator to enter the defrost cycle.
If this is the case, it is important to first test the defrost heater and thermostat before replacing the control board.
Frigidaire Gallery Refrigerator Temperature Problems and Solutions
Defrost Timer
The defrost timer is an essential component of a refrigerator’s defrost system, responsible for regulating the frequency of the defrost cycles. It is typically located in the control panel or behind the control panel of the refrigerator.
The defrost timer controls the defrost cycle by turning off the cooling system and turning on the defrost heater for a specified period of time. Once the defrost cycle is complete, the defrost timer turns off the defrost heater and turns on the cooling system, allowing the refrigerator to return to normal operation.
How to Check if the Defrost Timer is Working
To determine if the defrost timer is working correctly, first locate the timer and observe its dial or electronic display. If the dial or display is not moving, it may indicate that the timer is not functioning correctly.
Another way to check the timer’s operation is to unplug the refrigerator and wait for five minutes. After five minutes, plug the refrigerator back in and listen for the defrost timer to click on and off.
If the timer does not click, it may be broken and need to be replaced.
Common Issues With the Defrost Timer
The defrost timer is a mechanical component, which means it can wear out over time. Some common issues with the defrost timer include:
- Timer not advancing: If the defrost timer does not advance, it can cause the refrigerator to stop cooling and enter a permanent defrost cycle.
- Timer stuck in defrost cycle: If the defrost timer gets stuck in the defrost cycle, the refrigerator will not cool.
- Timer not turning on defrost heater: If the defrost timer does not turn on the defrost heater, the refrigerator will not defrost.
The defrost timer plays an important role in the proper functioning of a GE side-by-side refrigerator’s defrost system. If you suspect an issue with the defrost timer, it is important to address it promptly to prevent further damage and ensure the refrigerator is working efficiently.
Why do Ice Builds up in Refrigerator [Problems and Solutions]
Defrost Heater
The defrost heater is a critical component of a GE side-by-side refrigerator’s defrost system, responsible for melting any built-up ice and frost inside the freezer compartment.
The defrost heater is typically located behind the back wall of the freezer and is activated by the defrost timer during the defrost cycle. The defrost heater operates by generating heat and melting the frost and ice, which then drains through a defrost drain and into a pan at the bottom of the refrigerator.
How to Inspect the Defrost Heater
To inspect the defrost heater, you need to remove the back panel of the freezer compartment. Look for any signs of damage or corrosion on the heater itself, such as cracks, corrosion, or other damage. Additionally, inspect the defrost thermostat and defrost sensor, as these components are often located near the defrost heater and can also impact its operation.
Common Issues With the Defrost Heater
Some common issues with the defrost heater include:
- Heater not turning on: If the defrost heater does not turn on during the defrost cycle, the refrigerator will not defrost, causing frost and ice buildup in the freezer compartment.
- Heater not heating evenly: If the defrost heater is not heating evenly, it can cause uneven defrosting and lead to frost buildup in some areas of the freezer.
- Heater not melting all the ice: If the defrost heater is not strong enough to melt all the ice, it can cause frost and ice buildup in the freezer compartment.
- Heater element broken: If the defrost heater element is broken, it can cause the defrost cycle to fail, leading to frost and ice buildup in the freezer compartment.
The defrost heater is a crucial component of a GE side-by-side refrigerator’s defrost system and must be functioning correctly for the refrigerator to defrost properly.
Regular inspections of the defrost heater and other components of the defrost system can help prevent issues and ensure that your refrigerator is operating efficiently.
Defrost Thermostat
The defrost thermostat is an essential component of the defrost system in a GE side-by-side refrigerator. It acts as a temperature sensor that is responsible for monitoring the temperature inside the freezer compartment.
The defrost thermostat signals the defrost timer or control board to end the defrost cycle when the temperature reaches a certain level. This helps to prevent the freezer from overheating and damaging the food stored inside.
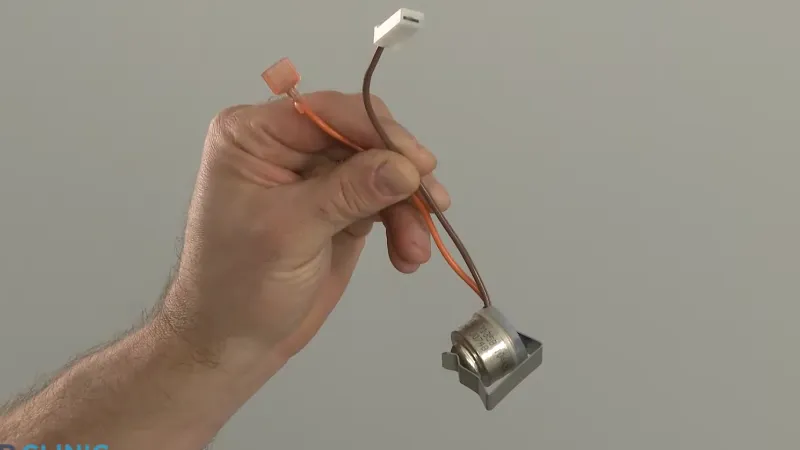
How to Test the Defrost Thermostat
To determine if the defrost thermostat is working correctly, you need to perform a continuity test. This test is done using a multimeter, which is an electronic testing device that measures the resistance of electrical components.
To perform the test, you will need to access the thermostat by removing the freezer shelves and back panel. Once you have access to the thermostat, follow these steps:.
- Set the multimeter to the continuity test setting.
- Touch one probe of the multimeter to each of the thermostat’s leads.
- Observe the reading on the multimeter. If the reading is zero, it means that the thermostat is working correctly. If the reading is infinity, it means that the thermostat is not working and needs to be replaced.
Common Issues With the Defrost Thermostat
The most common issue with the defrost thermostat is a malfunction, which can cause the defrost system to stop working. Other issues that can occur include a short circuit, which can cause the thermostat to activate even when the temperature inside the freezer is not high enough, or a faulty connection, which can prevent the thermostat from functioning properly.
In some cases, the thermostat may simply be dirty or covered in frost, which can interfere with its ability to sense the temperature. If you suspect that the defrost thermostat is not working correctly, it is best to have it checked by a professional appliance repair technician.
Defrost Sensor
The defrost sensor is an important component of a GE side-by-side refrigerator’s defrost system. It monitors the temperature in the freezer compartment during the defrost cycle and ensures that the defrost cycle is functioning properly. The defrost sensor is typically located near the evaporator in the freezer compartment.
How to Check the Defrost Sensor
To check if the defrost sensor is functioning properly, you can measure the resistance of the sensor using a multimeter. To do this, unplug the refrigerator and locate the sensor. You’ll typically find the sensor near the evaporator.
Use the multimeter to measure the resistance between the two terminals of the sensor. The resistance should fall within the specified range for your model of refrigerator.
Common Issues With the Defrost Sensor
The defrost sensor can become damaged or worn over time, which can cause it to malfunction. Some of the most common issues with the defrost sensor include:
- The sensor is reading the wrong temperature
- The sensor is not reading the temperature at all
- The sensor is shorted or has an open circuit
If you’re experiencing problems with your defrost sensor, it’s important to have it repaired or replaced as soon as possible. A malfunctioning defrost sensor can cause a number of problems with your refrigerator, including a build-up of ice in the freezer compartment, decreased cooling performance, and increased energy consumption.
Defrost Control Board
The defrost control board is the main component that controls the defrosting process of your GE side-by-side refrigerator. It is responsible for determining the frequency of the defrost cycle and ensuring that the cycle runs efficiently.
The board is connected to the defrost timer, defrost thermostat, and defrost heater, and works by controlling the electrical current that runs through them.
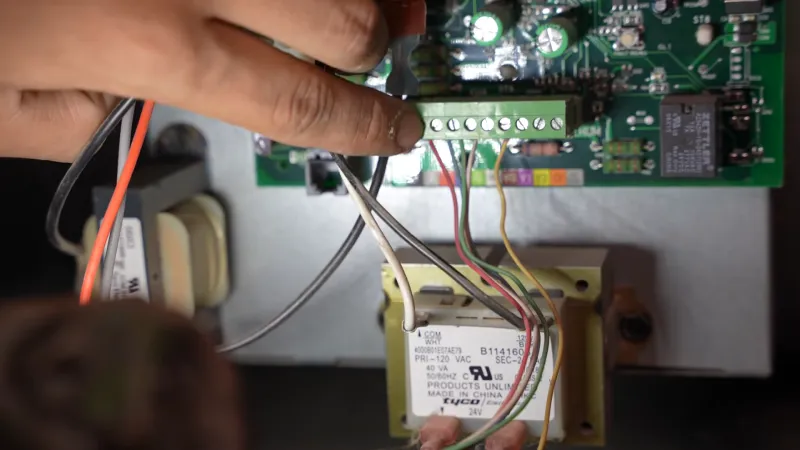
How to Check the Defrost Control Board
To check the defrost control board, you will need to identify if there are any visible signs of damage, such as burn marks or a broken circuit. If the board appears to be in good condition, you can use a multimeter to check for continuity in the electrical connections. If the board has failed, it will need to be replaced.
Samsung Refrigerator Problems and Solutions
Common Issues With the Defrost Control Board
The most common issue with the defrost control board is failure. This can be caused by electrical surges, overloading the circuit, or general wear and tear. When the defrost control board fails, the defrost cycle will not run, and your GE side-by-side refrigerator will not defrost.
If you suspect that the defrost control board is the issue, it is best to consult a professional for repair or replacement.
a properly functioning defrost control board is essential for the efficient functioning of your GE side-by-side refrigerator. If you experience any issues with your defrost cycle, it is important to check the defrost control board and address any issues promptly to prevent further damage to your refrigerator.
Manually Defrosting a Ge Side-by-side Refrigerator
Not all GE side-by-side refrigerators automatically defrost, so manual defrosting may be necessary. This process involves turning off the refrigerator and letting it warm up to room temperature. Once it has reached room temperature, the frost build-up can be scraped out.
Steps to Defrost a Ge Side-by-side Refrigerator
- Turn off the refrigerator: Unplug the refrigerator or turn off the circuit breaker that powers it.
- Remove all food: Move all food items to a cooler or another refrigerated location.
- Let the refrigerator warm up: Leave the refrigerator door open for several hours, or until all the frost has melted.
- Scrape Out the Frost: Use a plastic scraper to remove the melted frost from the interior of the refrigerator. Make sure to reach all corners and crevices to ensure a thorough defrost.
- Wipe down the interior: Use a soft cloth or paper towel to wipe down the interior of the refrigerator, removing any residual moisture or frost.
- Restart the Refrigerator: Once the defrost process is complete, plug the refrigerator back in or turn the circuit breaker back on. Allow the refrigerator to cool down before replacing any food items.
Safety Precautions When Manually Defrosting
Do Not Use Metal Tools
Using a metal scraper or other metal tool could cause damage to the interior of the refrigerator. Always use a plastic scraper or a soft cloth.
Avoid Using Heat Sources
Do not use hair dryers, heat lamps, or other heat sources to speed up the defrost process. This could damage the refrigeration components or cause other issues.
Be Careful With Water
Be careful when wiping down the interior of the refrigerator, as too much water could cause damage or create safety hazards. Use a soft cloth or paper towel to remove any residual moisture.
By following these steps and taking the necessary precautions, you can manually defrost your GE side-by-side refrigerator and keep it functioning properly.
Ice Maker Problems LG Refrigerators and Solutions
Closing Words
Defrost problems in GE side-by-side refrigerators can be caused by various factors, including a malfunctioning defrost timer, defrost heater, defrost thermostat, defrost sensor, or defrost control board.
Regular inspection of these components can help prevent defrost issues and ensure that your refrigerator is functioning properly. If a defrost problem arises, it is important to diagnose and resolve it as soon as possible to avoid any further damage to your appliance.
If you are unable to diagnose and fix the issue on your own, it is recommended to seek the assistance of a professional technician. In the meantime, you can also manually defrost your refrigerator by turning it off and scraping out any frost build-up.
By understanding these common defrost problems and taking the necessary steps to resolve them, you can ensure that your GE side-by-side refrigerator is running smoothly and efficiently.