Coffee Brown Floor Stain: The #1 Secret to a Flawless Finish
You envision a hardwood floor that radiates warmth and sophistication. A rich, deep coffee brown that grounds your space in timeless elegance. But turning that vision into reality is fraught with potential disasters—blotchy patches, uneven color, and a finish that looks amateurish, forcing you to live with a mistake or pay for a costly redo.
The problem isn’t just picking a color; it’s understanding how that color interacts with your specific wood floor. Many homeowners dive in, only to discover too late that their wood absorbs stain unevenly, leaving a permanent mess. This guide provides the professional secrets to achieving a perfect coffee brown finish, ensuring your floors become the stunning centerpiece you imagined.
You'll Learn About
Why Coffee Brown is the Perfect Choice for Your Floors
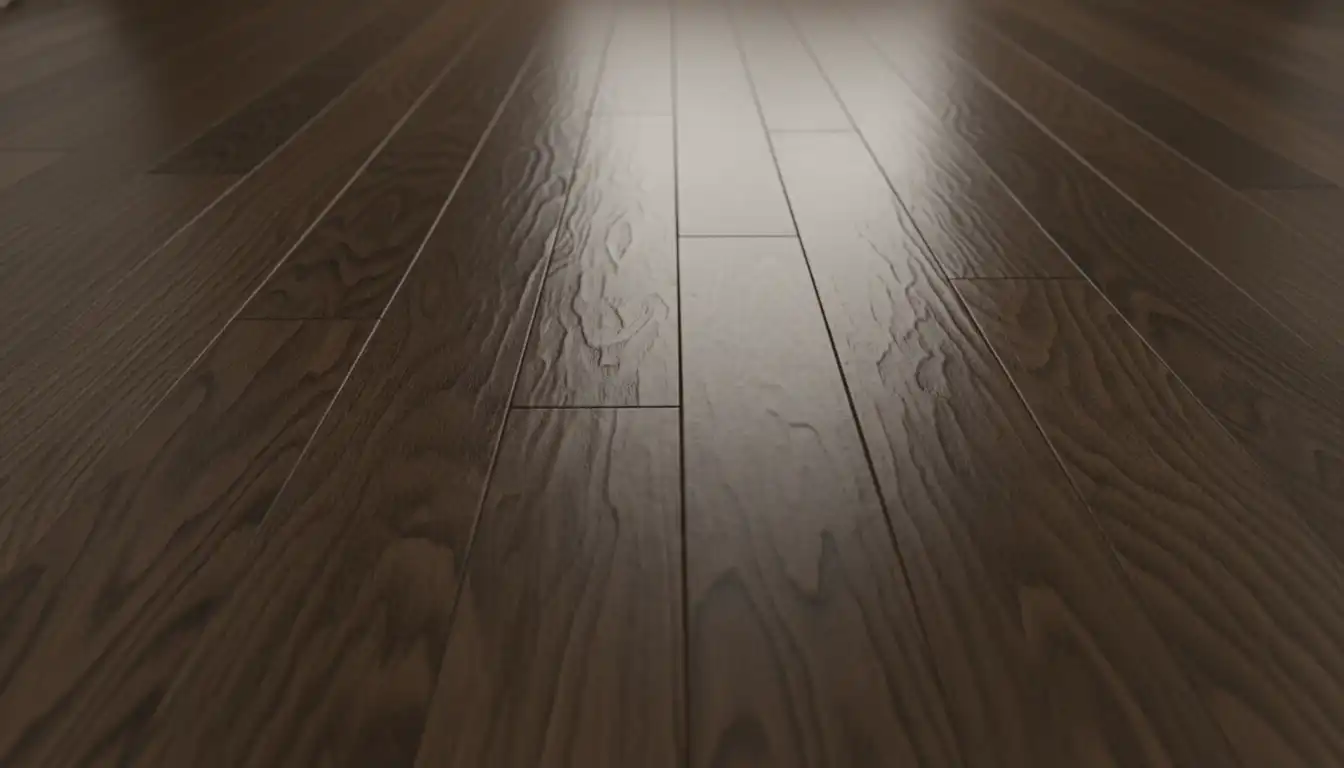
Coffee brown isn’t just a color; it’s a statement. This versatile shade brings a sense of organic luxury to any room, anchoring the space without making it feel small or dark. Its inherent warmth creates an inviting atmosphere that complements a vast range of interior design styles, from modern minimalist to rustic farmhouse.
Unlike trendy grays or blacks that can feel sterile, a rich coffee brown provides depth and character. It masterfully hides minor imperfections and dirt, making it a practical choice for busy households. More importantly, it serves as a stunning backdrop for your furniture and decor, allowing other elements in the room to truly shine.
The Hidden Challenge: Not All Coffee Browns Are Created Equal
The first hurdle in your staining project is realizing that “coffee brown” is a spectrum, not a single color. The final appearance is a combination of the stain’s formula and, crucially, the type of wood you’re applying it to. Understanding these two factors is non-negotiable for success.
Different brands formulate their coffee brown stains with varying undertones—some lean slightly red, others have a cooler, more neutral base. The wood species itself plays an even bigger role. Porous woods like oak will soak up the stain deeply, revealing a rich, textured grain. Less porous woods like maple, however, resist stain penetration and can easily become blotchy if not prepared correctly.
The Wood Species Dictates the Outcome
Think of your wood floor as the canvas. An oak floor, with its prominent grain, will showcase a coffee brown stain beautifully, creating a classic, textured look. Pine, on the other hand, is notorious for its uneven density, which causes it to absorb stain inconsistently, leading to dark, unsightly patches.
Before you even open a can of stain, identify your wood type. This knowledge will guide your entire process, from sanding and preparation to the type of stain you choose. For a truly deep and consistent color, you might explore options beyond a simple stain, such as the darker finishes discussed in a comparison of Minwax Espresso vs Dark Walnut.
Choosing Your Weapon: Oil, Water, or Gel Stain?
The type of stain you select has a massive impact on the application process and the final look. Each has distinct properties suited for different skill levels and wood types. Making the wrong choice is one of the most common DIY mistakes.
Oil-based stains penetrate deeply and offer rich color but have a strong odor and long dry times. Water-based stains are low-odor, dry quickly, and are easy to clean up but can sometimes raise the wood grain. Gel stains are thick and sit on top of the wood, providing excellent control and preventing blotching, making them a fantastic choice for difficult woods like pine and maple.
| Stain Type | Best For | Pros | Cons |
|---|---|---|---|
| Oil-Based | Oak, Hickory, Ash (Porous woods) | Deep color penetration, rich look, durable | Strong fumes, long dry time, harder cleanup |
| Water-Based | General interior use, DIY-friendly projects | Low odor, fast drying, easy cleanup | Can raise wood grain, may offer less color depth |
| Gel Stain | Pine, Maple, Cherry (Blotch-prone woods) | Prevents blotching, no-drip formula, easy application | Sits on the surface, may obscure some grain |
The Pro’s Playbook: A Step-by-Step Guide to Perfection
Achieving a professional-looking finish is all in the preparation and application technique. Rushing any of these steps will telegraph a DIY job. Follow this playbook meticulously to get it right the first time.
Step 1: The Critical Foundation – Flawless Sanding and Prep
You cannot achieve an even stain on an unevenly sanded floor. Proper sanding is the most important step of the entire process. Start with a coarse grit sandpaper to remove the old finish and any imperfections, then progressively move to finer grits (finishing with 120-150 grit for floors) to create a smooth, uniform surface.
After your final sanding pass, you must thoroughly vacuum all dust from the room. Use a shop vacuum with a brush attachment, paying close attention to corners and edges. Follow this with a tack cloth or a rag lightly dampened with mineral spirits to pick up any remaining fine dust particles.
Step 2: The Secret to Even Color – Wood Conditioning
Here is the secret that separates amateurs from professionals: always use a pre-stain wood conditioner, especially on soft or blotch-prone woods. This product partially seals the wood pores, allowing the stain to be absorbed much more evenly. It is the single best insurance policy against a blotchy finish.
For an even deeper and more uniform color on porous woods like oak, pros use a technique called “water popping.” After the final sanding, the floor is lightly misted with water. This opens up the wood grain, allowing it to accept the dark stain more deeply and evenly across the entire floor.
Step 3: The Art of Application – Wiping On, Wiping Off
When applying the stain, work in small, manageable sections. Use a clean, lint-free rag, a foam brush, or a lambswool applicator to apply a liberal but even coat of stain, always moving in the direction of the wood grain.
Let the stain penetrate for the time recommended by the manufacturer—usually 5 to 15 minutes. The longer it sits, the darker the color will be. Then, using a separate clean rag, wipe off all the excess stain. Failing to wipe off the excess is a critical error; it will leave a sticky, tacky film on the surface that will never dry properly.
Step 4: Building Depth – The Power of Multiple Coats
For a deeper, richer coffee brown, you may need to apply a second coat. It’s always better to build color with two thin coats than to try to achieve it with one heavy, dark coat. This gives you more control over the final shade and ensures a more even result.
Ensure the first coat is completely dry according to the manufacturer’s instructions before applying the next. Do not sand between coats of stain, as this will remove the color you just applied.
Step 5: Sealing the Deal – Applying a Durable Top Coat
The stain provides the color, but the top coat provides the protection. Once your stain has fully cured (this can take 24-72 hours), you must apply a protective finish like polyurethane. This clear coat will protect your floors from scratches, spills, and daily wear and tear.
Apply at least three coats of a high-quality, floor-grade polyurethane, following the manufacturer’s directions for application and dry times. Lightly sand with very fine-grit sandpaper (220 grit) between coats for the smoothest possible finish, wiping away all dust before applying the next coat.
Avoiding the Nightmares: Common Mistakes with Dark Stains
Dark stains are less forgiving than light ones. They highlight every flaw in sanding and every mistake in application. The most common nightmares—blotching, lap marks, and dust nibs—are all preventable with careful work.
Blotching is caused by uneven stain absorption and is solved by proper sanding and wood conditioner. Lap marks (streaks where you stopped and started) are avoided by working in small sections and always maintaining a “wet edge.” Finally, dust nibs in the final finish are prevented by meticulous cleaning before and between each coat of polyurethane.
Designing Around Your New Floors
A coffee brown floor is a powerful design element that can beautifully anchor a room. To create a cohesive look, pair it with lighter wall colors like cream, beige, or a soft greige to create a pleasant contrast that makes the room feel airy and bright. This contrast allows the richness of the floors to stand out.
When it comes to furnishings, you have incredible flexibility. The deep neutral tone of the floor complements a wide array of styles. You can learn more about what is brown furniture and how to pair different wood tones for a sophisticated, layered look. Light-colored furniture will pop against the dark floors, while pieces in complementary shades of brown can create a warm, monochromatic scheme.
Long-Term Beauty: Maintaining Your Coffee Brown Finish
Dark floors have a reputation for showing dust and scratches more easily. However, proper maintenance can keep them looking pristine for years. The key is consistent, gentle cleaning and proactive protection.
Sweep or vacuum with a hard-floor attachment regularly to remove grit and dust that can scratch the finish. For deeper cleaning, use a pH-neutral cleaner designed for hardwood floors and a microfiber mop—never use excessive water. Place felt pads under all furniture legs and use area rugs in high-traffic zones to protect the finish from daily wear and tear.