10×12 Bathroom Layout: Unlock Luxury in Your Master Suite
Designing a bathroom that balances luxury with functionality is a challenge, but a 10×12 bathroom layout offers the perfect “Goldilocks” dimensions. At 120 square feet, this footprint is significantly larger than the average 40-square-foot standard bath, yet it requires precise planning to avoid wasted space. Many homeowners struggle with this rectangular canvas, unsure how to fit a freestanding tub, a walk-in shower, and a double vanity without creating a cramped “obstacle course.”
The solution lies in strategic zoning and understanding the “blueprint” rules of clearance. By dividing your 10×12 space into distinct wet and dry functional zones, you can comfortably fit a separate water closet, a spa-like shower, and dual sinks while maintaining smooth traffic flow. This guide will walk you through the architectural principles, specific clearance numbers, and three distinct layout concepts to transform your 10×12 space into a high-end sanctuary.
You'll Learn About
The 10×12 Advantage: Solving the “Undefined Space” Problem
The most common issue with 10×12 bathrooms isn’t a lack of space—it’s poor utilization. In smaller baths, fixtures are pushed to the perimeter by necessity. In a 10×12 room, simply lining walls with fixtures leaves a massive, unusable “dance floor” in the center that feels cold and empty. Conversely, trying to fill that center with a floating tub often blocks flow and makes the room feel smaller.
To solve this, we apply the “Activity Zoning” principle. Instead of treating the room as one big box, we divide it into three functional areas:
1. The Vanity Zone (Dry): High traffic, needs excellent lighting.
2. The Sanitary Zone (Private): The toilet, ideally separated for privacy.
3. The Bathing Zone (Wet): The shower and tub, often best combined or adjacent.
3 Expert Layout Concepts for 10×12 Spaces
Below are three proven layouts specifically tailored to the 10×12 rectangular footprint. Each maximizes value and functionality differently.
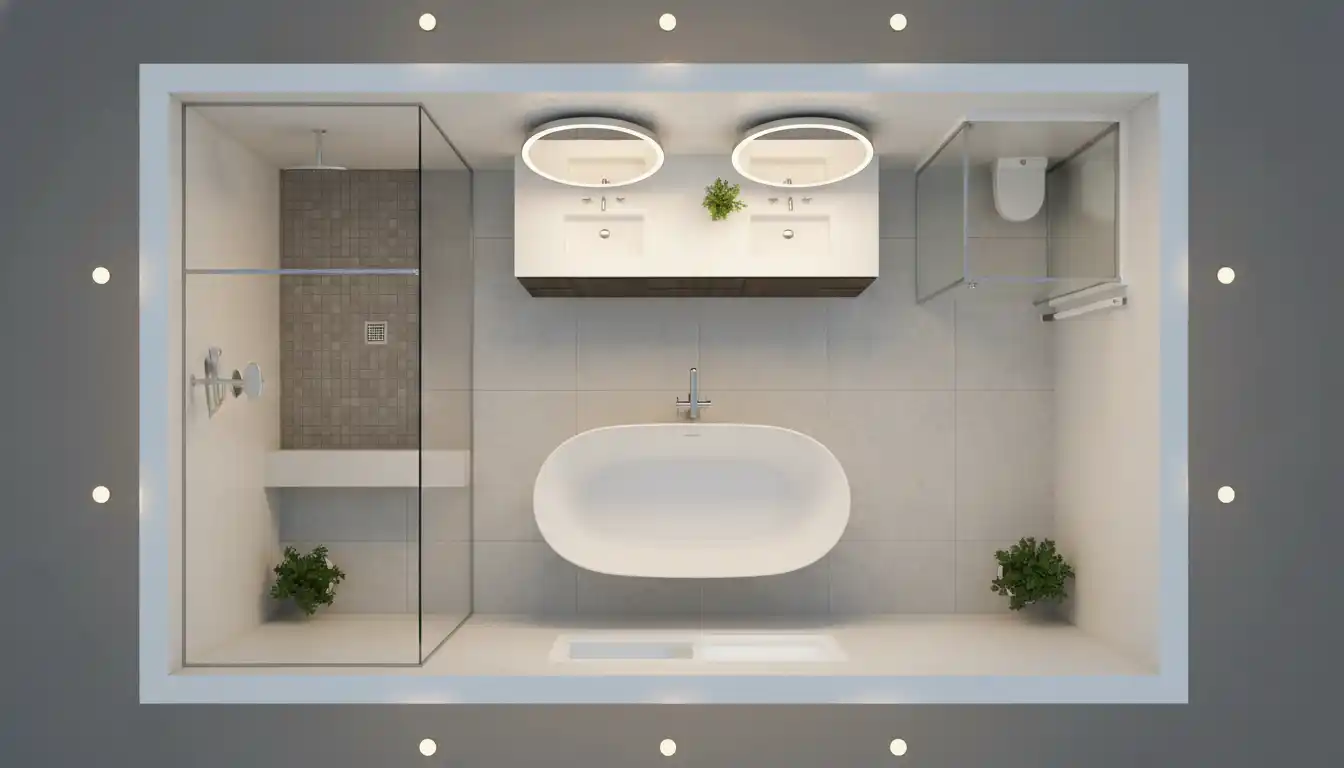
1. The “Wet Room” Sanctuary
This trending design places the tub and shower behind a single glass partition, effectively turning the back 4-5 feet of the room into a waterproof sanctuary. This is ideal if you want a massive shower experience and a modern, seamless look.
Layout Breakdown:
• Back Wall (10ft): A continuous wet zone. On the left, a 60-inch freestanding tub; on the right, an open shower area. A single glass pane separates this zone from the rest of the room.
• Side Wall (12ft): A massive 72-inch double vanity dominates the “dry” side, offering maximum storage.
• Entry/Front: A separate water closet (WC) room (approx. 36″ x 60″) creates ultimate privacy near the entrance.
This layout works because it consolidates plumbing to specific walls and eliminates the “box-within-a-box” feel of a traditional enclosed shower stall.
2. The Classic Master Suite (Separate Water Closet)
If privacy is your top priority, this layout focuses on a fully enclosed toilet room (water closet). Resale value often jumps with a separate water closet, as it allows two people to use the bathroom simultaneously.
Layout Breakdown:
• Corner 1: A large corner shower (42″ x 42″ neo-angle or 36″ x 60″ rectangle).
• Corner 2: A separate water closet room.
• Long Wall: A 60-inch double vanity.
• Focal Point: A freestanding tub placed on an angle or centered on the remaining wall to serve as visual art.
Pro Tip: In this layout, ensure the door to the water closet swings out or is a pocket door. An inward-swinging door in a small WC is a major safety hazard.
3. The Universal Design “Future-Proof” Layout
Designing for longevity means creating a space that is accessible to everyone, regardless of mobility. A 10×12 space is perfect for insulating against future mobility issues by incorporating wide turn radiuses.
Layout Breakdown:
• Curbless Shower: A zero-entry shower (minimum 5×5 feet) takes up one corner, allowing wheelchair access.
• Wide Walkways: A central turning radius of 60 inches is preserved clear of fixtures.
• Floating Vanity: A wall-mounted vanity installed at a comfortable height with knee clearance underneath.
Critical Dimensions: The Numbers You Can’t Ignore
When drawing up your plans, “eyeballing it” is a recipe for disaster. You must adhere to NKBA (National Kitchen & Bath Association) guidelines to ensure the room passes code and functions comfortably. Use these specific dimensions as your checklist:
- Toilet Clearance: You need a minimum of 30 inches of width for the toilet (15 inches from the center line to any side obstruction). For true comfort, aim for 36 inches. In front of the toilet, you legally need 21 inches, but 30 inches is the recommended comfortable standard.
- Shower Size: While 30×30 is the code minimum, it feels like a phone booth. In a 10×12 room, do not settle for less than 36×48 inches. A 48×60 inch shower is considered luxury sizing.
- Walkway Width: Main traffic paths should be at least 36 inches wide. If two people will stand back-to-back at a double vanity, you need at least 48 inches of clearance behind the vanity.
- Tub Spacing: For a freestanding tub, leave at least 4 inches between the tub lip and the wall for cleaning access, and 12 inches on the ends if plumbing allows.
Cost vs. Value: Where to Spend in a 10×12 Remodel
Remodeling a bathroom of this size is a significant investment. Below is a breakdown of features comparing their cost impact versus the functional value they add to a 10×12 layout.
| Feature | Cost Impact | Functional Value (1-10) | Notes |
|---|---|---|---|
| Moving Plumbing (Toilet/Shower) | High ($2,000+) | 10 | Essential for optimizing flow in a 10×12 space. Often required to create a separate Water Closet. |
| Separate Water Closet (Framing & Door) | Medium ($1,500) | 9 | Adds privacy and resale value. Requires dedicated lighting and ventilation fan. |
| Curbless Shower Entry | Medium-High ($2,500) | 8 | Requires lowering floor joists or raising the floor. Excellent for universal design and modern aesthetics. |
| Freestanding Tub | Medium ($1,200 – $3,000) | 6 | A stunning focal point, but less practical than a built-in deck for holding soap/books/drinks. |
| Heated Floors | Low-Medium ($800 – $1,500) | 7 | Highly recommended for large tiled areas to prevent the room from feeling cold and cavernous. |
Solving Common Pain Points
The Storage Dilemma
Even in a large bathroom, storage often gets forgotten. Avoid the mistake of relying solely on the vanity. In a 10×12 layout, you have vertical space to exploit. Consider adding a tall linen tower (18-24 inches wide) between double sinks or recessed into a wall niche. This is often more effective than deep vanity drawers which can interfere with plumbing. If you are doing a DIY renovation, be mindful of dust and debris; learning how to clean up after removing popcorn ceiling or drywall is crucial before you start installing pristine new cabinets.
Lighting the Void
A single ceiling light will leave shadows in the corners of a 10×12 room. Layer your lighting:
1. Task Lighting: Sconces at eye level (65-70 inches from floor) on either side of the vanity mirror.
2. Ambient Lighting: Recessed cans on a dimmer switch for general illumination.
3. Accent Lighting: A waterproof downlight in the shower and a small chandelier or pendant over the tub for drama.
Waterproofing and Finishes
With larger bathrooms, you have more surface area, meaning more tile and grout. If you plan on a wet room layout, ensure you use proper waterproofing membranes (like Schluter-Kerdi or RedGard) on the entire floor and up the walls. When sealing fixtures, especially around custom layouts, choosing the right sealant is vital. Using a polystyrene compatible caulk is important if you are using specific foam insulation boards or backers to prevent chemical degradation of your waterproofing layers.
Frequently Asked Questions: 10×12 Master Bathroom Layouts
What is the most efficient floor plan for a 10×12 master bathroom?
In a 120-square-foot space, the most efficient layout typically involves placing the plumbing fixtures along the walls to maximize central circulation space. A popular configuration places a double vanity on one long wall, a large walk-in shower and freestanding tub on the opposite wall, and the toilet tucked into a corner or a separate water closet. This “galley” or perimeter style ensures an open flow while allowing distinct zones for bathing and grooming.
Can I fit both a freestanding tub and a separate shower in a 10×12 bathroom?
Yes, a 10×12 footprint is ideally sized to accommodate both a spacious walk-in shower and a freestanding soaking tub without feeling cramped. To maintain a luxury feel, ensure there is at least 30 inches of clearance between the tub and surrounding fixtures. A wet room configuration, where the tub is placed inside a large tiled shower area, is also a modern solution that maximizes space and waterproofing.
What is the ideal size for a double vanity in this bathroom size?
For a 10×12 master suite, a 72-inch (6-foot) double vanity is the gold standard for luxury and functionality. This width provides ample countertop space and drawer storage between the two sinks. If your specific layout involves door obstructions, a 60-inch vanity is the minimum recommended size for two sinks, though it offers less counter space and elbow room.
Should I enclose the toilet in a separate water closet?
Incorporating a private water closet (or toilet room) is highly recommended for a 10×12 luxury master bath. This feature significantly increases functionality by allowing one person to use the facilities while another uses the vanity or shower. A standard water closet requires a space of roughly 36 inches by 60 inches, which easily fits within a 120-square-foot layout.
How do I determine the best lighting plan for a bathroom of this magnitude?
A luxury bathroom requires a layered lighting approach consisting of ambient, task, and accent lighting. Start with recessed ceiling lights for general illumination, add sconces at eye level near the vanity to eliminate shadows on the face, and consider a statement chandelier over the tub for elegance. For a 10×12 space, ensure you have separate dimmer switches for each zone to control the mood and functionality.
What are the ventilation requirements for a 120-square-foot bathroom?
Proper ventilation is critical to prevent mold and protect high-end finishes. For a bathroom over 100 square feet, exhaust fans are typically rated by the number of fixtures rather than just square footage, or you should aim for a fan with at least 130 CFM (cubic feet per minute). Ideally, place the vent near the shower or steam source and ensure it is ducted directly to the outside, not into an attic.
Is a 10×12 bathroom large enough for a center island?
Generally, a 10×12 space is not large enough to comfortably accommodate a center island. While spacious, the room requires clear walkways of at least 30 to 36 inches between fixtures. Adding an island often impedes traffic flow and makes the room feel smaller. Instead, focus on maximizing perimeter storage with linen towers or built-in cabinetry.
Does a curb-less shower work well in a 10×12 layout?
A zero-entry or curb-less shower is an excellent choice for a 10×12 layout as it enhances accessibility and visual continuity. By eliminating the shower dam, the floor tiles flow seamlessly from the main area into the shower, making the room appear larger and more luxurious. However, this requires recessing the subfloor or raising the floor level to achieve the proper slope for drainage.
What size tile is recommended to make the space look luxurious?
Large-format tiles (such as 12×24 inch or 24×24 inch) are preferred for a 10×12 bathroom. Larger tiles require fewer grout lines, which creates a cleaner, less cluttered visual aesthetic that mimics the look of slab stone. If you use a different tile for the shower floor, ensure it is smaller to provide adequate slip resistance, or use a linear drain with large matching tiles.
How much clearance do I need in front of the vanity and shower?
To adhere to building codes and National Kitchen & Bath Association (NKBA) guidelines, you should plan for a minimum of 30 inches of clear floor space in front of any fixture, including the vanity, toilet, and tub. For a truly luxurious feel that allows two people to move past one another comfortably, aim for 36 to 48 inches of walkway width in the center of the room.
Final Thoughts: The “Zone” Rule
If you take only one piece of advice for your 10×12 bathroom layout, let it be this: Respect the zones. Do not let the toilet encroach on the relaxation vibe of the tub. Do not let the vanity door swing into the person standing at the shower. The luxury of 120 square feet is not just in the size of the fixtures, but in the empty space you preserve between them. Plan for flow, plan for privacy, and your bathroom will feel like a high-end hotel suite every day.