Window Separating From Wall? Don’t Panic—Here’s Your Fix
You glance at your window and notice something deeply unsettling. A gap is forming, a distinct line where the window frame and the wall are pulling apart. It’s a homeowner’s nightmare, sparking immediate questions about structural integrity, cost, and complexity of the repair.
This separation is more than a cosmetic issue; it’s a breach in your home’s protective envelope. Ignoring it can lead to water intrusion, pest infestations, and significant energy loss. Understanding the root cause is the first step toward a lasting solution.
You'll Learn About
Why Is My Window Pulling Away From the Wall? Uncovering the Cause
A window separating from a wall rarely happens overnight. It’s often the result of underlying issues that have been developing over time. Identifying the correct cause is crucial for applying the right fix and preventing recurrence.
Foundation Settlement: The Most Serious Culprit
One of the most alarming causes of window separation is foundation settlement. When the soil beneath your home shifts or compacts, your foundation can move, placing immense stress on the entire structure. This movement can cause walls to shift and pull away from window frames.
Signs that often accompany foundation issues include stair-step cracks in exterior brickwork, cracks in interior drywall (especially around door and window frames), and doors that stick or no longer latch properly. If you notice a window gap along with these other symptoms, it’s a strong indicator of a foundation problem that requires professional assessment.
Moisture and Material Degradation
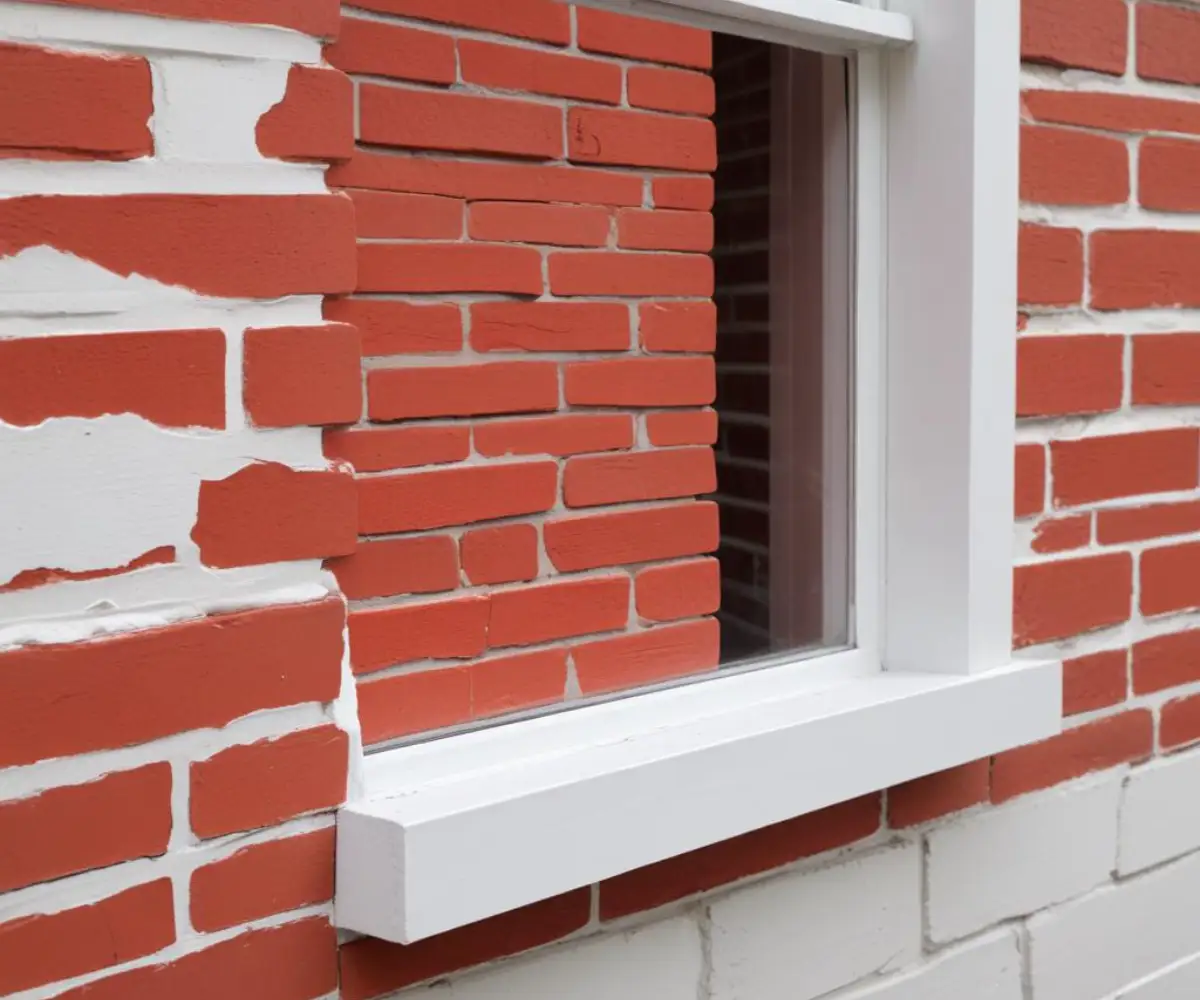
Water is the enemy of many building materials. Persistent moisture from leaks or high humidity can cause wood frames and surrounding structural elements to rot and decay. As the wood weakens, it loses its ability to hold the window securely in place, leading to separation.
Vinyl and wood frames can also warp over time due to temperature fluctuations and exposure to the elements. This physical change in the material can create gaps and break the seal between the window and the wall. A similar issue can be seen in the gap between stucco and concrete, where different materials expand and contract at different rates.
Faulty Installation and Failing Materials
Sometimes, the problem dates back to the initial installation. A poorly installed window might not have been properly secured to the house’s framing. Over time, gravity and the natural movements of the house can cause the window to shift and separate from the wall.
The sealants and caulking used to seal the gap between the window and the wall also have a limited lifespan. As these materials age, they can dry out, crack, and pull away, breaking the seal and creating an opening.
Assessing the Severity: Is It a DIY Fix or Time to Call a Pro?
Once you’ve identified the likely cause, you need to determine the best course of action. The solution can range from a simple DIY repair to a complex structural fix requiring a professional contractor. Knowing when to tackle it yourself and when to call for help is key.
Small gaps, particularly on the interior where trim is pulling away from drywall, may be simple cosmetic fixes. However, significant exterior gaps, especially those accompanied by other structural warning signs, warrant a professional opinion. It can be frustrating trying to find a reliable professional, which leads many to wonder why do contractors not show up, but persistence is key for major repairs.
When to DIY: Minor Gaps and Sealant Failure
If the gap is small (less than a quarter-inch), the window is still firmly in place, and there are no signs of major structural movement, you can likely handle the repair yourself. This usually involves removing the old, failed caulk and applying a new, high-quality sealant.
For interior gaps between the window trim and the drywall, a flexible painter’s caulk is often sufficient. For exterior gaps, you’ll need a durable, weatherproof exterior-grade sealant to protect against the elements.
When to Call a Professional: Structural Issues and Large Gaps
If you suspect foundation settlement, see large or growing gaps, or notice the wall itself is bowing or leaning, do not attempt a DIY fix. These are signs of serious structural problems that require the expertise of a structural engineer or foundation repair specialist. Attempting to simply seal these gaps can trap moisture and hide a worsening problem.
Likewise, if a window feels loose in its opening or the separation is due to extensive wood rot, a professional contractor should handle the repair. This may involve removing the window to repair the underlying structure and properly reinstalling and sealing it.
Your Step-by-Step Guide to Fixing Minor Window Gaps
For smaller gaps caused by sealant failure or minor material shrinkage, a DIY repair is a manageable project. Follow these steps to create a new, durable seal that will protect your home and improve energy efficiency.
Step 1: Clean and Prepare the Area
A successful seal starts with a clean surface. Use a utility knife or a caulk removal tool to carefully cut and scrape away all the old, failing caulk or sealant from the gap. Be thorough and remove as much of the old material as possible.
Once the old caulk is removed, clean the area with a stiff brush and a vacuum to remove any dust and debris. For exterior surfaces, you may need to wash the area with a mild detergent and water, then allow it to dry completely.
Step 2: Insert a Backer Rod (for larger gaps)
If the gap you are sealing is more than 1/4 inch wide and deep, you should use a foam backer rod. This flexible foam material is pushed into the gap to partially fill it before applying caulk. This provides a solid surface for the caulk to adhere to and prevents you from using an excessive amount of sealant.
Choose a backer rod that is slightly larger in diameter than the gap. Press it firmly into the gap, ensuring it is set to a consistent depth, typically about half the width of the joint.
Step 3: Apply New Sealant
Load a tube of high-quality sealant into a caulk gun. For exterior gaps, choose a product labeled for exterior use that is waterproof and flexible, such as a siliconized acrylic or polyurethane sealant. For interior gaps, an acrylic latex caulk is a good choice as it is paintable.
Cut the tip of the nozzle at a 45-degree angle to a size that matches the gap. Puncture the inner seal, then apply a steady, continuous bead of caulk into the gap. Move the gun smoothly to ensure an even application.
Step 4: Smooth the Caulk Bead
Immediately after applying the caulk, smooth the bead to create a clean, professional-looking seal. You can use a caulk finishing tool or simply wet your finger and run it lightly along the bead. This tooling process presses the sealant into the joint, ensuring good adhesion to both surfaces.
Wipe away any excess caulk with a damp cloth before it starts to skin over. Allow the sealant to cure completely according to the manufacturer’s instructions, which can take anywhere from a few hours to a full day.
Comparing Repair Options and Potential Costs
The cost and complexity of fixing a window that’s separating from the wall can vary dramatically. Understanding your options will help you budget and plan accordingly. Below is a table outlining common scenarios, typical solutions, and estimated cost ranges.
| Problem Scenario | Common Solution | Estimated Cost | Best For |
|---|---|---|---|
| Minor interior trim separation (less than 1/8″) | DIY re-caulking with acrylic latex caulk. | $10 – $30 | Cosmetic issues, small paintable gaps. |
| Failed exterior caulking (gap up to 1/4″) | DIY removal of old caulk and application of new exterior-grade sealant. | $20 – $50 | Preventing drafts and minor water intrusion. |
| Larger gaps (over 1/4″) needing insulation | DIY application of backer rod and sealant, or minimal expanding foam. | $30 – $75 | Sealing significant drafts and improving insulation. |
| Significant wood rot in frame or sill | Professional repair or replacement of rotted wood sections. | $250 – $800+ per window | When the structural integrity of the frame is compromised. |
| Loose window unit due to installation failure | Professional removal and re-installation of the window. | $350 – $1,000+ per window | Windows that physically move or were improperly secured. |
| Separation caused by foundation settlement | Professional foundation repair (e.g., piers, mudjacking). | $5,000 – $15,000+ | When accompanied by other signs of structural issues. |
Preventative Maintenance: Your Best Defense
The best way to deal with a separating window is to prevent it from happening in the first place. Regular inspection and maintenance can help you catch small issues before they escalate into major problems. Even communities focused on simplicity understand the value of solid construction, a principle you might find interesting in the context of an Amish electrician and their approach to modern technology.
Annually inspect the caulking around all your windows, both inside and out. Look for any signs of cracking, peeling, or shrinking. Re-caulk any failing seals immediately to maintain a watertight barrier and prevent energy loss.
Maintain Proper Drainage
Ensure that your gutters and downspouts are clean and functioning correctly. Water that is not properly directed away from your home can saturate the soil around your foundation, leading to settlement and the types of structural stress that cause window separation.
Also, check that the ground around your foundation slopes away from the house. This helps to prevent water from pooling near the walls and seeping into the soil, protecting both your foundation and the structural integrity of your window openings.