Gap Between Stucco and Concrete? Don’t Let It Ruin Your Home!
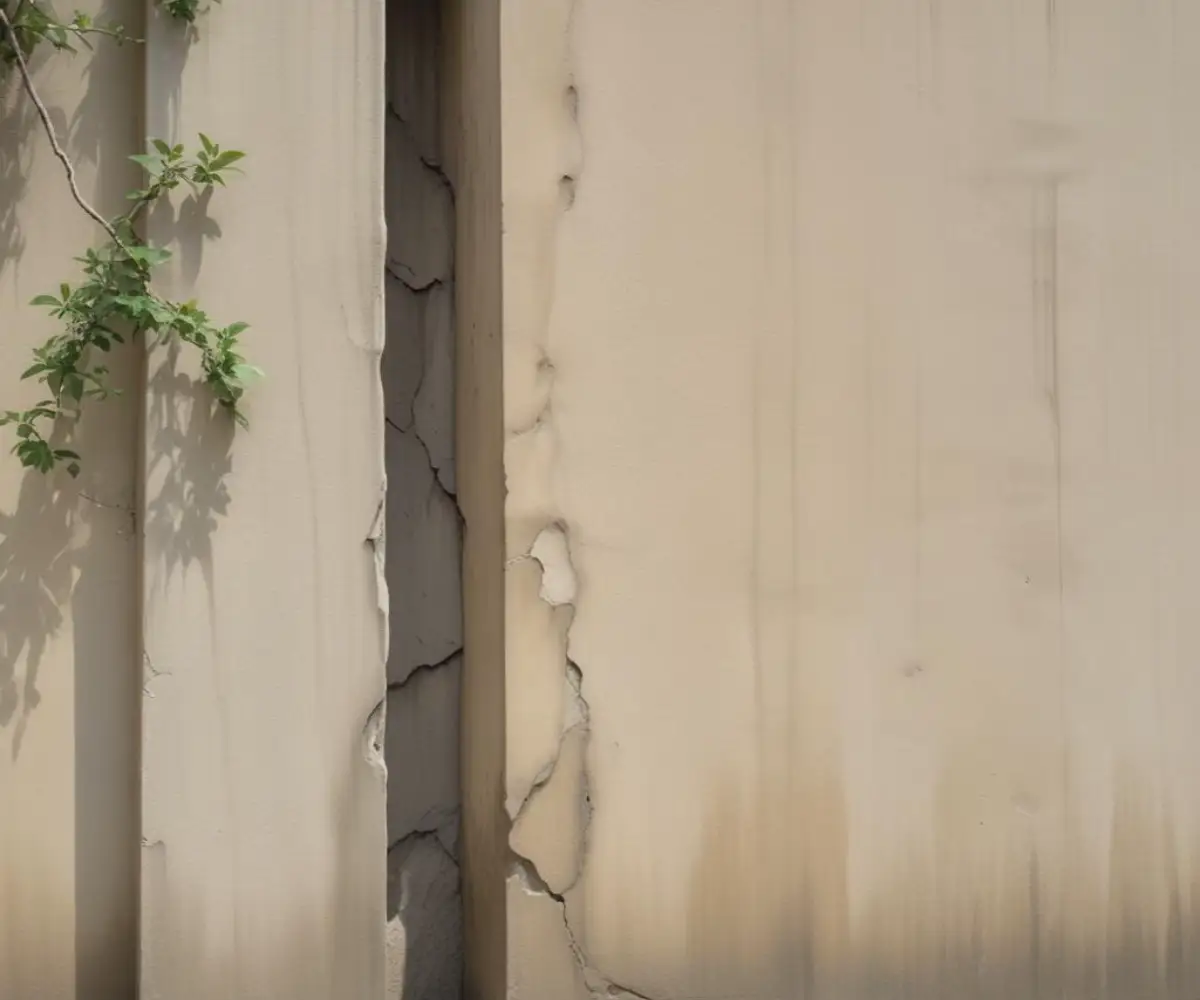
You see it every time you walk outside—that nagging little gap between the bottom of your stucco wall and the concrete slab or foundation. It might seem like a small cosmetic issue, but ignoring it is one of the biggest mistakes a homeowner can make. This seemingly minor crack is a superhighway for water, pests, and expensive problems right into the core of your home.
This isn’t just about looks; it’s about protecting your property’s structural integrity and value. That gap is a vulnerability, and sealing it is a critical piece of home maintenance. Fortunately, with the right knowledge and tools, it’s a problem you can solve.
You'll Learn About
Why Does This Gap Even Happen? Understanding the Root Causes
That space between your stucco and concrete didn’t just appear overnight. Several powerful forces are constantly at play, working to pull these two materials apart. Understanding them is the first step to a permanent fix.
Soil Settlement and Foundation Shifts
The most common culprit is the natural settling of your home. Over years, the soil beneath your foundation compacts and shifts, causing the entire structure to move slightly. This movement, even if it’s just a fraction of an inch, puts immense stress on the rigid stucco, causing it to separate from the concrete base.
Thermal Expansion and Contraction
Stucco and concrete are two different materials that react to temperature changes in different ways. On a hot day, both materials expand; on a cold night, they contract. The problem is they don’t do it at the same rate, which creates a constant push-and-pull effect that can eventually break the seal between them.
Improper Installation
Sometimes the problem dates back to the original construction. A critical component called a “weep screed”—a metal flashing at the bottom of the stucco—may have been installed incorrectly, or not at all. The weep screed is designed to allow moisture to escape from behind the stucco. An improper installation can lead to water buildup and the formation of gaps. This issue can be worsened by other construction flaws, such as applying stucco without proper sheathing, which compromises the entire wall system’s integrity.
Water Damage and Soil Erosion
Water is the ultimate enemy of your home’s exterior. If water gets behind the stucco through other cracks or poor flashing, it can slowly erode the soil directly beside your foundation. This creates a void, causing the concrete slab to settle and the gap to widen, starting a vicious cycle of damage.
Is This Gap a Serious Problem? (Spoiler: Yes)
It’s easy to dismiss a small gap, but the potential consequences are significant and costly. Here’s what you’re risking by not addressing the issue promptly.
The Silent Destroyer: Water Intrusion
That gap is a direct entry point for rainwater. Water seeping in can saturate the wooden sill plate and framing of your house, leading to wood rot, toxic mold growth, and a compromised structure. What starts as a simple crack can lead to thousands of dollars in repairs to your home’s foundation and walls.
An Open Invitation for Pests
To insects like ants, spiders, and termites, that gap is a wide-open front door. Rodents can also squeeze through surprisingly small openings to find shelter within your walls. Sealing this entry point is a crucial step in pest control and preventing infestations that can cause further damage.
Wasted Energy and Higher Bills
Air leakage is another hidden cost of this gap. In both winter and summer, conditioned air from inside your home can escape, while outside air infiltrates. This forces your heating and cooling systems to work overtime, leading to noticeably higher energy bills month after month.
Your Step-by-Step Guide to Sealing the Gap
For gaps up to about half an inch wide that don’t show signs of major structural failure, this is a manageable DIY project. Follow these steps carefully for a professional, long-lasting seal.
Step 1: Assess the Damage and Clean the Area
Your first job is to prepare the surface. Using a wire brush, small pry bar, and a shop vacuum, thoroughly clean out the gap. Remove all loose debris, old caulk, dirt, and weeds. The new sealant needs a clean, stable surface to adhere to properly.
Step 2: Choose the Right Sealant (This is Crucial!)
Do not just grab any tube of caulk. You need a high-performance, flexible sealant designed for exterior use on masonry. The best choice is a polyurethane-based or elastomeric sealant. These products are designed to remain flexible, adhering tightly to both the stucco and concrete while accommodating their natural movement.
Avoid cheap acrylic or latex caulks, as they will quickly dry out, crack, and fail in this application. Your choice of sealant will determine how long your repair lasts.
| Sealant Type | Flexibility | Durability | Best Use Case | Paintable? |
|---|---|---|---|---|
| Polyurethane | Excellent | Excellent | Ideal for stucco-to-concrete gaps and expansion joints. Highly water-resistant. | Yes |
| Elastomeric/Hybrid | Superior | Excellent | Handles significant movement and temperature changes. Great for larger gaps. | Yes |
| 100% Silicone | Very Good | Very Good | Highly waterproof, but cannot be painted and can be difficult to tool smoothly. | No |
| Acrylic/Latex | Poor | Poor | Not recommended for this application. Will crack and fail quickly. | Yes |
Step 3: The Right Tools for a Professional Finish
Gather your tools before you begin. You will need:
- A high-quality caulk gun
- Utility knife to cut the sealant tube
- Wire brush
- Backer rod (for gaps wider than 1/4 inch)
- A bucket of water and a sponge or rags
- Painter’s tape (optional, for cleaner lines)
Step 4: Applying the Sealant Like a Pro
If your gap is deeper or wider than 1/4 inch, start by inserting a foam backer rod. This flexible foam rope fills most of the void, saving you sealant and creating the ideal shape for the caulk joint. Push it into the gap so it sits about 1/4 to 1/2 inch below the surface.
Next, cut the nozzle of your sealant tube at a 45-degree angle, making the opening just slightly smaller than the gap you’re filling. Apply a steady, consistent bead of sealant into the gap, ensuring it makes solid contact with both the stucco and the concrete. Immediately after applying the sealant, tool the bead with a wetted finger or a caulk tool to press it firmly into the joint and create a smooth, concave finish.
When to Call a Professional Instead of DIY
A DIY repair is not always the right answer. Certain signs indicate a deeper problem that requires an expert evaluation from a structural engineer or foundation repair specialist.
Signs of Major Foundation Issues
Be on the lookout for red flags. These include gaps wider than a half-inch, cracks that are actively growing, stair-step cracks in brick or block foundations, or doors and windows inside your home that have begun to stick or no longer close properly. These are all signs of significant foundation movement that sealant alone cannot fix.
Widespread Stucco Damage
If you see large areas of crumbling, cracking, or discolored stucco, it suggests a widespread moisture problem behind the wall. Simply sealing the bottom gap would be like putting a bandage on a broken arm. A professional stucco contractor needs to identify and fix the source of the water intrusion first.
Prevention: How to Stop Gaps from Forming in the Future
Once you’ve sealed the gap, you need to address the underlying causes to prevent it from happening again. Effective prevention is all about controlling water.
Master Your Water Management
Ensure your gutters are clean and functioning properly. Your downspouts should discharge water at least 4-6 feet away from your foundation. The soil around your house should be graded to slope away from the walls, preventing water from pooling against the concrete.
Regular Inspections are Your Best Friend
At least twice a year, walk the perimeter of your home and inspect the area where the stucco meets the concrete. Catching and sealing a small hairline crack before it grows is much easier and cheaper than dealing with a major gap later on. The principles of proper sealing are universal, whether you’re fixing a foundation gap or learning how to fill a gap between a fence post and the house.
Mind the Landscaping
Avoid piling mulch or soil directly against the bottom of your stucco. Building codes often require several inches of clearance between the grade and the bottom of the wall cladding. This separation is crucial for allowing the wall to dry out and preventing moisture from wicking up into the stucco.
Addressing the gap between your stucco and concrete is a vital task for any homeowner. It protects your home from water damage, pests, and energy loss, preserving its value and structural health. A sealed home provides a stable, protected environment, which is the first step toward tackling other projects, like deciding how to mount a light on an uneven stone surface. By following these steps, you can confidently solve the problem and secure your investment for years to come.