Water Where Brick Meets Foundation? I Had That Nightmare. Here’s My Step-by-Step Diagnostic Plan.
That sinking feeling in your stomach when you see a dark stain or, worse, a trickle of water seeping in where your basement wall meets the floor is something I know all too well. My own discovery came after a three-day spring rain. I went into my garage to grab something and was hit by that damp, musty smell. There it was: a dark, wet line stretching a good ten feet along the concrete block foundation, right below where the brick siding began.
My first thought was a catastrophic crack in the foundation. I pictured excavators and a bill that would drain my savings. Before you go down that rabbit hole of panic, take a breath. I spent the next month obsessing over this problem, talking to old-timers, and methodically testing every variable. What I learned is that 90% of the time, the problem isn’t a single, expensive failure. It’s a combination of small, simple, and often cheap-to-fix water management issues outside your home.
This is my complete diagnostic guide—the one I wish I had when I was standing in that damp garage. We are going to be detectives, not demolition experts.
The Big Misconception: It’s Not a “Leak,” It’s a “Pathway”
First, let’s change our thinking. The internet is full of articles about “leaky foundations.” That word implies your foundation has a hole in it. While that can be true, it’s rare. What’s far more common is a relentless supply of water finding a pre-existing, non-critical pathway.
Think of your foundation like a coffee mug. The mug itself is waterproof. But if you pour a steady stream of water onto the rim for an hour, some of it is bound to find its way over the edge. Your foundation is the same. The joint where your concrete foundation wall meets the concrete floor slab (called the “cove joint”) isn’t a perfect, fused seal. It’s a seam. When thousands of gallons of rainwater are collected and aimed at that seam, the relentless “hydrostatic pressure” will eventually push a little water through.
Our job isn’t to perfectly seal a hundred feet of seams from the inside. Our job is to stop aiming the firehose at the wall in the first place.
The 4-Step Outdoor Inspection That Solves Almost Everything
Grab a notepad, your phone for pictures, and if you can do this during or right after a good rain, you’ll feel like a genius. We’re going to trace the journey of a single raindrop from the sky to your wall.
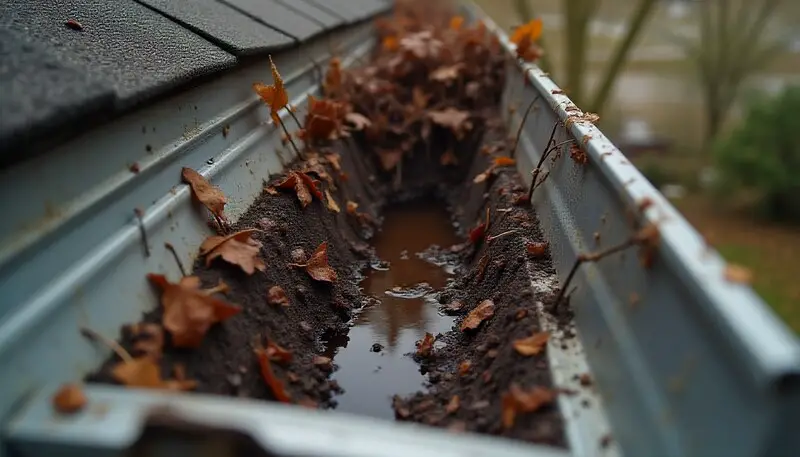
Step 1: The Gutter “Waterfall” Test
This is the number one culprit, and it was a big part of my problem. We tend to think of clogged gutters as a minor issue, but they are the equivalent of a broken dam next to your house.
My Experience: I have a big oak tree in my front yard. I’d ignored the gutters for a year, figuring a little overflow was no big deal. During a heavy rain, I stood outside and watched as a solid sheet of water poured over a 15-foot section of the gutter. It was like Niagara Falls in miniature. This sheet of water hammered the ground, creating a muddy trench in my flowerbed right against the foundation. All of that water was soaking the soil in the exact same area as my interior dampness.
- What to Look For:
- The Waterfall: During rain, is water sheeting over the edge of the gutter instead of flowing to the downspout?
- The Debris Dam: Look inside the gutter. Is it filled with black, gritty sludge from your shingles, leaves, or pine needles? This “shingle grit” is heavy, holds water like a sponge, and is often the main cause of the dam.
- The Trench: Look for a ditch or eroded line in your mulch or dirt directly below the gutter edge. This is the scar left by a long-term waterfall.
- The Fix: This is a free, if dirty, fix. Get a ladder, gloves, and a bucket. Scoop out the debris. Then, take a garden hose up with you and run water down the gutter to ensure it flows freely out the downspout.
- Pro Tip: If you have large trees, consider installing simple mesh gutter guards. They aren’t perfect, but they prevent the large-scale clogs that cause these waterfalls.
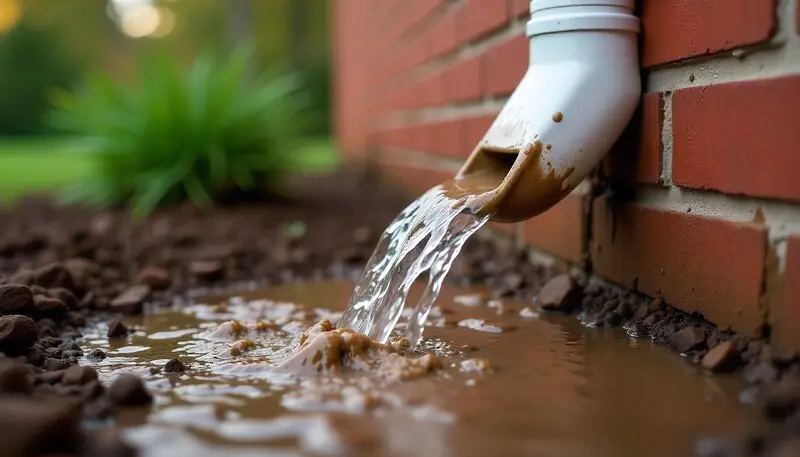
Step 2: The “Splash Zone” Investigation
This is the detail that most articles completely miss. They say “extend your downspouts,” but they don’t explain the insidious physics of the problem. When water from a short downspout hits the ground, it doesn’t just soak in. It hits with force, creating a “Splash Zone.”
Thousands of tiny droplets bombard the bottom 12-18 inches of your brick wall. Brick is porous, like a sponge. When it gets relentlessly machine-gunned with water, it becomes saturated. That water soaks through the brick, hits the sheathing behind it, and runs down to the base of the wall—right where your leak is.
My Experience: My worst leak was in a corner of my garage. I finally realized that my sump pump discharge pipe and a downspout were both dumping water in that exact same corner, less than a foot from the wall. The brick was visibly darker and greener with algae in that spot. I was effectively pressure-washing my own foundation for hours after every storm.
- What to Look For:
- The Crater: Look at the dirt or mulch right below a downspout. Do you see a clean-washed, crater-like effect? That’s a high-velocity impact zone.
- The Clean Brick: Is the brick itself darker, or ironically, cleaner in that area from the constant splashing?
- Misplaced Sprinklers: Check your irrigation system. Is a sprinkler head pounding the same spot on your wall every morning?
- The Fix: This is the easiest and most impactful fix. Buy simple, cheap downspout extenders (either the flexible black plastic kind or a concrete splash block) and ensure water is discharged at least 4-6 feet away from the house. For my sump pump, I installed a longer PVC pipe to carry the water out into the yard.
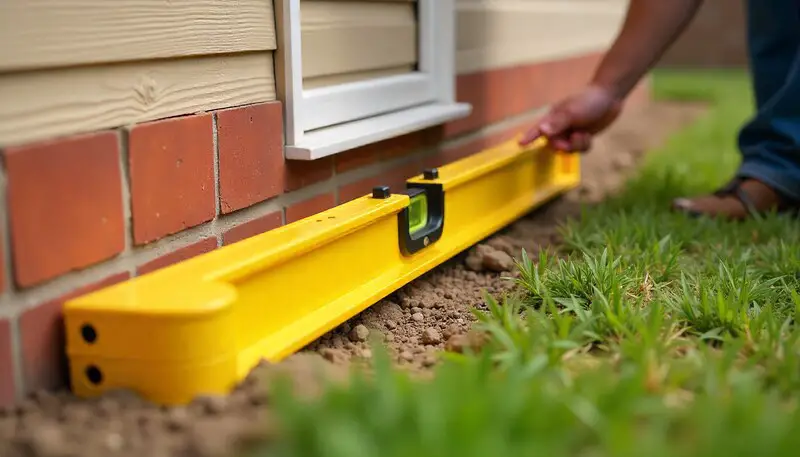
Step 3: The “Island vs. Moat” Grading Test
Think of your house as an island. You want water to flow away from it on all sides. Over years, the soil around your foundation settles, creating a subtle but dangerous “Moat.” This moat collects all the water from your gutters and splash zones and holds it against the foundation wall like a filled bathtub.
- What to Look For: After a rain, are there visible puddles sitting right against your foundation? That’s a moat.
- The Definitive Test: Place a 4-foot level on the ground with one end touching your foundation. Lift the other end until the bubble is centered. Is there a gap of at least 2 inches under the raised end? This means you have a slope of about 4%. If not, your grading is flat or negative.
- The Fix: This is a perfect weekend project. Buy bags of heavy, clay-based topsoil (not light mulch or potting soil, as water flows right through it). Pack this soil against the foundation and grade it out, creating a gentle, visible slope away from the house for at least 4-5 feet. It doesn’t have to be pretty, it just has to be sloped.
My Experience: I spent a single Saturday afternoon and about $40 on bags of soil to fix the grade around the front of my house. It felt like such an insignificant change, but the next time it rained, I could actually see the water flowing away from the house instead of pooling against it.
Step 4: The Weep Hole “Breathing” Check
Brick veneer is a siding, not a waterproof barrier. It’s designed to get wet. Behind it, there’s an air gap and a waterproof membrane against your home’s actual structure. At the very bottom of the brick wall, there should be tiny gaps in the vertical mortar joints every 2-3 feet. These are “Weep Holes.” They are not a mistake. They are the wall’s breathing system. They are designed to let the moisture that gets behind the brick out.
My Experience: A neighbor of mine was meticulously sealing every crack on his house. He saw these “holes” and neatly filled every single one with caulk. A year later, he had a massive mold problem inside his wall. He had suffocated his wall, trapping all the natural moisture inside. More commonly, mulch and soil get piled up over the years and completely block these holes.
- What to Look For: Walk the perimeter of your house. Can you see your weep holes? They should be completely clear of soil, mulch, paint, and caulk.
- The Fix: Use a trowel to gently dig out the area around your weep holes. If they’re clogged with debris, use a thin piece of flexible wire or a zip tie to gently probe the hole and clear it out.
Flashing Where Siding Meets Concrete
Diagnostic Summary Table: Connecting the Clue to the Cause
Use this table to make sense of what you’re seeing. Find your primary symptom in the left column to get the most likely cause and your first action.
| Symptom You See (The Clue) | Where to Look First (The Location) | Most Likely Cause (The Diagnosis) | Your First Action (The Prescription) |
| A long, consistent damp line along the wall after rain. | Look up at the gutter directly above the damp area. | The Gutter Waterfall Effect: A clogged gutter is overloading the entire area. | Clean the gutters thoroughly. |
| Water is visible in only one specific spot, often a corner. | Look at the downspout or any discharge pipes in that corner. | The Splash Zone: Concentrated water is saturating one spot. | Add extenders to move water 6+ feet away. |
| The entire basement perimeter feels damp after heavy, prolonged rain. | Look at the soil and landscaping all around the house. | The Moat: Poor grading is trapping water against the foundation everywhere. | Check grading with a level and add soil to create a slope. |
| A musty, damp smell, but very little visible water. | Check the very bottom course of bricks outside. | Blocked Breathing: Your weep holes are likely clogged with soil or debris. | Gently excavate and clear all weep holes. |
| Water is coming up through cracks in the middle of the floor. | The floor itself, away from the walls. | Hydrostatic Pressure: Groundwater is being pushed up from below. | This is not an outdoor issue. Call a pro. |
| Water is actively flowing through a visible crack in the foundation. | The crack itself. | A True Leak/Pathway: The crack is the primary pathway for water. | Call a foundation specialist for crack injection. |
When to Stop and Call a Professional
I am a DIYer, not a structural engineer. My goal is to empower you to solve the 90% of problems that are simple. Trust is built on knowing your limits. If you have done all four of these outdoor checks and you still have water coming in, it is time to call a professional.
You MUST call a reputable foundation waterproofing company if:
- You see significant cracks: Look for horizontal cracks in the concrete foundation, “stair-step” cracks in the mortar, or any crack wider than a quarter-inch.
- The wall is bowing: If you look down the length of the wall and it appears to be leaning or bowing inward, this is a sign of serious pressure that requires an expert.
- The issue is hydrostatic pressure: If your diagnostic table suggests water is coming from below (up through floor cracks), the outdoor fixes won’t solve it. You likely need an interior solution like a sump pump or an interior drainage system.
When you make that call, you are now in a position of power. You can confidently say, “I have cleaned my gutters, extended my downspouts, checked my grading, and cleared my weep holes, and I am still getting water.” This saves time and shows the contractor you are a serious, informed homeowner.
I hope this guide has turned your panic into a plan. By methodically managing the water on the outside, you can almost always solve the frustrating problem on the inside.