Varivalve Quick Vent Leaking? Stop the Hiss and Drip Now!
That persistent hissing, spitting, and dripping sound from your radiator isn’t just an annoyance; it’s a sign that your heating system needs attention. If you have a one-pipe steam system, the culprit is often a malfunctioning Varivalve quick vent. This small but crucial component is designed to let air out and keep steam in, but when it fails, you get puddles on the floor and an inefficiently heated room.
Ignoring a leaking Varivalve quick vent can lead to water damage, higher energy bills, and uneven heating throughout your home. Fortunately, addressing the problem is often a straightforward process that you can tackle yourself. This guide will walk you through diagnosing the cause and implementing the right solution to restore peace, quiet, and warmth to your home.
You'll Learn About
Understanding Your Steam Radiator and the Varivalve’s Role
To fix the problem, it helps to understand the process. In a one-pipe steam system, the boiler heats water to create steam. This steam travels up through the pipes to your radiators, pushing out the cold air that settled inside when the system was off.
The Varivalve, or air vent, is the gatekeeper in this process. Its job is to stay open to allow the cold air to escape, making way for the hot steam. Once the radiator fills with steam, the heat causes the vent to close, trapping the steam inside so it can release its heat and warm your room. As the steam cools and condenses back into water, it flows back down the same pipe to the boiler to be reheated, and the cycle begins again.
Why Your Varivalve Is Leaking: Uncovering the Root Cause
A leaking Varivalve is rarely a random occurrence. It’s a symptom of an underlying issue within your heating system. Simply replacing the vent might offer a temporary fix, but the problem will likely return if the core issue isn’t addressed. Let’s explore the most common culprits behind that frustrating drip.
Culprit #1: Clogged Vent from Debris and Sediment
Over time, the inside of your pipes and boiler can corrode, creating rust and mineral scale. These tiny particles get carried along with the steam and can easily clog the small opening of your Varivalve. When the vent’s internal float mechanism is jammed with gunk, it can’t close properly, allowing hot water and steam to spit out.
This is often the most common reason for a leaking vent. You might notice the water sputtering out is discolored, which is a clear sign of sediment buildup in the system.
Culprit #2: Excessive Boiler Pressure
Your residential steam heating system is designed to operate under very low pressure, typically between 0.5 and 2 PSI (pounds per square inch). If the boiler pressure is set too high, it can force water and “wet steam” all the way up to your radiators and out through the vents, no matter how new or clean they are.
High pressure is not only inefficient but can also be dangerous and cause loud banging noises in your pipes, known as water hammer. Check your boiler’s pressure gauge (the “pressuretrol”) to ensure it’s within the safe and effective range for your home.
Culprit #3: Improper Radiator Pitch
For the condensed water (condensate) to properly drain back to the boiler, your radiator must have a slight, almost imperceptible tilt back toward the supply pipe. If the radiator is perfectly level or, worse, tilted toward the air vent, water will pool at the bottom.
When the next heating cycle starts, the incoming steam will violently push this pooled water out of the nearest exit—your Varivalve vent. This is a frequent issue in older homes where floors have settled over time.
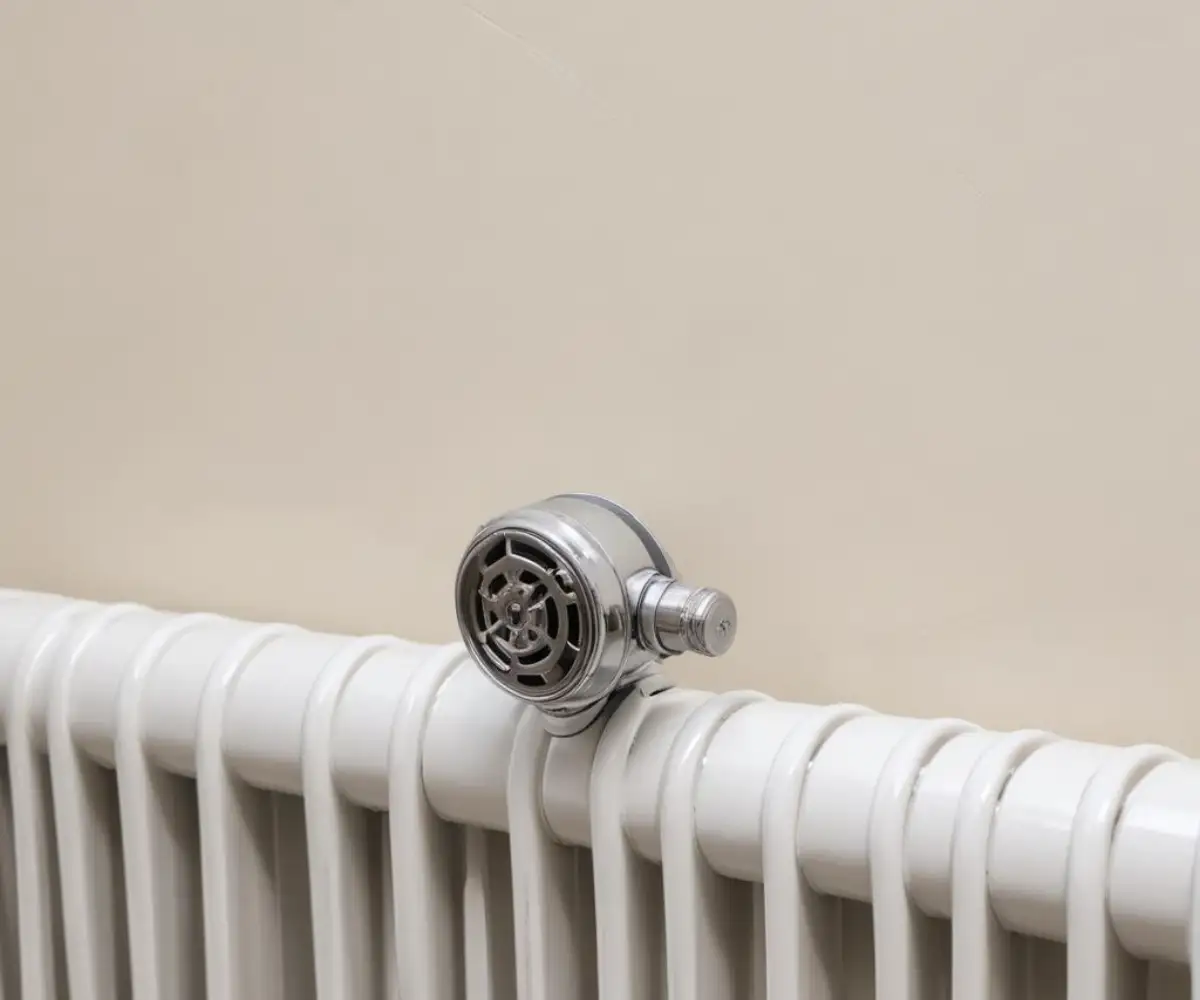
Culprit #4: A Worn-Out or Faulty Valve
Like any mechanical part, a Varivalve can simply wear out over time. The internal components, such as the float and needle valve, can degrade or break, preventing the vent from sealing shut when steam enters the radiator. If you’ve ruled out other causes, the vent itself may have reached the end of its service life.
Even a seemingly minor component failure can have a big impact. It reminds weight capacity of a thumbtack—small things can bear significant responsibility within a larger system.
Your Step-by-Step Guide to Fixing the Leak
Now that you understand the potential causes, it’s time to roll up your sleeves and fix the leak. Follow these steps methodically to diagnose and resolve the issue safely and effectively.
Step 1: Safety First! Let the System Cool Down
Never work on a steam heating system while it is hot. Steam can cause severe burns in an instant. Turn down your thermostat to ensure the boiler does not cycle on, and wait until the radiator and its components are completely cool to the touch before proceeding with any repairs.
Step 2: Check the Radiator’s Pitch
This is a quick and easy check. Place a level on top of the radiator. There should be a slight downward slope from the side with the vent towards the side with the main pipe. If it’s level or pitched the wrong way, you’ll need to correct it.
Slide thin shims (wood or plastic) under the feet on the vent side of the radiator to gently raise it until the level shows the correct pitch. This simple adjustment ensures condensate drains properly and can instantly solve the spitting problem.
Step 3: Clean the Varivalve Vent
If you suspect a clog is the issue, cleaning the vent is your next move. Using a wrench, carefully unscrew the Varivalve from the radiator by turning it counter-clockwise. Be gentle to avoid damaging the threads.
Submerge the vent in a bowl of white vinegar for about 30 to 60 minutes. The acetic acid will help dissolve mineral deposits and rust. Afterward, rinse it thoroughly with water and gently shake it to remove any loosened debris. You should be able to blow air through it freely before reinstalling.
Step 4: Inspect and Replace the Varivalve
If cleaning doesn’t solve the problem, or if the vent is visibly damaged or old, replacement is the best option. New Varivalves are readily available at most hardware and plumbing supply stores.
Before installing the new vent, wrap the threads with a few layers of Teflon tape in a clockwise direction. This ensures a tight seal. Screw the new valve in by hand until it’s snug, then give it a final quarter-turn with a wrench. Do not overtighten, as this can damage the threads on the radiator.
Step 5: Check Your Boiler Pressure
Locate the pressure gauge on your boiler. For most residential steam systems, the operating pressure should be very low, ideally below 2 PSI. If the gauge is reading significantly higher, the pressuretrol needs adjustment.
Adjusting boiler pressure can be a more advanced task. If you’re not comfortable doing this yourself, it’s best to call a qualified HVAC technician. They can ensure the system is running safely and efficiently.
Troubleshooting Your Leaking Varivalve: A Quick Guide
Use this table to quickly identify the problem and find the corresponding solution. It simplifies the diagnostic process and points you in the right direction for a lasting fix.
| Symptom | Likely Cause | Solution |
|---|---|---|
| Vent spits discolored water and hisses constantly. | Debris and sediment buildup clogging the vent. | Remove and clean the vent in vinegar. If still leaking, replace it. |
| Multiple radiator vents are leaking, and there’s loud pipe banging. | Boiler pressure is too high (above 2 PSI). | Check the pressure gauge on the boiler. Adjust the pressuretrol or call an HVAC professional. |
| Vent leaks water primarily when the heat first comes on. | Improper radiator pitch, causing water to pool. | Use a level to check the pitch. Add shims under the radiator feet on the vent side to create a slight tilt toward the pipe. |
| A new or recently cleaned vent continues to leak. | The vent is faulty or has worn out internal parts. | Replace the Varivalve with a new, high-quality vent. |
| System is noisy and heating is uneven across the house. | Unbalanced system; some vents may be too fast or too slow. | Use the adjustable feature on the Varivalve to balance the system. Slow down vents on radiators that heat too quickly and speed up those on radiators that are slow to heat. |
Preventing Future Leaks: Proactive Maintenance Tips
Once you’ve stopped the leak, a little proactive maintenance can prevent it from happening again. Keeping your steam heating system in top shape ensures reliability and efficiency for years to come.
Annual Boiler Maintenance
Schedule a professional service for your boiler at least once a year, preferably before the heating season begins. A technician will clean the internal components, check pressure settings, and ensure the low-water cutoff is functioning correctly. This maintenance helps reduce the amount of rust and sediment circulating in your system.
Proper home maintenance extends beyond your heating system. For instance, knowing how to move doorbell wiring is a useful skill for any homeowner undertaking renovations or repairs.
Regularly Flush Your Boiler
Draining some water from your boiler periodically (a process called “blowing down”) helps remove the sludge and sediment that accumulates at the bottom. This prevents that debris from being stirred up and sent to your radiators. Follow your boiler manufacturer’s instructions for frequency and procedure.
Keeping your home in good repair often involves a variety of tasks. While focused on your radiator, you might notice the surrounding area needs attention. For example, if you have wood floors, you might wonder can you use restor a finish on wood floors to address any water spots or scuffs.
Listen to Your System
Pay attention to the sounds your heating system makes. A quiet, gentle hiss as air escapes the vents is normal. However, loud clanging, persistent hissing, or gurgling sounds are all indicators that something is amiss. Catching these issues early can prevent a small problem from turning into a major repair.
Conclusion: Taking Control of Your Home’s Comfort
A leaking Varivalve quick vent is more than just a minor drip; it’s a signal from your heating system that it needs attention. By systematically checking for the common culprits—clogs, high pressure, improper pitch, and component failure—you can diagnose the issue with confidence. With the right knowledge and a few simple tools, you can perform the repair yourself, saving time and money while ensuring your home remains a warm and comfortable sanctuary.
Don’t let a small leak disrupt your peace and quiet. Addressing the problem head-on not only solves the immediate issue but also contributes to the overall health and efficiency of your steam heating system. Enjoy the satisfying silence of a well-maintained radiator and the consistent warmth it provides all winter long.