Temporary Shower During Renovation? Don’t Sweat It!
Embarking on a bathroom renovation is exciting. But as the dust settles on day one, a daunting reality hits: you have no shower. Suddenly, daily hygiene becomes a logistical nightmare.
This common oversight can turn a dream project into a stressful ordeal. The thought of days or weeks without a proper wash is enough to make anyone anxious. But don’t panic—there are practical and accessible solutions.
You'll Learn About
Why a Temporary Shower Isn’t a Luxury, It’s a Necessity
Going without a shower for an extended period is more than just an inconvenience. It disrupts routines, adds stress to your family, and makes your home feel less like a sanctuary and more like a campsite. Relying on gyms or neighbors is a short-term fix that quickly becomes tiresome.
Having a dedicated temporary shower at home maintains a sense of normalcy and comfort. It’s a crucial element for surviving a renovation with your sanity intact, allowing you to focus on the project without sacrificing basic comforts.
Top Temporary Shower Solutions for Your Renovation
When your main bathroom is out of commission, you have several viable options to stay clean. These range from simple DIY setups to full-service rentals, each with its own benefits and considerations.
The DIY Champion: Build Your Own Temporary Shower
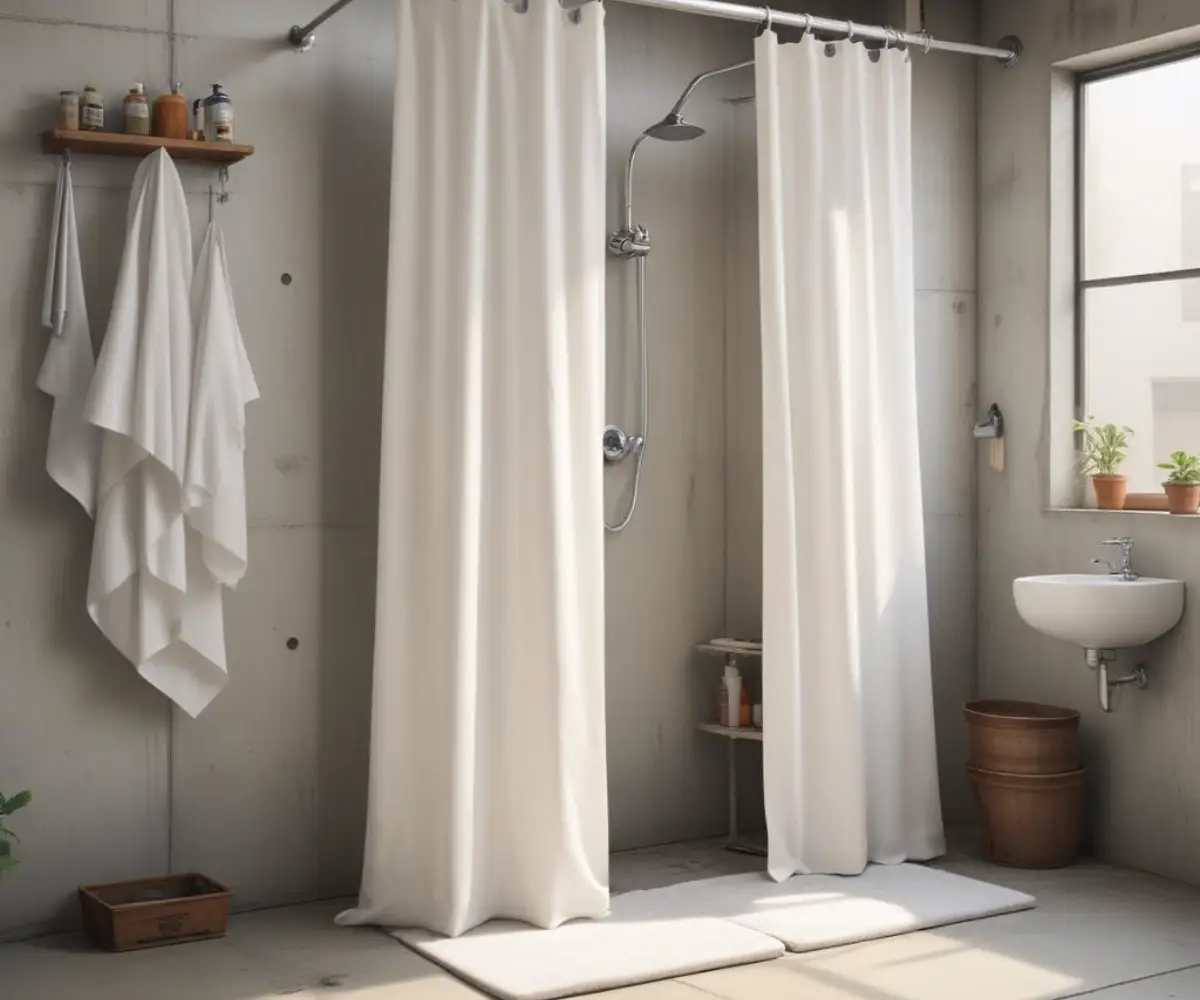
For the handy homeowner, creating a makeshift shower is a cost-effective and popular option. This approach offers maximum flexibility, allowing you to set up a functional washing station in a basement, garage, or even a laundry room. The core components are simple: a base to catch water, a curtain for privacy, and a connection to a water source.
Many DIYers connect a handheld shower head to a utility sink faucet or washing machine hookup. For drainage, a large storage tote or a custom-built basin directed towards a floor drain works well. While it requires some effort, the result is a surprisingly effective solution that costs very little.
The All-in-One: Renting a Portable Shower Unit
If DIY isn’t your style, renting a portable shower is a hassle-free alternative. These self-contained units are delivered to your home and professionally installed, often in a discreet location like a backyard or driveway. They provide a complete, private, and comfortable shower experience.
Rental units typically come with hot and cold running water, lockable doors, and proper drainage. Some even include changing areas and sinks. While it’s a more expensive option, the convenience and comfort it offers can be well worth the investment, especially for longer renovation projects.
The Convenient Camper: Using an Outdoor or Camping Shower
Portable camping showers offer a quick and easy solution. These lightweight systems often consist of a water bag or a small, battery-powered pump that draws water from a bucket. They are incredibly versatile and can be set up almost anywhere.
For hot water, some models use propane heaters to provide an on-demand warm shower. This option is perfect for short-term needs and can be paired with a pop-up privacy tent. It strikes a great balance between the full DIY approach and a professional rental.
Comparison of Temporary Shower Options
Choosing the right temporary shower depends on your budget, the duration of your renovation, and your comfort level with DIY projects. Here’s a breakdown of the most common solutions to help you decide.
| Shower Solution | Average Cost | Pros | Cons |
|---|---|---|---|
| DIY Basement/Garage Shower | $50 – $200 | Highly cost-effective; Utilizes existing plumbing and drains; Customizable setup. | Requires manual setup and teardown; Potential for water spillage if not built carefully. |
| Portable Shower Unit Rental | $1,000 – $4,500 (Varies by duration) | Completely hassle-free; Professional setup; Includes hot water and privacy. | Most expensive option; Requires outdoor space for placement. |
| Camping Shower with Privacy Tent | $100 – $300 | Very flexible and portable; Can be set up indoors or outdoors; Some models include water heaters. | Limited water capacity; May feel less stable or private than other options. |
| Gym or Community Center | $20 – $60/month (Membership) | No setup required; Access to full locker room facilities. | Inconvenient travel required; Limited by facility hours. |
Step-by-Step Guide: Setting Up a DIY Temporary Shower
A DIY temporary shower is a practical and budget-friendly way to get through your renovation. With a few basic materials and a bit of planning, you can create a functional space in your basement or garage.
Step 1: Choose Your Location
Select a spot that is close to both a water source and a floor drain. A basement or laundry room is often ideal because they are typically unfinished and designed to handle moisture. Ensure the area has adequate space for a small enclosure.
Step 2: Gather Your Materials
You will need a base to stand in and collect water, such as a large plastic storage bin, a kiddie pool, or a pre-fabricated shower pan. You’ll also need PVC pipes or wood for the frame, shower curtains for walls, a handheld shower sprayer, and an adapter to connect it to a sink or laundry hookup.
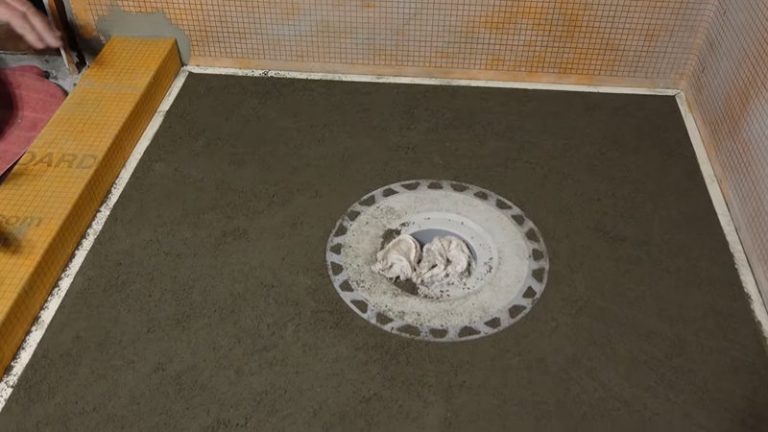
Step 3: Set Up the Base and Drainage
Place your chosen base directly over or next to the floor drain. If using a bin or pool, you may need to drill a hole and attach a hose to direct water into the drain. Creating a slight slope under the base can help ensure all water flows out properly.
Step 4: Create the Enclosure
Construct a simple frame around the base using PVC pipes or 2x4s. This frame will support the shower curtains. Hang two or three curtains to create a fully enclosed space for privacy and to prevent water from splashing out.
Step 5: Connect the Water Supply
Attach your handheld shower sprayer to a nearby utility sink faucet or use a Y-adapter to connect to the hot and cold water lines for your washing machine. This gives you easy control over the water temperature. Secure the showerhead to the frame at a comfortable height.
Pro Tips for a Hassle-Free Temporary Shower Experience
Once your temporary shower is set up, a few extra touches can make the experience much more comfortable and safe. Paying attention to these details helps prevent common issues like mold, lack of hot water, or privacy concerns.
Ensure Proper Ventilation
Moisture is inevitable, so good airflow is critical. Use a small fan to circulate air and help the area dry out between uses. This is especially important in a basement to prevent musty odors and mold growth. Good ventilation can also help you stop smoke from going upstairs if you’re dealing with dust and fumes from other parts of your renovation.
Plan for Hot Water
If you’ve connected your shower to a sink, you’ll have hot water readily available. However, if you are using a camping-style shower, you may need a portable, on-demand water heater. These devices often use propane to heat water instantly as it flows through the unit, providing a continuous supply of hot water.
Think About Privacy and Comfort
Even a temporary setup should feel private and secure. Ensure your shower curtains overlap and are weighted at the bottom to stay in place. Place a non-slip mat inside the shower base and a bath mat on the floor outside to prevent slips. This same attention to detail applies to other temporary solutions, such as finding a great renter friendly shower door when you can’t make permanent changes.
Keep it Clean and Mold-Free
Regularly clean your temporary shower to keep it hygienic. Wipe down the curtains and base to prevent soap scum buildup. A weekly spray with a bleach solution can also keep mold and mildew at bay, similar to how you might use an ant proof sealant to protect your home from pests.
Conclusion: Survive and Thrive During Your Renovation
A bathroom renovation doesn’t have to mean sacrificing your daily shower. With a bit of planning, a temporary shower during renovation is a perfectly manageable solution. Whether you opt for a DIY setup, a portable rental, or a camping shower, having a plan for personal hygiene will dramatically reduce stress.
By addressing this essential need, you can navigate your home improvement project with comfort and ease. Your temporary shower will bridge the gap, ensuring you stay clean and comfortable until your beautiful new bathroom is ready to enjoy.
Great breakdown of temporary shower options during a remodel — super helpful! I went through a bathroom renovation last year and didn’t realize how much I’d miss having a real shower until I was stuck using a bucket and hose for a week. For anyone in Arizona looking for something more convenient, I recently came across a local solution that rents out portable shower units: shower-rental.com/arizona/avondale/. It ended up saving me a lot of hassle. Definitely worth checking out if you want to stay comfortable during the renovation.
Thanks again for the tips — bookmarking this for my next project!
It sounds like you had quite the experience with your bathroom renovation! We totally get how inconvenient it can be to go without a real shower for even a short period of time. Thanks so much for sharing the portable shower rental resource — that’s a great find, especially for anyone in Arizona! It’s always good to have options that make a project less stressful.