Swamp Cooler Squirrel Cage Replacement [Causes, Step by Step Guide, Symptoms]
An evaporative swamp cooler, also known as a “swamp cooler,” is a type of air conditioning system that uses the natural process of evaporation to cool the air. It consists of a few key components, including a water pump, a water pad or cooling pad, a motor, and a squirrel cage.
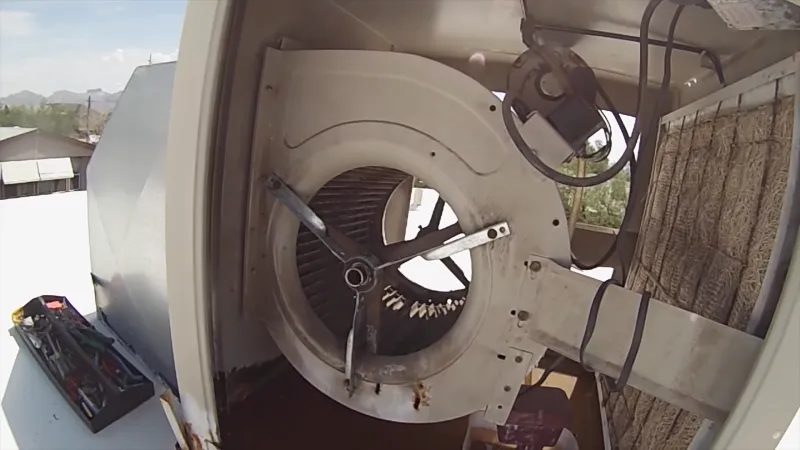
The squirrel cage, also known as a blower or impeller, is responsible for circulating the cooled air throughout the room or space being cooled. It is an important part of the cooling process and, like any other mechanical component, it can wear out over time and may need to be replaced.
In this article, we will discuss the process of replacing a squirrel cage in an evaporative swamp cooler.
You'll Learn About
Causes of Swamp Cooler Squirrel Cage Replacement
Wear and Tear
Over time, the squirrel cage of a swamp cooler can become worn down or damaged due to regular use. This can result in the need for replacement.
Corrosion
Exposure to moisture, humidity, or other corrosive elements can cause the squirrel cage to rust or degrade over time, leading to the need for replacement.
Bent or Damaged Blades
If the blades of the squirrel cage are bent or damaged due to a collision with an object or other impact, they will need to be replaced.
Motor Failure
The motor that drives the squirrel cage is an important component of the swamp cooler, and if it fails, the entire squirrel cage may need to be replaced.
Age
Like all mechanical systems, swamp coolers will eventually wear out over time and need to be replaced, including the squirrel cage.
Symptoms of a Faulty Squirrel Cage
There are several symptoms that may indicate that your swamp cooler’s squirrel cage needs to be replaced.
Decrease in Airflow
One of the most common signs is a decrease in airflow. If you notice that your swamp cooler is not blowing as much air as it used to, or if the air is not as cool, it could be a sign that the squirrel cage is not functioning properly.
Strange Noises
Another symptom to look out for is strange noises coming from the cooler. If you hear grinding, squealing, or other unusual noises coming from the cooler, it could be a sign that the squirrel cage is damaged or worn out.
Struggling to Run
If you notice that the motor is struggling to run or is not turning on at all, it could be a sign of a problem with the squirrel cage or another component. If you notice any of these symptoms, it is important to have your swamp cooler inspected and repaired as needed.
Tools and Materials Needed for Replacement
To replace the squirrel cage in your swamp cooler, you will need a few basic tools and materials. The most important item you will need is a replacement squirrel cage. This can typically be purchased from the manufacturer or from a supplier of swamp cooler parts.
You will also need a screwdriver or drill to loosen and remove any mounting screws or bolts. A wrench or pliers may also be useful for loosening any tight fittings. Finally, you may want to have some rags or a shop towel on hand to clean up any excess water or debris that may accumulate during the repair process.
With these tools and materials, you should be well equipped to replace the squirrel cage in your swamp cooler.
Step-by-step Guide for Replacing the Squirrel Cage
To replace the squirrel cage in your swamp cooler, follow these steps:
Turn Off the Power to the Cooler
This is an important safety measure that will prevent the motor from starting up while you are working on it.
Remove the Motor From the Cooler
This is typically done by loosening the mounting bolts and lifting the motor off the cooler. Once the motor is removed, you should be able to access the squirrel cage. Carefully remove the old squirrel cage, taking note of how it is attached and any other components that may need to be removed.
Install the New Squirrel Cage
Install the new squirrel cage, making sure it is aligned properly and reattaching any components that were removed.
Reattach the Motor
Reattach the motor and turn the power back on to the cooler.
It is important to follow these steps carefully to ensure that the replacement is done properly and that the cooler will operate correctly. If you are unsure about how to replace the squirrel cage, it may be best to consult with a professional or refer to the manufacturer’s instructions.
Tips for Maintaining Your Swamp Cooler
Proper maintenance is important for keeping your swamp cooler running efficiently and prolonging its lifespan. Here are some tips for maintaining your swamp cooler:
- Clean the cooler regularly. Dirt and debris can accumulate on the water pads and other parts of the cooler, which can reduce its efficiency and cause it to wear out more quickly. Regular cleaning will help prevent this build-up and keep your cooler running smoothly.
- Inspect and replace worn or damaged parts as needed. Over time, certain parts of the cooler, such as the squirrel cage, may wear out or become damaged. It is important to replace these parts as needed to ensure that the cooler is functioning properly.
- Follow the manufacturer’s instructions for maintenance and repair. Each swamp cooler model is different, so it is important to follow the specific instructions provided by the manufacturer for maintaining and repairing your specific model.
By following these tips, you can help ensure that your swamp cooler is operating at its best and will continue to provide reliable cooling for many years to come.
Step-by-step Guide to Fix a Rusty Hole in a Swamp Cooler
Materials Needed:
- Roofing cement or tar
- Evaporative cooler spray
- Paint brush or roller
- Clean cloth
Step 1: Clean the Area
Remove any loose rust or debris from the hole and surrounding area. Wipe the surface clean with a cloth to ensure it is free of dust or debris.
Step 2: Apply Roofing Cement or Tar
Using a paintbrush or roller, apply a generous amount of roofing cement or tar over the hole and surrounding area. Ensure that the entire surface is covered.
Step 3: Allow to Dry
Allow the roofing cement or tar to dry completely. This may take several hours, depending on the weather and humidity levels.
Step 4: Apply Evaporative Cooler Spray
Once the roofing cement or tar has dried, apply a thin coat of evaporative cooler spray over the entire surface of the pan. This will create a barrier to prevent moisture from seeping into the hole.
Step 5: Apply Second Coat of Sealant
Once the first coat of evaporative cooler spray has dried, apply a second coat to ensure complete coverage. This will provide added protection against future rust and corrosion.
Step 6: Allow to Dry
Allow the final coat of evaporative cooler spray to dry completely. Once dry, your swamp cooler is ready to use.
By following these simple steps, you can effectively patch a rusty hole in a swamp cooler pan. Regular maintenance and cleaning of your swamp cooler will also help prevent future rust and corrosion.
Also Read – What Is The Difference Between Bus Duct And Busbar
Conclusion
Replacing the squirrel cage in your swamp cooler is an important part of maintaining its efficiency and prolonging its lifespan. By following the steps outlined in this guide, you can replace the squirrel cage yourself or hire a professional to do the job.
It is important to remember to turn off the power to the cooler, remove the motor, carefully remove the old squirrel cage, install the new one, reattach any components that were removed, and reattach the motor before turning the power back on.
By following these steps and practicing proper maintenance, you can help ensure that your swamp cooler continues to provide reliable cooling for many years to come.