Should Tile Run the Same Direction as Hardwood? The Ultimate Guide
You’re standing at the threshold of a flooring project, a common yet critical decision looming before you: should tile run the same direction as hardwood? This single choice can dramatically alter the perception of your space, influencing everything from visual flow to the feeling of spaciousness. Get it wrong, and your home can feel disjointed and chaotic. Get it right, and you create a seamless, harmonious environment that elevates your entire home’s aesthetic.
The problem isn’t just about aesthetics; it’s about creating a cohesive design language throughout your home. When flooring materials change from room to room, the direction they are laid becomes a powerful tool to either unite or divide the spaces. Many homeowners fall into the trap of treating each room as an island, leading to a choppy and visually jarring experience.
You'll Learn About
The Great Flooring Debate: To Align or Not to Align?
The core of the issue lies in a fundamental design principle: creating a sense of visual continuity. When you transition from a room with hardwood floors to an area with tile, such as a kitchen or bathroom, the direction of the flooring planks or tiles sends a subconscious message. Aligning the direction of both materials can create a powerful sense of flow, guiding the eye smoothly from one space to the next and making the entire area feel larger and more unified.
Conversely, changing the direction can act as a visual stop sign. While sometimes intentional to define separate zones in an open-concept home, an arbitrary change can feel accidental and disruptive. The goal is to make your design choices look deliberate and well-considered, enhancing the overall architecture of your home rather than fighting against it.
Understanding the Psychology of Direction
The direction you lay your flooring has a subtle but significant psychological impact. Planks or tiles that run parallel to the longest wall of a room tend to make the space feel longer and more expansive. This is a classic designer’s trick to enhance the perception of size. When this principle is applied across multiple rooms with different flooring materials, it creates a powerful, unifying effect that makes a home feel more grand and thoughtfully designed.
Think of the lines in your flooring as arrows guiding movement and attention. A consistent direction creates a clear path, promoting a feeling of order and calm. In contrast, conflicting directions can create a subtle sense of unease or confusion, as the eye is pulled in multiple directions at once. This is particularly crucial in open-concept living spaces where the transition between materials is highly visible.
Key Factors to Consider Before Making a Decision
Before you commit to a flooring direction, several critical factors must be weighed. Each of these elements plays a role in determining the most effective and visually pleasing layout for your unique space. A hasty decision here can lead to long-term regret, so careful consideration is paramount.
From the overall layout of your home to the specific characteristics of each room, a holistic approach is necessary. Don’t just think about the two rooms where the materials meet; consider the entire floor plan and how the flooring direction will impact the home’s overall narrative. A successful flooring plan tells a cohesive story from the moment you walk through the door.
1. The Layout of Your Home: Open vs. Closed Floor Plans
In an open-concept home, consistency is king. The seamless flow between the kitchen, dining, and living areas is a hallmark of this design style. Therefore, running your tile in the same direction as your hardwood is almost always the best choice. This continuity enhances the sense of space and reinforces the open, airy feel that makes these layouts so popular.
For homes with more traditional, closed floor plans, you have a bit more flexibility. Since doorways create natural transitions and visual breaks, changing flooring direction between rooms can be less jarring. However, maintaining a consistent direction, especially in a main hallway that connects multiple rooms, can still contribute to a more cohesive feel throughout the house.
2. The “Longest Wall” and “Main Light Source” Rules
Two foundational principles in flooring installation can guide your decision. The first is to run the flooring parallel to the longest wall of the space. This technique visually elongates the room, making it appear larger. The second is to lay the flooring in the same direction as the main light source, such as a large window or glass door. This can help to hide seams and imperfections while accentuating the texture and finish of the flooring material.
When transitioning between hardwood and tile, try to apply these principles consistently. If your hardwood runs parallel to the longest wall in your living room, continue that direction with the tile in the adjoining kitchen. This creates a logical and visually pleasing continuity that feels intentional and professionally designed.
3. The Shape and Size of the Adjoining Rooms
Consider the dimensions of the rooms you are connecting. If you are transitioning from a large living room with hardwood to a smaller, narrower kitchen with tile, maintaining the same direction can help the kitchen feel more spacious. Laying the tile perpendicular to the hardwood in this scenario could make the kitchen feel even more cramped and cut-off from the main living area.
In cases where both rooms are of a similar size and shape, the decision may be less critical. However, defaulting to a consistent direction is often the safest and most effective choice for creating a harmonious look. When in doubt, err on the side of continuity.
The Verdict: When Should Tile Run the Same Direction as Hardwood?
After considering the key factors, the general consensus among interior designers and flooring experts is clear. For the most cohesive and visually expansive look, your tile should run in the same direction as your hardwood floors. This approach creates a seamless flow that unites different living areas, making your home feel larger, more open, and thoughtfully designed.
This is especially true for open-concept layouts where visual harmony is paramount. By maintaining a single, consistent direction, you avoid creating jarring visual breaks that can disrupt the sense of space. Think of it as creating a visual “superhighway” that guides the eye and movement effortlessly through your home.
When is it OK to Change Direction?
While consistency is generally preferred, there are a few specific scenarios where changing the direction of your flooring can be an effective design choice. These are exceptions to the rule and should be approached with a clear and deliberate intention. An accidental-looking change in direction will always detract from your home’s appeal.
One such scenario is when you want to create a distinct visual separation between two areas within an open floor plan. For example, you might run the hardwood in your living area lengthwise and then switch to a diagonal or herringbone pattern with the tile in the kitchen to define it as a separate functional zone. This must be done carefully to look intentional, often using a border or transition strip to frame the change.
Practical Solutions for a Seamless Transition
Achieving a beautiful and professional-looking transition between tile and hardwood involves more than just choosing the right direction. The execution of the transition itself is critical. A poorly managed seam can undermine even the best-laid plans, creating a trip hazard or an unsightly gap.
Fortunately, there are several effective methods for creating a clean and durable transition. From simple transition strips to more complex custom inlays, the right solution will depend on your specific flooring materials, the height difference between them, and your desired aesthetic. Investing time in planning this detail will pay dividends in the final result.
Using Transition Strips (T-Molding)
T-molding is one of the most common and effective ways to bridge the gap between two different flooring materials of similar heights. This T-shaped strip neatly covers the expansion gap required for both hardwood and tile, creating a clean and finished look. It’s a straightforward solution that provides a professional touch to the transition.
When selecting a T-molding, you can choose one that matches the hardwood for a seamless blend or opt for a contrasting material like metal for a more modern aesthetic. Ensure the T-molding is installed securely to prevent it from becoming a trip hazard over time.
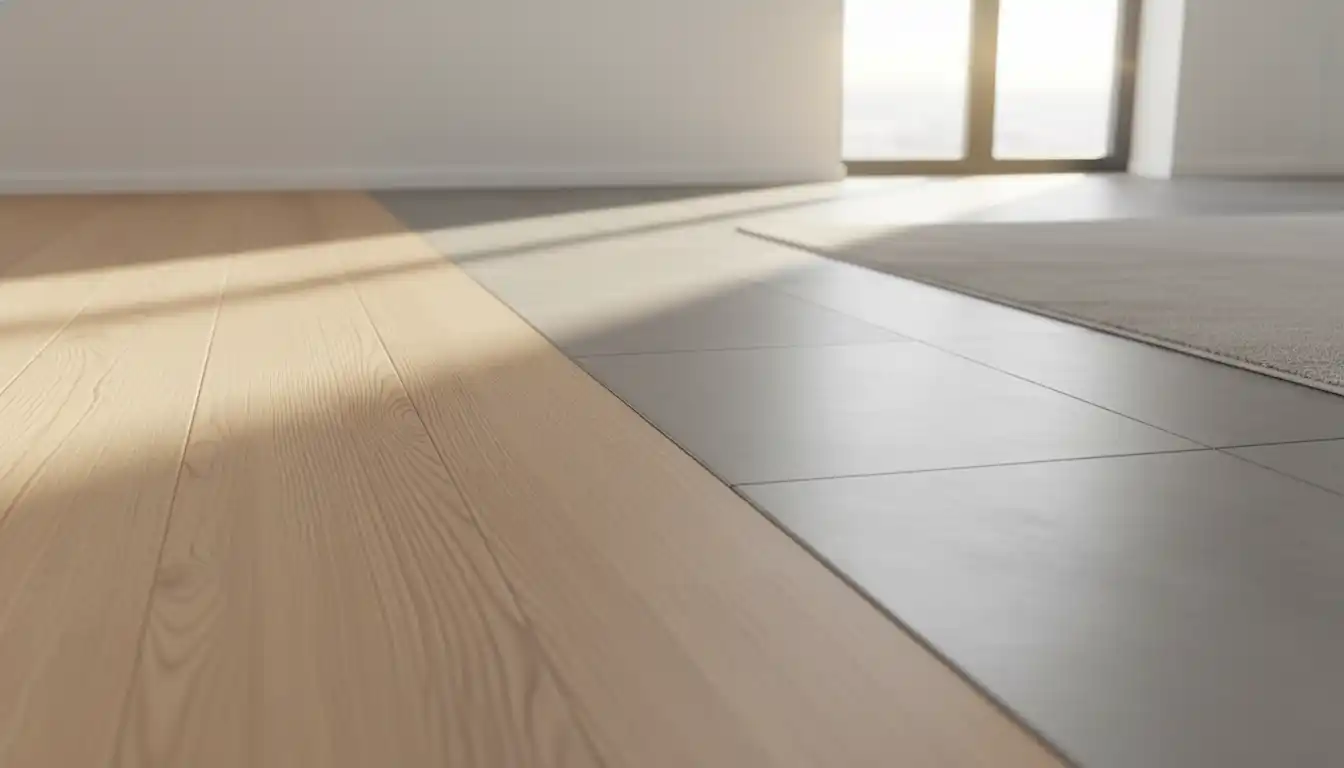
Creating a Flush Transition
For a truly seamless and high-end look, a flush transition is the ultimate goal. This involves installing the tile and hardwood at the exact same height, allowing them to meet directly without the need for a raised transition strip. This method requires meticulous planning and expert installation to ensure both subfloors are perfectly level.
A flush transition is ideal for modern and minimalist designs, creating an uninterrupted plane that enhances the sense of space. While more challenging to achieve, the elegant result is often well worth the effort, providing a clean, sleek look that is both beautiful and easy to maintain. Some homeowners with historic homes, such as those with unique 1940s wood flooring, may opt for this method to preserve the home’s original character.
Incorporating a Border or Inlay
A more decorative approach is to use a border or inlay at the transition point. This can be a single row of contrasting tile or a thin strip of wood running perpendicular to both floors. This technique turns the transition into a deliberate design feature, elegantly framing the shift from one material to another.
This method works particularly well when you are intentionally changing the direction of the flooring. The border acts as a visual “reset,” making the change in direction feel purposeful and integrated into the overall design. It’s a great way to add a custom touch to your flooring project.
Common Mistakes to Avoid
Navigating the complexities of a flooring project can be challenging, and several common pitfalls can derail your efforts. Being aware of these potential mistakes can help you avoid costly and frustrating setbacks. From improper subfloor preparation to neglecting expansion gaps, a small oversight can lead to significant problems down the line.
One of the most frequent errors is failing to account for the different thicknesses of the tile and hardwood. This can result in an uneven transition that is both a trip hazard and visually unappealing. Careful planning and measurement are essential to ensure a smooth and level transition between the two surfaces.
Another critical mistake is not leaving an adequate expansion gap where the two floors meet. Both wood and tile can expand and contract with changes in temperature and humidity. Without a proper gap, this movement can cause the flooring to buckle or crack. A professional installer will know the correct gap size and how to properly conceal it with a transition strip. Homeowners attempting a DIY fix should be cautious, as improper solutions like using expanding foam under laminate flooring can cause more harm than good by restricting necessary movement.
| Flooring Direction Strategy | Best For | Pros | Cons |
|---|---|---|---|
| Same Direction | Open-concept homes, creating flow | Creates a seamless, expansive look; enhances visual continuity. | May not be ideal for defining separate zones. |
| Perpendicular Direction | Closed floor plans, defining spaces | Can visually separate rooms; creates a clear boundary. | Can make spaces feel choppy and disconnected if not done carefully. |
| Diagonal Direction | Making small rooms feel larger, adding visual interest | Adds a dynamic and unique design element; can visually expand a space. | More complex installation; results in more material waste. |
Making the Right Choice for Your Home
Ultimately, the decision of whether your tile should run the same direction as your hardwood comes down to your home’s layout and your personal design goals. By understanding the principles of visual flow and considering the practical aspects of your space, you can make an informed choice that enhances both the beauty and functionality of your home.
Remember, the goal is to create a cohesive and intentional design. For most homes, especially those with open floor plans, maintaining a consistent direction is the key to achieving a harmonious and expansive feel. Always consider the big picture, and your floors will become a stunning foundation for your entire interior design. When evaluating materials, consider the long-term performance and reputation of brands. For instance, researching questions like, is Mohawk engineered flooring good, can provide valuable insights into durability and quality.
The Final Word on Flooring Direction
Ultimately, the choice of whether to run tile in the same direction as hardwood is a design decision that hinges on your desired outcome for the space. There is no single “right” answer, only the decision that best serves your home’s unique layout and aesthetic goals.
Key Takeaways for a Harmonious Home:
-
Prioritize Visual Flow: For an open-concept home or a space where you want to maximize the feeling of length and seamless connection, aligning the direction is often the best strategy. This creates a continuous, unbroken sightline that guides the eye smoothly across the transition.
-
Define and Delineate: If you are using the flooring to distinctly define a separate area (like a foyer or a wet room) and create a visual break from the main hardwood, a perpendicular or diagonal lay may be appropriate.
-
Work with the Light: Always consider the main light source (windows). Laying plank-style flooring parallel to the incoming light helps hide subtle imperfections and joints, enhancing the sense of unity.
By making a thoughtful, deliberate choice about flooring direction, you move beyond merely covering the subfloor. You are actively designing the perception of your space, ensuring your final project feels integrated, intentional, and beautifully complete.