Riding Mower Starter Not Engaging? Don’t Replace It Yet!
You turn the key, and instead of the satisfying roar of your riding mower’s engine, you hear a frustrating, high-pitched whirring or spinning sound. The engine isn’t turning over, and you’re left stranded in your garage or on the lawn. This is a classic sign that your riding mower starter is not engaging the flywheel.
This problem is surprisingly common, but the good news is that it’s often caused by a simple issue you can fix yourself with basic tools. Before you spend a fortune on a new starter or a call to a mechanic, this guide will walk you through the causes and solutions to get your mower running again.
You'll Learn About
Why Your Mower Just Spins: Understanding the Starter and Flywheel
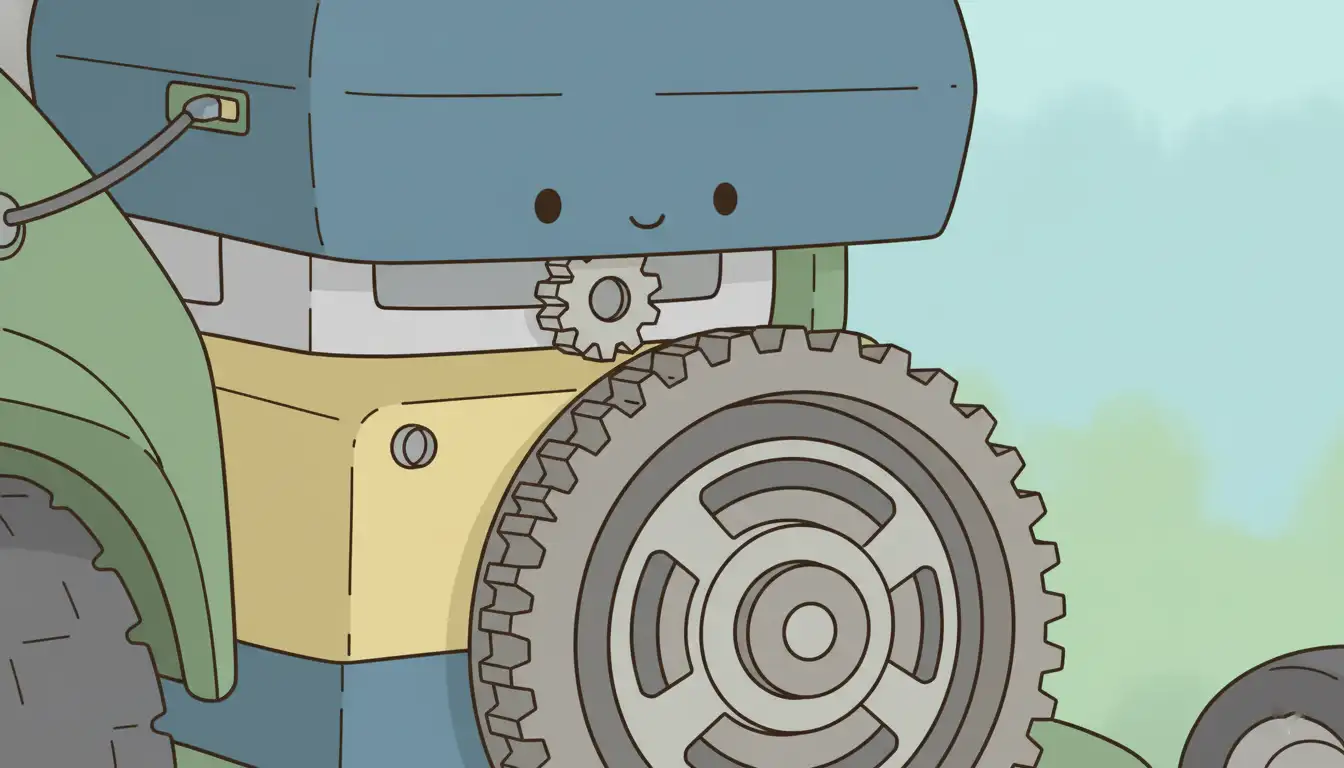
To fix the problem, it helps to understand what’s supposed to happen. When you turn the ignition key, you send a low-power signal to the starter solenoid. The solenoid does two things simultaneously: it closes a high-power circuit to spin the starter motor, and it physically pushes a small gear, called the Bendix gear, up a shaft.
This Bendix gear is designed to mesh with the large ring of teeth on the engine’s flywheel. Once engaged, the spinning starter motor turns the flywheel, which cranks the engine and starts it. The whirring sound you hear is the starter motor spinning freely, completely useless because the Bendix gear isn’t making contact with the flywheel.
The Most Common Culprits Behind Starter Engagement Failure
Several issues can prevent the Bendix gear from doing its job. Most of them are related to dirt, power, or worn-out parts. By starting with the simplest fixes first, you can often solve the problem in minutes.
A Weak Battery or Corroded Connections
This is the number one cause of starter problems. The starter motor requires a massive amount of amperage to both spin and throw the Bendix gear. A weak or dying battery may have enough power to spin the motor but not enough to forcefully engage the gear.
Even a good battery can’t deliver power through corroded or loose terminals. A thin layer of white or blue powder on the battery posts can stop the flow of electricity. It’s crucial to understand your battery’s power, as choosing the right one can prevent these issues; for instance, the difference between 230 CCA vs 300 CCA can significantly impact starting performance in different conditions.
A Dirty, Grimy, or Rusted Bendix Gear
The Bendix gear sits in a very dirty environment. Over time, grass clippings, dust, oil, and moisture can build up on the starter shaft where the gear slides. This grime can act like glue, preventing the gear from shooting up to meet the flywheel.
In many cases, the gear is simply stuck. The solenoid is trying to push it, but the friction is too great for it to overcome. This is often the easiest problem to fix.
A Faulty Starter Solenoid
The solenoid is the workhorse of the starting system. If the internal electromagnet that pushes the Bendix fails, the starter will spin but the gear won’t move. You might hear a single, solid “click” when you turn the key, followed by the spinning noise, which points directly to a solenoid issue.
Damaged or Stripped Gear Teeth
This is a more serious mechanical failure. If the teeth on the small Bendix gear or the large flywheel are broken, chipped, or worn down, they can’t mesh together. This usually happens over time from repeated grinding or can be caused by the engine backfiring during startup.
You can often diagnose this by a loud grinding noise during failed start attempts. A visual inspection is necessary to confirm damaged teeth.
The Ultimate Troubleshooting Guide: From Easy Fixes to Advanced Repairs
Follow these steps in order to diagnose and fix the problem efficiently. Always begin any work on your mower by disconnecting the negative battery cable to prevent accidental starts or electrical shorts. Safety is paramount.
Step 1: Scrutinize the Battery and Its Connections
Start with the power source. Put on safety glasses and gloves before inspecting the battery. Look for any signs of corrosion on the battery terminals.
Use a wire brush or a dedicated battery terminal cleaner to scrub the posts and the inside of the cable connectors until they are shiny. Reconnect the cables, ensuring they are screwed on tightly. A loose connection can be just as bad as a corroded one.
Step 2: Locate, Inspect, and Clean the Bendix Gear
The starter motor is a small cylindrical component mounted to the side of the engine, usually near the flywheel. The Bendix gear is the small gear visible at the top of the starter’s shaft. You may need to remove a plastic engine shroud to get a clear view.
With the battery disconnected, try to slide the Bendix gear up and down its shaft with your finger. It should move freely with a little spring tension. If it feels sluggish, sticky, or completely stuck, you’ve likely found your problem.
To clean a stuck Bendix, spray the shaft and gear liberally with brake cleaner or an electrical parts cleaner to dissolve the grime. Use a small wire brush or an old toothbrush to scrub the spiral grooves on the shaft. Wipe away the dirty residue and test the gear’s movement again. It should now slide easily.
Step 3: A Quick Lubrication Trick
After cleaning, it’s important to lubricate the shaft, but using the right product is critical. Do not use oil or grease like WD-40, as they are sticky and will attract more dirt and grass, causing the problem to return quickly.
The best lubricant for this application is a dry graphite lubricant. It lubricates the moving parts without creating a sticky surface. A light dusting on the shaft is all that’s needed.
Step 4: Check for Damaged Teeth and Proper Alignment
While you are inspecting the Bendix gear, take a close look at its teeth. Are they sharp and uniform, or are they chipped, broken, or worn flat? Now, use a flashlight to inspect the large teeth on the engine’s flywheel. You may need to have a helper turn the engine over by hand (with the spark plug wire disconnected) to inspect the entire circumference.
If you find significant damage to the Bendix gear, the entire starter motor assembly should be replaced. If the flywheel teeth are damaged, this is a much more involved repair that may require professional service. Also, check that the starter motor’s mounting bolts are tight. A loose starter can misalign the gears, causing engagement issues and grinding.
When to Suspect a Deeper Electrical Problem
If you’ve cleaned the Bendix and confirmed the battery is strong and well-connected, but the problem persists, the issue may lie with the solenoid or the starter motor itself. These situations often require more advanced testing.
Testing the Starter Solenoid
You can perform a quick bypass test to see if the solenoid is the culprit. This is for advanced users and carries a risk of sparks and high current. With the mower in neutral and the brake on, use a screwdriver with an insulated handle to briefly touch the two large terminals on the solenoid.
If this action causes the starter to engage and crank the engine, it confirms the starter motor is good and the solenoid is likely faulty and needs replacement. If it only spins the starter without engagement, the issue lies within the starter motor’s mechanical Bendix assembly.
Ignoring small maintenance tasks on your equipment can lead to bigger, more expensive problems down the line. It’s a principle that applies everywhere, from your lawnmower to your home. Overlooking something like nail pops all over the house might seem minor, but it could indicate larger structural issues, just as a whining starter is a warning sign of a pending failure.
The Telltale Signs of a Failing Starter Motor
Sometimes, the internal components of the starter simply wear out. The electromagnet in the solenoid may become too weak to push the Bendix gear with sufficient force. In other cases, the motor itself is failing.
A simple, yet surprisingly effective, diagnostic trick is to give the starter motor’s body a few firm taps with the handle of a screwdriver or a small mallet while an assistant turns the key. If this jostling frees up the internal components and allows the starter to engage, it’s a clear sign that the starter motor is on its last legs and should be replaced soon.
| Symptom | Most Likely Cause | Solution |
|---|---|---|
| High-pitched whirring/spinning sound, no engine crank. | Stuck/Dirty Bendix Gear | Clean the Bendix shaft and lubricate with dry graphite. |
| Single “click” then whirring sound. | Faulty Solenoid (Mechanical Part) | Test solenoid; likely needs replacement. |
| Single “click” and no other sound. | Weak Battery or Bad Solenoid (Electrical Part) | Charge/test battery, clean terminals, or replace solenoid. |
| Loud grinding or clashing noise. | Damaged Bendix or Flywheel Teeth | Visually inspect teeth; replace starter or flywheel. |
| No sound at all when turning the key. | Dead Battery or Faulty Safety Switch/Ignition | Check battery, brake/seat safety switches, and fuses. |
Preventative Maintenance: Stop Starter Problems Before They Start
An ounce of prevention is worth a pound of cure. Keeping your mower’s starting system reliable involves simple, routine maintenance that takes very little time. Proper care is key to avoiding sudden failures, a concept that applies to all aspects of property ownership, where unresolved issues like a neighbor’s retaining wall falling on your property can escalate into significant disputes if not addressed proactively.
Once or twice per mowing season, take a moment to blow compressed air around the engine and starter area. This removes the loose grass and debris that can gum up the Bendix gear. A clean engine is a happy engine.
Periodically check your battery terminals for signs of corrosion and ensure the connections are always tight. A quick inspection before you mow can save you a huge headache. By following these steps, you can ensure your riding mower starts reliably every time you turn the key.