Replace Sidelights with Wood for a Stunning Entryway Transformation
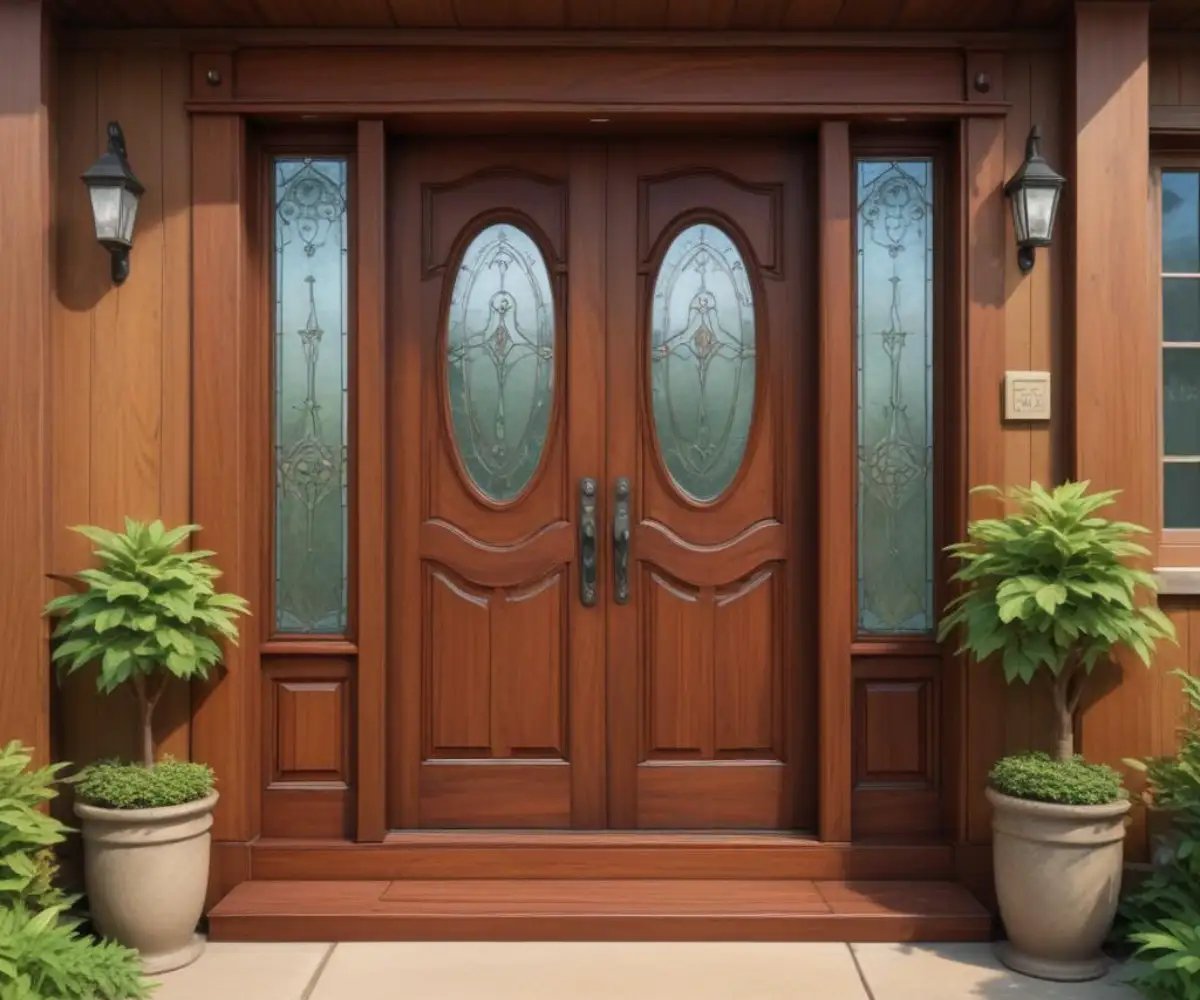
Are your glass sidelights making your entryway feel dated, exposed, and inefficient? You’re not alone. Many homeowners find that the very features meant to enhance their front door—those narrow glass panels—eventually become a source of frustration, compromising privacy and allowing drafts to creep in.
This common problem leaves you searching for a solution that boosts security, improves energy efficiency, and elevates your home’s curb appeal. The good news is there’s a timeless and elegant answer: replacing those glass panels with solid wood.
You'll Learn About
Why You Should Replace Glass Sidelights with Wood
Trading glass for wood is more than just a cosmetic upgrade; it’s a practical investment in your home’s comfort, security, and value. By making this switch, you address several key pain points associated with traditional glass sidelights, turning a vulnerable part of your home into a statement of strength and style.
Enhanced Privacy and Unmatched Security
The most significant drawback of glass sidelights is the lack of privacy. Clear glass offers an unobstructed view into your home for any visitor or passerby. While frosted or textured glass can help, it doesn’t compare to the complete visual barrier that solid wood provides.
From a security standpoint, a thin pane of glass next to your door lock is a weak point. Replacing glass with a solid wood panel eliminates this vulnerability, creating a much more robust and secure entryway that deters potential intruders. It transforms your front entrance from a point of concern into a fortress of safety.
Superior Energy Efficiency
Single-pane glass sidelights are notorious for poor insulation. They allow heat to escape in the winter and cool air to leak out in the summer, leading to uncomfortable drafts and higher energy bills. Wood, by its nature, is a much better insulator.
By installing solid wood panels, you create a more effective thermal barrier. This upgrade helps maintain a consistent indoor temperature and can lead to noticeable savings on your heating and cooling costs over time. It’s a smart move for both your comfort and your wallet.
Timeless Aesthetics and Awe-Inspiring Curb Appeal
Wood brings a warmth, richness, and classic elegance that glass simply cannot match. Replacing outdated sidelights with beautifully finished wood panels can dramatically transform the look of your front entrance. It creates a grander, more cohesive, and custom appearance.
This change allows you to match the wood to your existing front door or create a stunning contrast that boosts your home’s curb appeal. A beautiful entryway not only welcomes you home each day but also makes a powerful first impression on guests and potential buyers, increasing your property’s overall value.
Planning Your Sidelight Replacement Project
Before you begin, a little planning goes a long way. Properly assessing your current setup and choosing the right materials are crucial steps to ensure a smooth and successful project. Taking the time to plan will save you from headaches and costly mistakes down the road.
Assess Your Current Door System
The first step is to determine how your sidelights are constructed. Are they part of a single, pre-hung unit with the door, or are they separate sashes that can be removed individually? Most modern entryways feature a unified system, but older homes might have separate components.
Inspect the frame from both the inside and outside. Look for the seams between the door frame and the sidelight frames. Understanding this structure is key to planning the removal process, which you can learn more about in our guide on how to get rid of sidelights.
Choosing the Right Wood for Your Entryway
The type of wood you choose will impact the project’s durability, appearance, and cost. You must select a wood species suitable for exterior use that can withstand exposure to the elements. Some excellent choices include:
- White Oak: Naturally water-resistant and incredibly durable, making it a gold standard for exterior applications.
- Mahogany (Sapele): Known for its beautiful reddish-brown color, stability, and resistance to water and decay.
- Douglas Fir: A strong and stable wood that takes paint and stain exceptionally well and offers good rot resistance.
- Walnut: A premium choice prized for its rich, dark color and excellent durability and stability.
Consider a wood that complements your region’s climate. Choosing a species that grows in a similar environment can help minimize seasonal swelling and shrinking.
Design and Style Considerations
Think about the final look you want to achieve. Do you want the new wood panels to be stained to match your front door for a seamless, integrated look? Or would you prefer a painted finish that either matches or contrasts with your door and trim?
You can also choose the style of the panel itself. A flat panel offers a clean, modern look, while a raised panel design provides a more traditional and formal appearance. The goal is to create a design that feels like a natural and intentional part of your home’s architecture.
The Step-by-Step Guide to Replacing Sidelights with Wood
With your planning complete and materials in hand, it’s time to transform your entryway. This step-by-step guide will walk you through the process, from removing the old glass to installing and finishing your new wood panels. Work methodically and prioritize safety at every stage.
Tools and Materials Needed
- Safety Glasses and Gloves
- Utility Knife
- Pry Bar and Putty Knife
- Tape Measure and Pencil
- Circular Saw or Jigsaw
- Drill and Bits
- Wood Panels (chosen species)
- Exterior-Grade Screws or Fasteners
- Exterior-Grade Wood Filler
- High-Quality Exterior Caulk and Caulk Gun
- Sandpaper (medium and fine grit)
- Exterior Primer, Stain or Paint, and Sealant
- Paintbrushes or Rollers
Step 1: Carefully Remove the Existing Sidelights
Start from the inside of your home. Use a utility knife to score the paint and caulk lines around the interior trim (stop molding) that holds the glass sidelight in place. This prevents paint from chipping off the main frame.
Gently pry off the interior stop molding using a putty knife and pry bar. Once the molding is removed, go outside and cut any exterior caulk beads. The sidelight unit should now be loose enough to be carefully tapped out of the frame.
Step 2: Prepare the Opening
With the old sidelight removed, thoroughly clean the frame. Scrape away any old caulk, adhesive, or paint residue. Ensure the surface is smooth, clean, and dry, creating a perfect foundation for the new wood panel.
This is also the time to inspect the frame for any signs of rot or damage. Make any necessary repairs before proceeding to ensure the structural integrity of your entryway.
Step 3: Measure and Cut the Wood Panels
Precision is paramount in this step. Measure the height and width of the opening in at least three different places to account for any variations. Use the smallest of these measurements to ensure a snug fit.
Transfer these dimensions to your wood panel and double-check your marks. Use a circular saw or jigsaw with a straight edge guide to make your cuts. Aim for a clean, straight cut for a professional-looking result.
Step 4: Install the New Wood Panels
Before final installation, do a dry fit to ensure the panel fits perfectly in the opening. Make any minor adjustments with a hand plane or sandpaper as needed. Once you’re satisfied with the fit, it’s time to secure it.
Apply a continuous bead of high-quality exterior caulk around the inside edge of the exterior frame. Press the wood panel firmly into the opening against the caulk. Secure the panel by reinstalling the interior stop molding or by driving exterior-grade screws through the panel into the frame, recessing the screw heads slightly.
Step 5: Finishing for Beauty and Durability
The final step is to protect your new wood panels from the elements. If you used screws, fill the holes with an exterior-grade wood filler and sand smooth once dry. Caulk all interior and exterior seams to create a weatherproof seal.
Prime the entire panel with an exterior-grade primer. Then, apply several coats of high-quality exterior paint or stain, sanding lightly between coats for a smooth finish. Finally, apply a protective top coat or sealant to shield the wood from moisture and UV damage.
Common Challenges and How to Overcome Them
Even with careful planning, any DIY project can present unexpected challenges. Being aware of potential hurdles and knowing how to address them can keep your project on track and ensure a flawless, professional finish that lasts for years.
Dealing with Non-Standard Sizes
One of the most common issues is discovering your sidelight openings are not a standard size. This can make finding pre-cut panels impossible and requires a custom approach. This is similar to the challenges faced when dealing with unusual door dimensions, like a 29 3/4 interior door replacement.
The solution is to purchase a larger sheet of your chosen wood and cut it to your exact measurements. This ensures a perfect fit, regardless of the opening’s quirks. Always remember the carpenter’s rule: measure twice, cut once.
Ensuring a Weather-Tight Seal
A poor seal can lead to drafts, water leaks, and even rot, completely undermining the benefits of your new wood panels. Achieving an airtight and watertight seal is absolutely critical for the longevity and performance of your project.
Use high-quality, exterior-grade silicone or acrylic latex caulk. Apply a generous, continuous bead along all interior and exterior edges where the wood panel meets the frame. Pay special attention to the bottom sill, as this is the most vulnerable area for water infiltration.
Matching the Finish to Your Existing Door
Achieving a perfect match between your new wood panels and your existing front door can be tricky, especially with stained finishes. The age of the door, the type of wood, and previous exposure to sunlight can all affect how it absorbs stain.
To get the best match, always test your stain on a scrap piece of the same wood you used for the panels. Apply it in the same number of coats you plan to use on the final product. This allows you to adjust the color before applying it to the installed panels, ensuring a cohesive and professional look.
Cost Analysis: DIY vs. Hiring a Professional
Deciding whether to tackle this project yourself or hire a professional often comes down to budget and skill level. Understanding the potential costs of both routes can help you make an informed decision that aligns with your expectations and financial plans. This decision is a key factor in understanding why front doors are so expensive when considering the entire entryway system.
Here is a breakdown of the estimated costs involved in replacing two standard sidelights with wood panels.
| Item / Task | DIY Cost Estimate | Professional Cost Estimate | Notes |
|---|---|---|---|
| Wood Panels (e.g., Oak, Mahogany) | $150 – $400 | $150 – $400 | Price varies greatly by wood species and thickness. |
| Finishing Supplies (Primer, Paint/Stain, Sealant) | $75 – $150 | $100 – $200 | Professionals may use higher-grade materials. |
| Consumables (Caulk, Screws, Wood Filler) | $30 – $50 | $30 – $50 | Costs are generally similar for both. |
| Tool Purchase/Rental | $0 – $200 | $0 | Cost depends on what tools you already own. |
| Labor | $0 (Your Time) | $400 – $800+ | Based on 4-8 hours of labor at $50-$100/hour. |
| Total Estimated Cost | $255 – $800 | $680 – $1450+ | DIY offers significant savings but requires time and skill. |
Frequently Asked Questions (FAQ)
Can I replace just the glass in my sidelight with a wood panel?
Yes, in most cases, this is exactly what the project entails. You remove the glass unit and its immediate frame or sash and then fit a custom-cut wood panel into the remaining opening. The key is ensuring the main structural frame of the sidelight is sound.
How do I ensure the new wood panels are secure?
Security is achieved through proper installation. Use strong, exterior-grade fasteners to secure the panel to the frame. A continuous bead of high-quality adhesive caulk adds both a weather seal and bonding strength. Reinstalling the interior stop molding tightly provides the final layer of security.
Will replacing sidelights with wood make my entryway too dark?
While you will lose the natural light that came through the sidelights, many people find this to be a worthy trade-off for the added privacy and security. You can easily compensate for the loss of light by upgrading your interior entryway lighting, such as installing a brighter fixture or adding sconces.
A Worthwhile Upgrade for a Grand Entrance
Replacing your old glass sidelights with solid wood panels is a transformative project that offers immense benefits. You gain a significant boost in privacy, security, and energy efficiency, all while dramatically enhancing your home’s curb appeal with the timeless beauty of wood.
Whether you choose to tackle it as a rewarding DIY project or entrust it to a professional, this upgrade is a powerful investment. It creates a grand, welcoming, and secure entrance that you will appreciate every time you come home.