Stop Sweating Vents Now: Replace Insulation in Register Box
Notice water dripping from your ceiling vents? Are you seeing dark stains or smelling a musty odor near your air registers? These are common signs that the insulation inside or around your HVAC register box is failing. This isn’t just a minor issue; it’s a significant problem that can lead to higher energy bills, poor air quality, and even water damage to your home’s structure.
Many homeowners overlook the importance of the register box—the metal or fiberglass “boot” that connects your ductwork to the vent cover in your ceiling, floor, or wall. When its insulation degrades, it creates a host of problems that can impact both your comfort and your wallet. This article will guide you through why this happens and provide a detailed solution to fix it for good.
You'll Learn About
The Hidden Problem: Why Register Box Insulation Fails
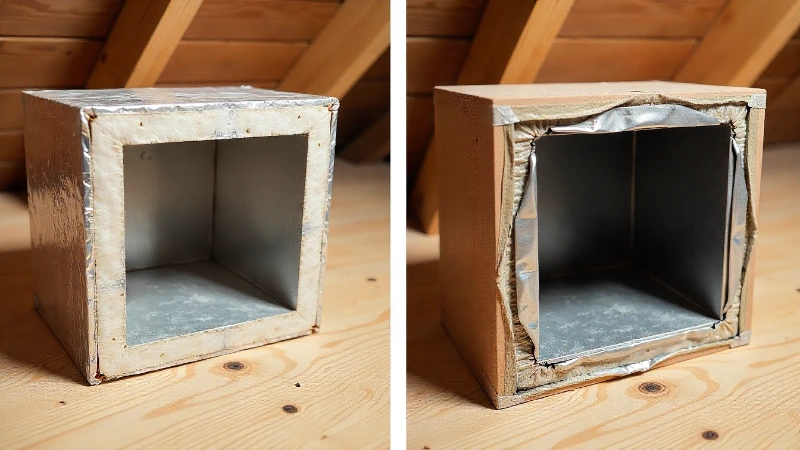
The insulation in or around your register box serves a critical purpose: it prevents the cold metal surface of the box from coming into contact with warm, humid air. This is especially important in unconditioned spaces like attics or crawlspaces. When hot, moist air meets the cold surface of a poorly insulated register box, condensation—or “sweating”—occurs.
Over time, this constant moisture can lead to several serious issues. Degraded insulation loses its ability to prevent this temperature exchange, leading to water damage, mold growth, and reduced HVAC efficiency. You’re essentially paying to cool or heat parts of your house you don’t even use, like the inside of your walls or attic.
Signs Your Register Box Insulation Needs Replacement
Identifying the problem early can save you from costly repairs down the road. Here are the most common symptoms of failing register box insulation:
- Condensation or “Sweating”: Water droplets forming on your vent covers is a classic sign. This moisture indicates that warm, humid air is condensing on the cold metal.
- Water Stains: Yellow or brown discoloration on the ceiling or wall around your vents points to a persistent moisture problem.
- Musty Odors: A damp, mildew-like smell near your vents is a strong indicator of mold growth caused by chronic condensation.
- Visible Mold: If you see black or greenish spots on the vent cover or inside the duct, you have a mold problem that needs immediate attention.
- Increased Energy Bills: If your HVAC system seems to be running constantly without effectively cooling or heating your home, leaky and poorly insulated register boxes could be a major cause.
The Solution: A Step-by-Step Guide to Replacing Register Box Insulation
Replacing the insulation around your register box is a manageable DIY project that can significantly improve your home’s energy efficiency and air quality. Follow these detailed steps to do it right.
Step 1: Gather Your Tools and Materials
Before you begin, make sure you have everything you need. This will make the process smoother and ensure a professional result.
| Tool/Material | Purpose |
|---|---|
| Screwdriver or Drill | To remove the vent register cover. |
| Safety Glasses and Gloves | To protect yourself from dust, debris, and insulation fibers. |
| Utility Knife | For cutting away old sealant and trimming new insulation. |
| Shop Vacuum or Cleaning Cloths | To clean the area around the register box thoroughly. |
| Foil-Faced Duct Insulation or Foam Board | The new insulation material. Foil-faced fiberglass is common. |
| HVAC Foil Tape | Crucial for sealing all seams. Do not use standard duct tape, as it will fail over time. |
| Duct Sealant (Mastic) | For creating an airtight seal between the register box and the drywall or subfloor. |
Step 2: Remove the Vent Cover and Inspect the Area
Start by turning off your HVAC system at the thermostat. Unscrew and carefully remove the vent register cover. Use a flashlight to inspect the inside of the register box and the surrounding area. Look for signs of moisture, mold, and gaps between the box and the drywall or floor.
You may find that the original installation was sloppy, leaving significant gaps that allow air from your attic or crawlspace to enter your living space. Identifying these leaks is a key part of the process.
Step 3: Clean and Prepare the Surface
If there’s old, degraded insulation inside the box, carefully remove it. Use a shop vacuum and damp cloths to clean the interior of the metal box and the surrounding drywall or wood framing. If you find mold, treat it with a mold-killing solution according to the product’s instructions. A clean, dry surface is essential for the new sealant and tape to adhere properly.
Step 4: Seal the Gaps
This is the most critical step for preventing future problems. Use a high-quality duct sealant (mastic) to fill any gaps between the metal flange of the register box and the drywall or subfloor. Apply a generous bead of sealant and use a gloved finger or putty knife to smooth it out, creating a complete, airtight seal. This single step will drastically reduce air leakage and improve your system’s efficiency.
For more complex wiring situations, like when you discover 3 black wires in a light switch while working, it’s always best to consult a professional electrician. Similarly, if you are unsure about the electrical work, it’s better to be safe.
Step 5: Install the New Insulation
Now it’s time to insulate the outside of the register box. The goal is to create a thermal barrier that prevents condensation. Cut pieces of foil-faced duct insulation or rigid foam board to fit snugly around all sides of the metal box. The foil facing should be on the outside, facing the unconditioned space (e.g., the attic).
Make sure the insulation pieces fit tightly against each other, leaving no gaps. Thinking about other home projects, if you need to run a power cable behind the wall, careful planning is just as important to ensure safety and effectiveness.
Step 6: Tape All Seams Securely
With the insulation in place, use HVAC foil tape to seal all seams and joints. Overlap the tape onto the adjoining pieces of insulation to create a continuous vapor barrier. Cover the seams where the insulation meets the ductwork and where it meets the drywall or subfloor. Do not skip this step; the foil tape is what makes the insulation system truly effective by blocking moisture.
Step 7: Reinstall the Vent Cover
Once you’ve sealed everything with foil tape, you can reinstall the vent register cover. Turn your HVAC system back on and enjoy the benefits of a properly sealed and insulated system. You should notice improved airflow and a reduction in drafts and musty smells.
Sometimes, home maintenance can reveal other issues. For instance, if you’re also working on small engine repairs and find your Kohler engine stalls after 10 minutes, it’s a reminder that diagnosing the root cause is key to any successful repair, whether it’s mechanical or HVAC-related.
Spray foam to stop register grilles from sweating
What’s Happening:
- Sweating registers happen when the cold air coming from the HVAC system comes in contact with warm, moist air in the room. This causes condensation, or “sweating,” to form on the metal surface of the register (the metal grille over the vent). In extreme cases, this can lead to water pooling around the grille, creating moisture issues that could lead to mold or wood damage.
Why Spray Foam Helps:
- Insulating the metal register boot (the metal ducting or connection that leads to the register grille) helps prevent condensation from forming. Metal, being a good conductor of heat and cold, can act as a bridge for temperature differences. When warm, moist air from the room comes in contact with the cold metal register boot, it causes condensation.
- Spray foam (like the canned, expandable foam insulation available in most hardware stores) is effective at creating a barrier. It works by filling gaps and insulating the register boot. Since foam has a low thermal conductivity, it prevents the cold air inside the metal boot from transferring its coldness to the outside of the boot (where it meets the warm room air).
How You Do It:
- Locate the register boot: This is the part of the ductwork that connects the register grille to the main duct system.
- Apply spray foam: You can use a can of expanding foam insulation to fill in the gaps around the register boot where air may be leaking. The foam will expand and harden, insulating the metal boot. This stops the cold from radiating through the boot and potentially causing condensation on the grille.
- Ensure a good seal: Make sure the foam fully seals the connection between the duct and the register. Any gaps can allow moisture to build up.
Benefits:
- Prevents condensation: By insulating the register boot, you reduce the risk of cold air meeting warm, moist air, which in turn stops the sweating.
- Increases energy efficiency: By reducing air leaks around the register boot, your HVAC system doesn’t have to work as hard to keep the air temperature regulated.
- Simple DIY fix: This method is easy to do and can be completed in an afternoon with a can of spray foam.
In short, by applying spray foam to the register boot, you’re adding insulation to stop temperature differences from creating condensation, which helps maintain a dry, mold-free area around the register grille.
When to Call a Professional
While replacing register box insulation is a great DIY project, there are times when it’s best to call an HVAC professional. If you find extensive mold growth that extends into the ductwork, or if the register boxes are in hard-to-reach or unsafe locations, it’s wise to seek expert help.
A professional can also perform a full system inspection to identify other areas of energy loss. They have the tools to conduct pressure tests and ensure your entire duct system is sealed and performing optimally. Taking care of your home’s systems proactively is always the best approach.