Painting Only One Side of a Fence: The Costly Mistake Hiding in Plain Sight
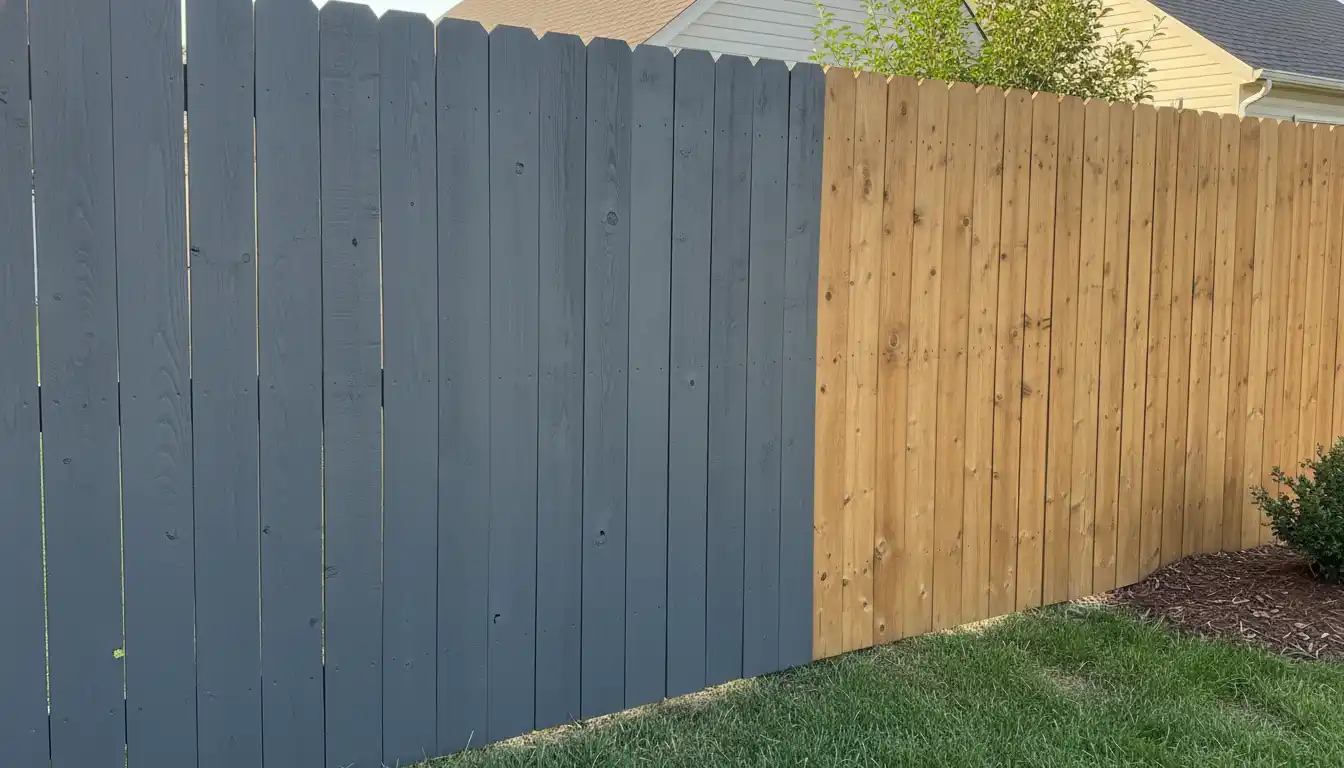
It seems like a clever shortcut. You gaze out at your backyard, notice the weathered fence, and think, “Why go through the trouble and expense of painting both sides?” Painting only the side you see saves time, money, and effort. But this seemingly logical decision is one of the biggest mistakes a homeowner can make, leading to disastrous consequences that go far beyond aesthetics.
This common oversight can trigger premature rot, incite neighborhood disputes, and ultimately cost you far more than the price of a few extra gallons of paint. Before you pick up that brush, it’s crucial to understand the hidden science and surprising legalities behind this seemingly simple home improvement task.
You'll Learn About
The Hidden Science: Why One-Sided Painting Destroys Your Fence
The primary reason to paint or stain a wooden fence is protection. A quality exterior coating acts as a barrier, shielding the wood from its two greatest enemies: moisture and UV radiation. When you apply this protective layer to only one side, you create a dangerous imbalance that accelerates the very decay you’re trying to prevent.
Wood is a porous, natural material that “breathes,” meaning it absorbs and releases moisture from the air. Painting one side seals those pores, while leaving the other side completely exposed. This unsealed side will soak up rain and humidity like a sponge. The sealed side, however, prevents that absorbed moisture from evaporating, effectively trapping water inside the wood panels. This constant internal moisture is a breeding ground for mold, mildew, and devastating wood rot.
This phenomenon is known as differential moisture content. It causes the wood to warp, twist, and crack as the unpainted side swells with water and the painted side tries to remain stable. The fence essentially tears itself apart from the inside out, leading to costly repairs or a full replacement years ahead of schedule.
Neighborly Nightmares: The Legal and Social Fallout
Beyond the physical damage to your fence, the decision to paint only one side can open a Pandora’s box of social and legal issues. Fences are often the source of friction between neighbors, and a two-toned, half-finished appearance can quickly sour relationships. Good fences may make good neighbors, but a poorly painted one can do the opposite.
Before you begin, the most critical first step is to determine the legal ownership of the fence. Is it entirely on your property, your neighbor’s, or is it a shared boundary fence? Property deeds and land surveys hold the answer. Painting a fence that doesn’t belong to you, even just your side, can be considered vandalism or property damage in some jurisdictions.
Even if the fence is entirely yours, open communication is essential for maintaining a positive relationship. Your neighbor has to look at their side of the fence every day. A sudden, unannounced color change or, worse, paint drips and overspray on their property can create significant resentment. It’s a common courtesy that is often overlooked, much like people forget about what’s going on with the inside of white cabinets until it’s too late. A simple conversation beforehand can prevent a world of trouble.
Navigating the Conversation with Your Neighbor
Approaching your neighbor doesn’t have to be awkward. Frame the conversation around mutual benefit. Explain that painting both sides is crucial for the fence’s longevity, which protects both of your property values. Many neighbors will be reasonable and may even offer to split the cost of materials if you’re providing the labor.
Come prepared with a few color options that complement both homes. If they are resistant to a color, suggest a high-quality wood stain instead. Stains enhance the natural wood grain and are often less visually jarring than a solid paint color. Getting a written agreement, even a simple email, is always a good idea to prevent future misunderstandings.
The Right Way to Paint a Fence: A Step-by-Step Guide
If you’ve communicated with your neighbor and are ready to proceed, following the correct steps will ensure a beautiful, long-lasting finish that protects your investment. Rushing the job or using improper techniques will lead to a finish that peels and cracks within a year.
Step 1: Thorough Preparation is Non-Negotiable
Proper prep work accounts for 80% of a successful paint job. Start by cleaning the fence thoroughly to remove dirt, mildew, and old, flaking paint. A power washer on a low setting is effective, but a stiff brush and a quality wood cleaner can also work well. Allow the fence to dry completely for at least 24-48 hours before proceeding.
Next, sand any rough spots and scrape away any remaining loose paint. This ensures the new coat of primer and paint will adhere properly. Just as making a modern upgrade is better than figuring out what to do with an old Nutone intercom system, proper preparation is key to avoiding outdated results.
Step 2: Always Use a Primer
Skipping primer is a false economy. An exterior-grade, stain-blocking primer is essential for a uniform and durable finish. It prevents tannins in the wood (especially cedar and redwood) from bleeding through and discoloring the topcoat. It also provides a superior surface for the paint to grip, extending the life of your paint job significantly.
Step 3: Application Techniques for a Flawless Finish
When it comes to application, you have three main options: brush, roller, or sprayer. A paint sprayer offers the fastest and most even coverage, but requires careful masking to control overspray. Always use a large piece of cardboard or a painter’s shield along the top and bottom of the fence to prevent paint from getting onto your neighbor’s property, your plants, or the ground. A brush is best for cutting in and detail work, while a small roller can be efficient for flat panel fences.
Apply two thin topcoats of high-quality exterior acrylic latex paint for the best results, allowing adequate drying time between coats as specified by the manufacturer. Knowing the right materials to use is as important as knowing how to pick the perfect Turkish melon; the right choice leads to a much better outcome.
Comparing Your Options: Paint vs. Stain
While paint offers a thick, protective layer and a wide variety of colors, wood stain is another excellent option that offers its own set of benefits. Stains penetrate the wood rather than forming a surface film, which means they won’t peel or chip. They are often easier to reapply in the future.
| Feature | Exterior Paint | Wood Stain |
|---|---|---|
| Appearance | Opaque, solid color. Hides wood grain. | Transparent to solid. Enhances wood grain. |
| Protection | Excellent UV and moisture barrier. Forms a surface film. | Good moisture protection, UV protection varies by opacity. Penetrates wood. |
| Longevity | 5-10 years before peeling or cracking may occur. | 2-5 years before color fades; requires reapplication. |
| Maintenance | Requires scraping and sanding before repainting. | Easier reapplication; typically just requires cleaning. |
| Best For | Covering imperfections, drastic color changes, maximum protection. | Highlighting natural wood beauty, easier long-term maintenance. |
The Final Verdict: An Investment, Not an Expense
Painting only one side of your fence is a shortcut that leads to a dead end. The initial savings in time and money are quickly erased by the high cost of premature wood rot, structural failure, and potential conflicts with your neighbors. Treating your fence as a complete structure and protecting all of its surfaces is the only way to ensure it remains a valuable and attractive asset to your property.
By investing the effort to do the job correctly—communicating with neighbors, preparing the surface meticulously, and using quality materials on both sides—you are not just painting a fence. You are protecting your property, fostering good community relations, and making a smart, long-term investment in your home’s value and appeal.
Frequently Asked Questions
Is it okay to paint only one side of a fence?
While you can paint just one side of a fence for aesthetic reasons, it is highly recommended to paint or stain both sides for maximum protection. Treating only one side leaves the other vulnerable to moisture and sun damage, which can lead to rot and shorten the lifespan of the entire fence. Sealing both sides creates a protective barrier that keeps moisture out.
What problems can arise from painting only one side of a fence?
Painting only one side of a wooden fence can trap moisture within the wood. This happens because the unpainted side can absorb water, which then gets trapped by the painted side, potentially leading to warping, rotting, and insect infestation. Ultimately, this can diminish the fence’s structural integrity and longevity.
Do I need to ask my neighbor before painting my side of a shared fence?
Yes, it is always best to communicate with your neighbor before painting a shared fence. Even if the fence is technically on your property, a simple conversation can prevent disputes and maintain a good relationship. Depending on local regulations and HOA guidelines, your neighbor may have a say in the fence’s appearance.
What is the proper etiquette for painting a fence between properties?
The best approach is to discuss your plans with your neighbor beforehand. It’s considerate to inform them of your intentions, the color you plan to use, and the timeline for the project. If the fence is on the property line, it may be a shared responsibility, making communication even more crucial.
How can I avoid getting paint on my neighbor’s side of the fence?
To prevent paint from seeping through to your neighbor’s side, it’s best to use a roller instead of a sprayer, as sprayers can cause overspray. You can also use cardboard or sheeting to catch any drips. Informing your neighbor of your plans can also allow them to take any precautions on their side.