Laminate Flooring 90 Degree Turn?
Installing laminate flooring is a popular and cost-effective way to add new flooring to a home. One of the challenges of installing laminate flooring is making a 90-degree turn at a corner or hallway.
This can be a tricky process, but with the right tools and techniques, it is possible to create a seamless and professional-looking installation. In this article, we will provide a step-by-step guide for making a 90-degree turn with laminate flooring, as well as some tips to help ensure a successful and long-lasting installation.
You'll Learn About
Is It Ok to Change the Direction of the Laminate Flooring?
Yes, it is okay to change the direction of the laminate flooring. As mentioned, board direction is primarily an aesthetic issue when it comes to laminate flooring.
Changing the direction of the boards can help create a sense of balance and proportion in a room, and can also help draw the eye to certain features or areas of the room. Additionally, changing the direction of the boards at natural transition points, such as doorways, can help create a more cohesive and visually appealing look.
Ultimately, the decision to change the direction of laminate flooring should be based on personal preference and the overall design of the space.
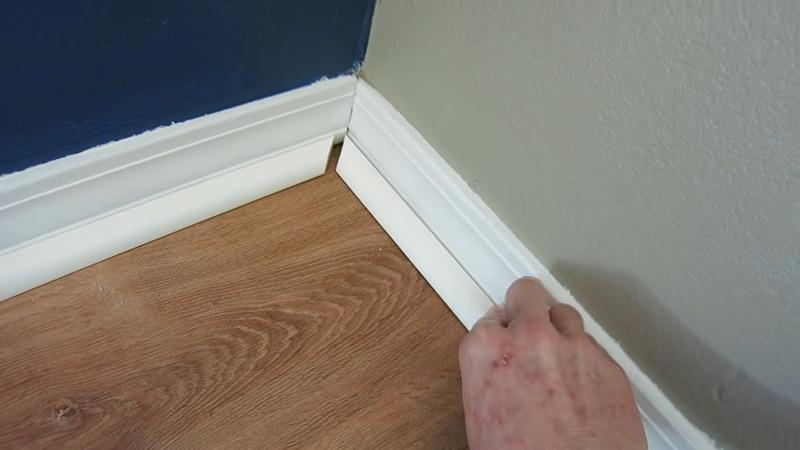
How to Make Laminate Flooring 90-Degree Turn? [Proper Method]
Tools needed:
- Measuring tape
- Pencil or pen
- Jigsaw or circular saw
- Coping saw or jigsaw
- Tapping block and hammer
- T-molding or transition strip
- Expansion gap tool or spacer blocks
- Safety glasses and hearing protection (if using power tools)
Here is the step-by-step guide:
- Measure the width and length of the hallway, and calculate the number of laminate planks you will need to cover the entire area. Make sure to account for any waste, and add an extra 10% to allow for any cutting or fitting mistakes.
- Begin installing the laminate planks at the far end of the hallway, parallel to the length of the hallway. Use a tapping block and a hammer to securely connect the planks together using the tongue and groove system.
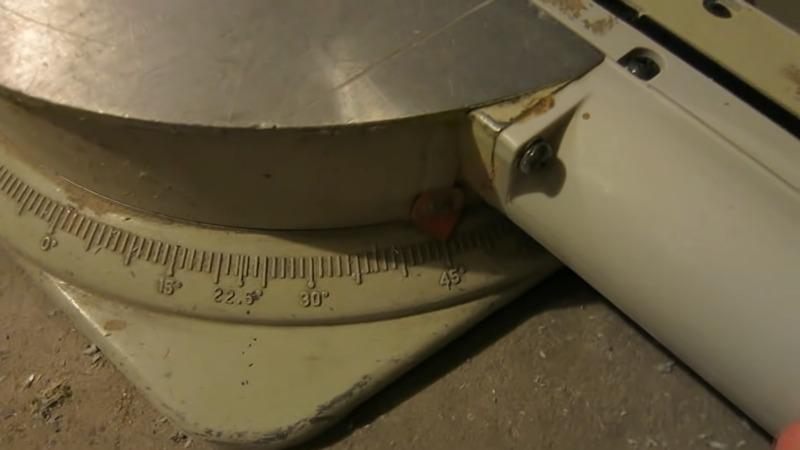
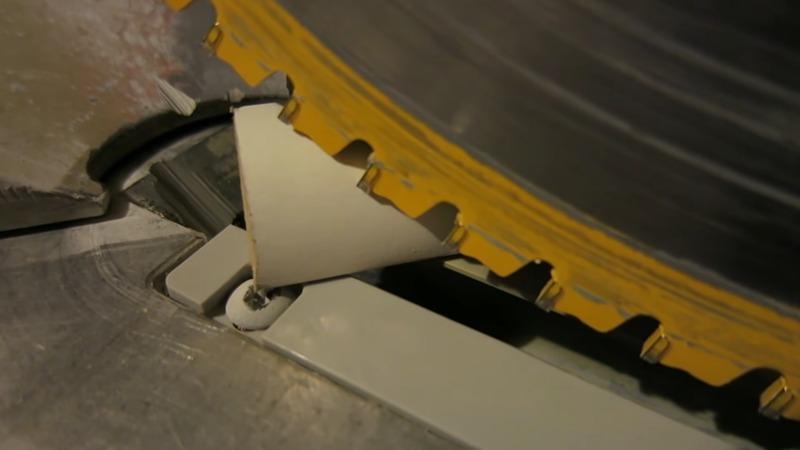
- As you approach the corner, measure and mark the exact location of the 90-degree turn on the last plank. Use a jigsaw or circular saw to carefully cut the plank along the marked line, creating two pieces with 45-degree angled ends.
- Remove the cut plank pieces, and install the full-length planks on either side of the corner, making sure to leave a small expansion gap between the planks and the walls.
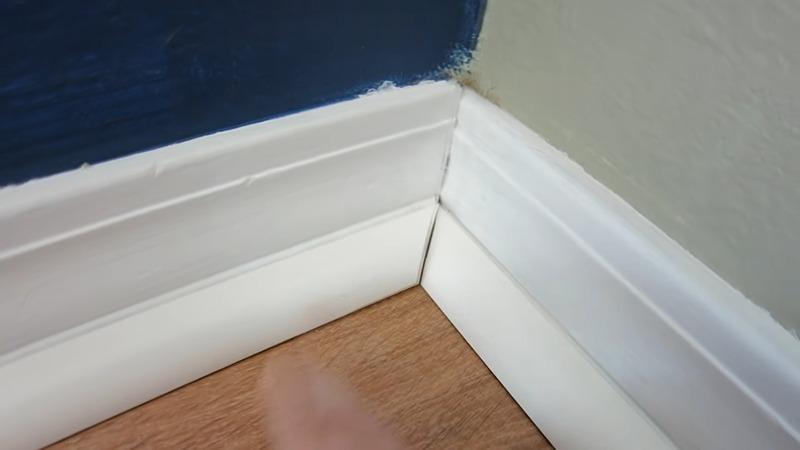
- Use a coping saw or a jigsaw to trim the angled ends of the two cut plank pieces so that they fit snugly together at the corner.
- Install the trimmed plank pieces at the corner, making sure that the angled ends are securely connected and that the planks are level with the surrounding floor.
- Continue installing the planks along the short leg of the hallway, making sure to leave the necessary expansion gap at the walls, and use a tapping block and hammer to securely connect the planks together.
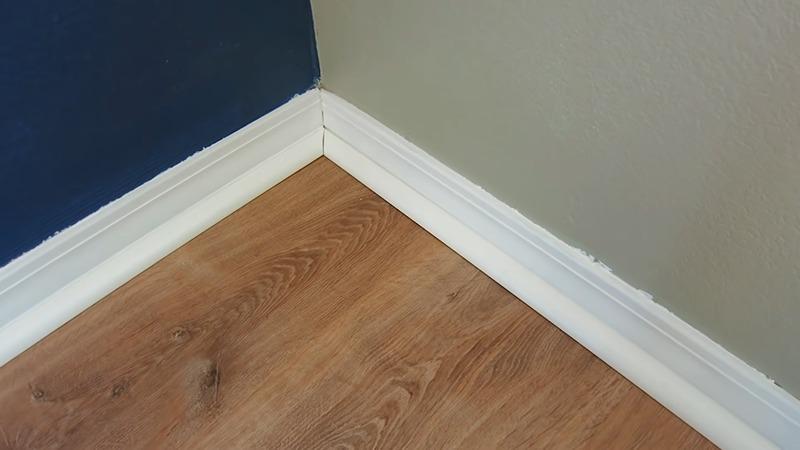
- Once the entire floor is installed, use a T-molding or another transition strip to cover the seam where the two directions of the planks meet at the corner.
Pros and Cons
Pros of making a 90-degree turn with laminate flooring:
- Allows for a seamless transition between different directions of the flooring, creating a clean and professional-looking installation.
- Can avoid a “cross-planked” look in hallways or other areas where the flooring changes direction.
- Can add a unique and interesting visual element to the flooring design.
Cons of making a 90-degree turn with laminate flooring:
- Can be difficult to do accurately, and may require specialized tools and skills.
- May not be possible with all types of laminate flooring, as some may not allow for cutting or modifying the planks.
- This can compromise the stability and durability of the flooring, as the planks may not be securely connected at the corners.
- Can be time-consuming and may require additional material, such as transition strips or moldings, to cover the seams.
What Thickness is Good for 90 Degree Cuts?
It is generally recommended to use laminate flooring that is between 6-12mm thick for 90 degree cuts. Here are five reasons why:
Durability
Thicker laminate flooring is generally more durable and resistant to damage, such as dents, scratches, and wear and tear. This is especially important at corners and other high-traffic areas where the planks may be more susceptible to damage.
Stability
Thicker laminate flooring is also more stable and less likely to warp or buckle over time. This is important for ensuring a smooth, even surface, and can help prevent the planks from separating or coming loose at the corners.
Appearance
In general, thicker laminate flooring has a more realistic and high-quality appearance. This is since thicker planks have more layers, including a thicker backing and a more realistic-looking wear layer.
Sound reduction
Thicker laminate flooring is typically better at reducing noise and improving sound quality in a room. This is since thicker planks have more layers, which can help absorb and reduce sound waves.
Ease of installation
Although thicker laminate flooring may be slightly more difficult to cut and install, it is generally easier to work with than thinner planks. This is because thicker planks are more stable and less likely to warp or break during the installation process. Additionally, the added thickness can help provide more support and stability to the flooring overall.
Tips While Making 90 Degree Cuts
- Start by measuring the width and length of the hallway and calculating the number of laminate planks you will need to cover the entire area.
- Begin installing the laminate planks at the far end of the hallway, parallel to the length of the hallway.
- As you approach the corner, measure and mark the exact location of the 90-degree turn on the last plank.
- Use a jigsaw or circular saw to carefully cut the plank along the marked line, creating two pieces with 45-degree angled ends.
- Remove the cut plank pieces and install the full-length planks on either side of the corner, leaving a small expansion gap between the planks and the walls.
- Use a coping saw or jigsaw to trim the angled ends of the two cut plank pieces so that they fit together at the corner.
- Install the trimmed plank pieces at the corner, making sure the angled ends are securely connected and the planks are level with the surrounding floor.
- Continue installing the planks along the short leg of the hallway, leaving the necessary expansion gap at the walls.
- Once the entire floor is installed, use a transition strip to cover the seam where the two directions of the planks meet at the corner.
- Always use appropriate safety equipment, such as safety glasses and hearing protection, when using power tools.
Frequently Asked Questions
- Can laminate flooring be installed over concrete?
Yes, laminate flooring can be installed over concrete as long as the concrete is clean, dry, and level. It is recommended to use a moisture barrier, such as a plastic vapor barrier, to protect the laminate from moisture and other potential damage. - Can laminate flooring be installed in bathrooms or other damp areas?
In general, it is not recommended to install laminate flooring in bathrooms or other damp areas. This is because laminate flooring is not water-resistant and can be damaged by moisture and humidity. If you want to use laminate in a damp area, it is important to use a moisture barrier and take steps to prevent water from coming into contact with the flooring. - Can laminate flooring be refinished or sanded?
No, laminate flooring cannot be refinished or sanded like hardwood flooring. This is because laminate flooring is made up of a series of layers that are fused together and cannot be sanded down or refinished. If the surface of the laminate becomes damaged, it will need to be replaced. - Can laminate flooring be used with underfloor heating?
Yes, laminate flooring can be used with underfloor heating. In fact, many modern laminate flooring products are specifically designed for use with underfloor heating systems. It is important to check the manufacturer’s instructions to ensure that the laminate is compatible with the type of underfloor heating system being used. - Can laminate flooring be installed on stairs?
Yes, laminate flooring can be installed on stairs, but it can be a more challenging process than installing it on a flat surface. It is important to carefully measure and cut the planks to fit the stairs, and to use a high-quality adhesive to secure the planks in place. It is also recommended to use stair nosing or another type of transition piece to cover the edges of the steps and provide a smooth, seamless transition between the stairs and the floor.
Final Words
Making a 90-degree turn with laminate flooring requires careful planning and attention to detail. By following the steps outlined above and using the right tools and techniques, you can create a professional-looking installation that will last for years to come.
Additionally, following these tips and using appropriate safety equipment can help ensure a safe and successful installation process. With a little patience and effort, you can create a beautiful and functional laminate floor that will enhance the look and value of your home.
Bad laminate flooring may cause your sink to back up, sometimes even drain and make your home dirty.