Installing Sliding Shower Doors With Walls Not Plumb? Your Fix
There is nothing quite like the feeling of unboxing a brand new, gleaming sliding shower door, ready to complete your bathroom oasis. But as you set the frame against the tile, a dreaded realization sinks in—the walls are not perfectly straight. A noticeable gap laughs back at you, turning a straightforward upgrade into a frustrating puzzle.
This scenario is far more common than you might think. From charming older homes with decades of settling to brand new constructions with minor framing imperfections, out-of-plumb walls are a frequent challenge for DIY enthusiasts and even seasoned professionals.
The good news is that a crooked wall doesn’t mean your dream of a perfectly sealed, smoothly gliding shower door is over. With the right knowledge and techniques, you can overcome this obstacle and achieve a professional, watertight installation. This guide will walk you through everything you need to know.
You'll Learn About
Why Perfectly Plumb Walls Are a Rarity
Before diving into the solutions, it’s helpful to understand why your walls might not be perfectly vertical. It’s rarely a sign of a major structural problem. More often, it’s the result of common, subtle issues that occur during a home’s life.
Houses naturally settle over time, causing slight shifts in the framing. Additionally, the process of installing backer board and tile can introduce minor variances. Even a thick layer of tile adhesive applied unevenly can be enough to throw a wall slightly out of plumb, creating installation headaches.
The First Commandment: Measure, Measure, Measure
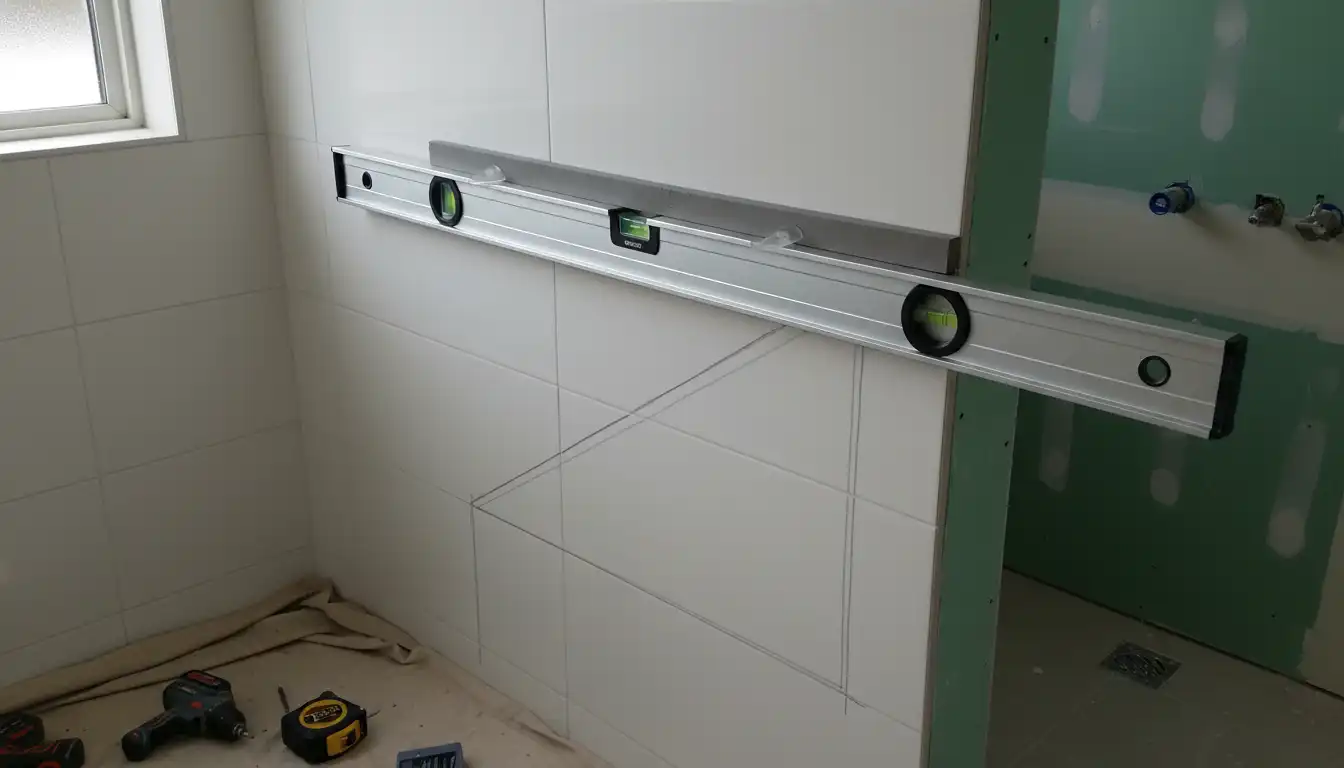
You cannot fix a problem you don’t fully understand. Before you attempt any installation, a thorough measurement of your shower alcove is non-negotiable. This is where you identify the precise nature of the issue.
Your Best Friend: A Reliable Level
A four-foot level is the ideal tool for this job. Press it vertically against the tile on one side of the shower opening. Check the bubble; if it’s not perfectly centered, you have an out-of-plumb wall. Repeat this process at several points along the wall to see if the angle is consistent.
Do the same for the opposite wall. It is entirely possible for one wall to be plumb while the other is not, or for both to lean in different directions. Understanding the unique geometry of your space is crucial.
Width Matters: Top, Middle, and Bottom
Next, use a tape measure to find the width of the shower opening at three distinct points: near the top, across the middle, and just above the shower curb or tub edge. If you get three different numbers, it confirms your walls are not parallel. Make a clear note of these measurements, as they will dictate your installation strategy.
The Strategic Fix: How to Install a Sliding Door on Crooked Walls
Once you’ve diagnosed the problem, you can choose the best method to correct it. Most modern sliding shower doors are designed with some tolerance for out-of-plumb walls, but significant gaps require a more hands-on approach.
Method 1: The Power of Built-In Adjustments
Many sliding door kits come with built-in adjustability. This is your first line of defense. The vertical wall jambs—the metal channels that attach to the walls—are often designed to sit inside a slightly wider U-channel. This allows you to slide the jamb in or out to compensate for a leaning wall while keeping the jamb itself perfectly plumb.
Some models feature adjustable rollers or wall profiles that offer a small range of motion. Always consult your manufacturer’s installation manual to understand the specific adjustment capabilities of your door. Often, these systems can correct for variances up to 3/8 of an inch, which may be all you need.
Method 2: Using Shims for a Plumb Foundation
If the built-in adjustments aren’t enough, shims are your next solution. Shims are thin, tapered pieces of plastic or composite material that can be inserted behind the wall jamb to fill the gap and create a plumb surface for the door frame.
To do this, hold the wall jamb in place and use your level to get it perfectly vertical. You will see a gap between the jamb and the wall, likely wider at the top or bottom. Slide shims into this gap near each screw hole until the jamb is stable and plumb. Do not overtighten the screws, as this can bow the aluminum frame.
Once the jamb is secured, you can trim the protruding ends of the shims with a utility knife. The small remaining gap will be completely covered and sealed with silicone caulk at the end of the installation.
Method 3: When to Use a Filler Strip
For very large gaps (typically over 1/2 inch), a simple shim may not suffice. In these cases, a tapered filler strip is the professional solution. Some high-end door kits include these, but they can also be purchased separately or fashioned from vinyl stock.
A tapered filler is cut to match the exact contour of the gap, providing a solid, continuous surface to mount the wall jamb against. This method provides the most stable and visually appealing result for severely out-of-plumb walls.
Choosing a Door That Forgives Imperfection
If you’re in the planning stages of your project, you can save yourself a lot of trouble by choosing a door designed to handle these issues. Not all shower doors are created equal when it comes to installation flexibility.
Framed Doors Offer More Leeway
Generally, framed or semi-frameless sliding doors provide the most adjustability. Their metal frames and U-channels are specifically designed to conceal imperfections and accommodate slight variances in wall angles. They are an excellent choice for older homes or any installation where you suspect the walls may not be perfect.
Frameless doors, while beautiful, demand near-perfectly plumb walls for a secure and watertight fit. Their minimal hardware offers very little room for error. If your heart is set on a frameless look, consider a professional consultation to ensure your walls are suitable.
Check the Specs Before You Buy
When shopping for a shower door, look for the “out-of-plumb adjustability” range in the product specifications. Manufacturers like Cardinal often highlight this feature, which can range from 1/4 inch to a full inch on some models. Choosing a door with a generous adjustment range is a smart move for any renovation project.
| Correction Method | Best For (Gap Size) | Pros | Cons |
|---|---|---|---|
| Built-in Frame Adjustment | Up to 3/8 inch | Easiest method; no extra parts needed. | Limited range; may not be enough for larger gaps. |
| Plastic/Composite Shims | 1/8 inch to 1/2 inch | Inexpensive and effective; provides solid backing for screws. | Requires careful placement to avoid bowing the frame. |
| Tapered Filler Strip | Over 1/2 inch | Most stable and professional solution for large gaps. | May require custom cutting; can be more complex. |
Knowing When to Call in a Professional
While installing a shower door on out-of-plumb walls is a very manageable DIY project, there is a point where professional help is the wiser choice. If your walls are out of plumb by more than 3/4 of an inch, the installation becomes significantly more complex.
A professional installer has the tools and experience to handle severe cases, potentially by ordering a custom-sized door or scribing fillers for a perfect fit. Investing in professional installation can prevent costly mistakes, water damage, or even the risk of shattered glass from a poorly fitted door.
Whether you’re planning a full shower door to ceiling transformation or a simple upgrade, crooked walls don’t have to stop you. By carefully measuring, choosing the right door, and using the proper correction techniques, you can achieve a flawless, leak-proof installation that looks fantastic and functions perfectly for years to come.
The Final, Crucial Step: A Flawless Silicone Seal
No matter which method you use to plumb the frame, the final step is a meticulous application of silicone caulk. This is what creates the waterproof barrier that prevents leaks and protects your bathroom from water damage.
Apply a continuous bead of 100% silicone caulk designed for kitchens and baths along the inside and outside edges where the metal frame meets the tile and the shower curb. This bead will expertly hide any remaining small gaps from your shims or adjustments, giving the installation a clean, finished look.