How to Remove Grout from Penny Tile: Quick & Easy Method
Penny tiles offer a timeless, charming aesthetic to any space, but they come with a unique challenge: a vast network of grout lines. When that grout becomes stained, cracked, or you simply over-grout during installation, removing it feels like an impossible task. The small, rounded nature of the tiles makes it a delicate operation, where one wrong move can lead to chipped, scratched, or completely ruined tiles.
Many homeowners find themselves staring at a floor or backsplash that’s lost its luster, trapped under a web of discolored or excessive grout. The fear of causing irreparable damage often leads to hesitation, but leaving old, failing grout can result in bigger problems like water damage. This guide will walk you through the safest and most effective methods to reclaim the beauty of your penny tile installation.
You'll Learn About
Why Removing Grout From Penny Tile Is So Tricky
The primary difficulty lies in the sheer number of grout lines and the curved edges of each tile. Unlike standard square or rectangular tiles with straight grout lines, penny rounds present a continuous, winding path. This makes using traditional, straight-edged removal tools a high-risk endeavor.
Furthermore, the small surface area of each tile offers little room for error. A slip of a powerful tool can easily skip over the grout line and gouge the delicate tile surface. Understanding these challenges is the first step toward choosing the right tools and techniques for a successful project.
The Problem with Power Tools and Curved Lines
Power tools like angle grinders or reciprocating saws, while fast, are often too aggressive for the intricate nature of penny tile. It’s incredibly difficult to follow the curved grout lines without nicking the edges of the tiles. This is a common pain point for DIY enthusiasts who, in an attempt to save time, end up causing costly damage.
Even an oscillating multi-tool, often hailed as a go-to for grout removal, requires immense control and a very steady hand. The vibration can cause the blade to jump, and the flat edge of the blade isn’t ideal for the concave lines surrounding each penny tile. Many professionals advise against using aggressive power tools unless you have significant experience.
Preparing for Grout Removal: Safety and Setup
Before you begin chipping away at old grout, proper preparation is crucial for both your safety and the protection of your surrounding space. Grout removal creates a significant amount of fine dust, which can be harmful if inhaled. Taking the time to set up your workspace correctly will make the entire process smoother and safer.
First, ensure the area is well-ventilated by opening windows and using fans. Cover drains, furniture, and any fixtures with plastic sheeting and painter’s tape to protect them from dust and debris. If you’re working on a project like a fireplace surround, make sure to read up on tasks such as fireplace gas valve cover plate removal to ensure all components are properly protected.
Essential Safety Gear You Can’t Skip
Your personal safety is non-negotiable. Always wear safety goggles to protect your eyes from flying grout particles. A dust mask or respirator is equally important to prevent inhaling harmful silica dust. Finally, a good pair of work gloves will protect your hands from abrasions and the sharp edges of your tools.
Step-by-Step Guide: Manual Grout Removal Methods
For penny tile, manual removal is often the safest and most precise approach. It requires more patience and elbow grease, but it gives you maximum control, significantly reducing the risk of damaging your tiles. These methods are perfect for homeowners who prioritize precision over speed.
Start by gathering your tools. You’ll need a carbide-tipped grout scraper or a specialized grout saw. These hand tools are designed to fit into narrow grout lines and have durable blades that can stand up to the abrasive nature of grout without dulling too quickly.
The Grout Scraper Technique
A carbide-tipped grout scraper is one of the most effective manual tools for this job. Its triangular or pointed tip can navigate the curves around penny tiles more effectively than a flat-bladed tool. Start by applying firm, steady pressure and run the scraper along the grout line.
Work in small sections, carefully following the curve of each tile. The goal is to remove at least half the depth of the old grout to ensure the new grout has a solid base to adhere to. It’s a slow process, but the control it offers is unmatched.
Using a Grout Saw for Precision
A grout saw is another excellent manual option. It features a handle and one or two carbide-grit blades. This tool works like a small saw, allowing you to “cut” through the old grout with a back-and-forth motion.
This method is particularly useful for harder, sanded grouts. While it still requires effort, the sawing action can be less strenuous than pure scraping for some individuals. Again, patience is key; let the tool do the work and avoid forcing it, which could cause it to slip and scratch the tile.
When to Cautiously Use Power Tools
While manual methods are safest, power tools can be used on penny tile with extreme caution and the right attachments. An oscillating multi-tool is the most commonly recommended power tool for this task due to its relative precision compared to more aggressive options. This is a job that requires focus, so if you’re feeling fatigued from other household tasks, it’s best to wait.
If you’re already tackling other physically demanding projects, you might ask yourself, “am I too heavy to get on my roof?” It’s a reminder to assess your physical limits and ensure you have the steady hand required for this delicate work before you even begin.
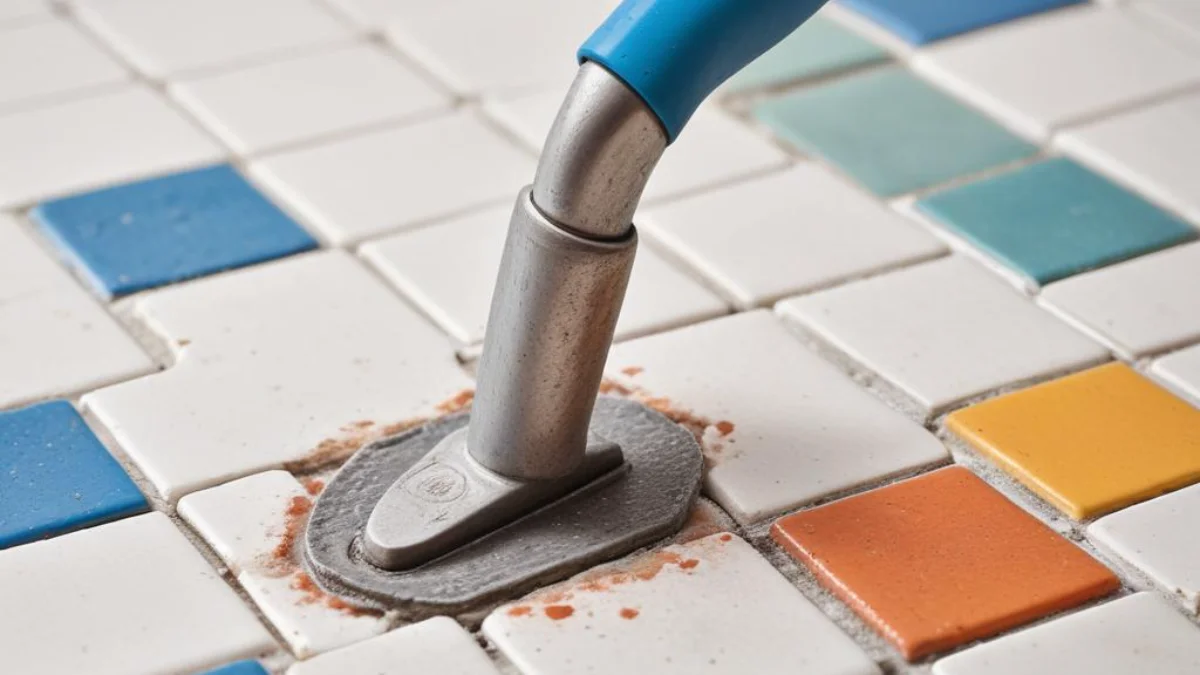
The Oscillating Multi-Tool Method
If you opt for an oscillating tool, you must use a specific grout removal blade. These are typically diamond-coated or carbide-tipped and come in various shapes. For penny tile, a rounded or curved blade is ideal as it can better follow the contours of the tiles.
Set your tool to a low speed to start. High speeds increase the risk of the blade jumping and damaging the tile. Let the tool’s vibrations do the work; do not apply excessive force. Guide the blade carefully along the grout lines, paying close attention to the edges of each penny tile.
| Grout Removal Method | Best For | Pros | Cons |
|---|---|---|---|
| Manual Grout Scraper | Small areas, delicate tiles, DIY beginners | Maximum control, low risk of tile damage, inexpensive | Time-consuming, labor-intensive |
| Manual Grout Saw | Harder sanded grouts, precise lines | Good control, effective on tough grout | Slower than power tools, can be tiring |
| Oscillating Multi-Tool | Larger areas, experienced users | Much faster than manual methods | Higher risk of damaging tiles, requires a very steady hand |
| Rotary Tool (e.g., Dremel) | Detail work, tight corners, experienced users | Excellent for precision in tight spots | Can easily damage tiles if not controlled, creates a lot of dust |
Cleaning Up and Preparing for New Grout
Once you have successfully removed the bulk of the old grout, a thorough cleanup is essential. Use a shop vacuum with a brush attachment to meticulously remove all dust and debris from the grout lines. Any remaining particles can compromise the bond of the new grout.
After vacuuming, wipe the tiles and grout lines with a damp sponge to remove any lingering dust. Allow the entire area to dry completely before you even think about applying new grout. This is a critical step for ensuring a long-lasting and professional-looking finish.
Dealing with Stubborn Haze and Residue
Sometimes, even after thorough scraping, a thin layer of grout haze remains on the tile surface. For this, you can use a commercial grout haze remover or a homemade solution of white vinegar and water. Be sure to test any chemical cleaner on an inconspicuous area first, especially if you have natural stone or unglazed tiles.
Apply the cleaner according to the manufacturer’s instructions and use a non-abrasive scrub pad to gently lift the haze. Rinse the area thoroughly with clean water afterward to neutralize any acidic residue. A clean surface is paramount for the next steps.
Final Thoughts on Your Penny Tile Project
Removing grout from penny tile is undoubtedly a challenging and tedious task, but it is not impossible. The key to success is prioritizing patience and control over speed. By choosing the right tools for your skill level and taking a careful, methodical approach, you can successfully refresh your tiled surface without causing damage.
Whether you opt for the safety of manual tools or the cautious speed of an oscillating tool, the result will be a clean slate ready for fresh grout. This project can dramatically transform the look of your space, restoring the intricate beauty of your penny tile installation. If you are considering a full bathroom remodel, exploring options and understanding the Kohler LuxStone price can provide valuable context for your project’s budget and scope.