How to Remove a Stuck Furnace Filter: Tips and Techniques for Easy Removal
Changing your furnace filter is an essential maintenance task that ensures your HVAC system functions efficiently and maintains indoor air quality. However, sometimes, removing a stuck furnace filter can be a challenging task.
Whether due to debris buildup, improper installation, or other factors, a stuck filter can cause frustration and delay your maintenance routine.
In this comprehensive guide, we’ll explore various methods and techniques for safely and effectively removing a stuck furnace filter, allowing you to maintain your HVAC system with ease.
You'll Learn About
Understanding the Importance of Changing Furnace Filters
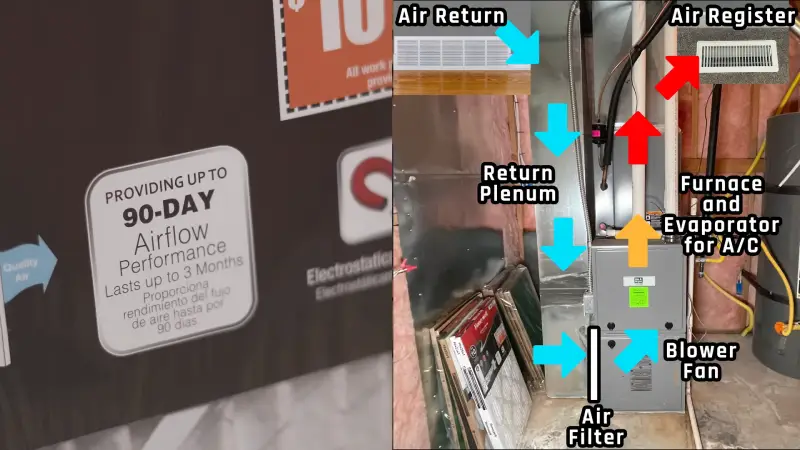
Function of Furnace Filters
- Air Quality: Furnace filters trap dust, dirt, pollen, and other airborne particles, improving indoor air quality and reducing allergens.
- HVAC Efficiency: Clean filters allow for proper airflow, which helps your HVAC system operate efficiently and reduces energy consumption.
- System Longevity: Regular filter changes prevent strain on your HVAC system, prolonging its lifespan and reducing the risk of costly repairs.
Frequency of Filter Changes
- The frequency of filter changes depends on factors such as filter type, household size, pets, and indoor air quality.
- Generally, it’s recommended to check and replace disposable filters every 1-3 months and clean or replace reusable filters every 3-6 months.
Common Reasons for a Stuck Furnace Filter
Accumulated Debris
- Dust, dirt, and debris can accumulate around the filter, causing it to become stuck in the filter housing.
Incorrect Installation
- Filters that are installed improperly may not align correctly with the housing, making them difficult to remove.
Aging Filters
- Over time, filters may deteriorate or become brittle, making them more challenging to remove.
Methods for Removing a Stuck Furnace Filter
1. Use a Filter Removal Tool
Removing a stuck furnace filter can be a challenging task, especially when it’s tightly lodged within its housing. However, with the right approach and tools, you can effectively tackle this issue without causing damage to the filter or the furnace. One method commonly used for this purpose is employing a filter removal tool. Let’s delve into the detailed steps of using this tool to remove a stuck furnace filter:
Step 1: Assess the Situation Before attempting to remove the stuck filter, it’s essential to assess the situation carefully. Take note of any visible obstructions or irregularities around the filter housing. Ensure that the furnace is turned off to prevent any accidents during the removal process.
Step 2: Prepare the Filter Removal Tool Retrieve the filter removal tool from your toolkit. These tools are specially designed to grip and extract stuck filters efficiently. Familiarize yourself with the tool’s features, such as its gripping mechanism and handle.
Step 3: Position the Tool Carefully position the filter removal tool at an angle that allows easy access to the filter housing. Ensure that the tool is aligned properly to prevent slippage or damage to the housing.
Step 4: Insert the Tool Insert the filter removal tool into the filter housing, ensuring that it securely grips the filter. The tool’s gripping mechanism should latch onto the filter’s surface, providing a firm hold for extraction.
Step 5: Apply Pressure With the tool securely in place, apply gentle but firm pressure to pull the filter out of the housing. Use steady force, avoiding sudden or jerky movements that may cause damage to the filter or the furnace components.
Step 6: Rotate if Necessary If the filter is stuck at an angle or appears to be wedged tightly within the housing, try rotating it slightly while applying pressure. Rotating the filter can help loosen any debris or residue that may be causing it to stick.
Step 7: Repeat as Needed If initial attempts to remove the filter are unsuccessful, repeat the process, adjusting the angle and pressure as necessary. Exercise patience and caution to avoid causing damage to the filter or the furnace.
Step 8: Inspect the Filter and Housing Once the filter has been successfully removed, inspect both the filter and the housing for any signs of damage or debris. Clean the filter housing thoroughly to ensure proper airflow and filtration efficiency.
Step 9: Replace the Filter After removing the stuck filter, replace it with a new filter of the appropriate size and type. Ensure that the filter is installed correctly, with the airflow direction indicator pointing in the right direction.
Step 10: Test the Furnace Before turning the furnace back on, perform a quick test to ensure that the new filter is properly installed and the housing is secure. Monitor the furnace operation for any unusual noises or malfunctions.
2. Apply Lubrication
When faced with a stuck furnace filter, utilizing lubricants such as silicone spray or WD-40 can be an effective solution to loosen the filter and facilitate its removal. These lubricants work by reducing friction between the filter and the housing, making it easier to dislodge the filter without causing damage. Let’s explore the step-by-step process of using lubricants to remove a stuck furnace filter:
Step 1: Assess the Situation Before applying any lubricant, carefully assess the condition of the stuck filter and its housing. Check for any visible obstructions or signs of damage that may hinder the removal process. Ensure that the furnace is turned off to prevent any accidents during the procedure.
Step 2: Select the Lubricant Choose an appropriate lubricant for the task, such as silicone spray or WD-40. These lubricants are known for their ability to penetrate tight spaces and reduce friction effectively.
Step 3: Prepare the Work Area Clear any debris or clutter around the furnace area to provide ample space for maneuvering. Place a protective covering or old cloth beneath the filter housing to catch any excess lubricant and prevent staining.
Step 4: Spray Lubricant Shake the lubricant canister well to ensure proper mixing of the ingredients. Apply a small amount of lubricant around the edges of the stuck filter where it contacts the housing. Aim to coat the entire perimeter of the filter with a thin layer of lubricant.
Step 5: Allow Time for Penetration After applying the lubricant, allow it sufficient time to penetrate and loosen any debris, adhesive, or rust that may be holding the filter in place. The waiting time may vary depending on the severity of the stuck filter, but a few minutes should typically suffice.
Step 6: Attempt Removal Once the lubricant has had time to work its magic, attempt to remove the filter using gentle pressure. Grasp the edges of the filter firmly and try to wiggle it back and forth to loosen it from the housing. Avoid using excessive force, as this may cause damage to the filter or the furnace components.
Step 7: Repeat as Needed If the filter remains stuck after the initial attempt, reapply the lubricant and repeat the process. Be patient and persistent, adjusting your technique as necessary to gradually loosen the filter from the housing.
Step 8: Clean Up After successfully removing the stuck filter, wipe away any excess lubricant from the filter housing and surrounding area using a clean cloth. Dispose of the used cloth and any debris responsibly.
Step 9: Inspect and Replace Inspect both the filter and the housing for any signs of damage or wear. If the filter is damaged or excessively dirty, replace it with a new one of the appropriate size and type.
Step 10: Test the Furnace Before restarting the furnace, perform a quick test to ensure that the filter is properly installed and the housing is secure. Monitor the furnace operation for any unusual noises or malfunctions.
3. Use a Pry Bar or Screwdriver
When dealing with a stubbornly stuck furnace filter, employing a pry bar or screwdriver can offer an effective solution to dislodge it from its housing. However, it’s crucial to proceed with caution to avoid damaging either the filter or the housing. Let’s outline the step-by-step process of using a pry bar or screwdriver to remove a stuck furnace filter:
Step 1: Prepare the Work Area Before beginning the removal process, ensure that the furnace is turned off to prevent any accidents. Clear the surrounding area of any clutter or obstacles to provide adequate space for maneuvering.
Step 2: Select the Tool Choose an appropriate tool for the task, such as a pry bar or a flathead screwdriver. Opt for a tool that is sturdy and has a slim profile to fit between the filter and the housing without causing damage.
Step 3: Assess the Situation Carefully inspect the stuck filter and its housing to identify any potential obstacles or irregularities. Take note of the filter’s orientation and any visible signs of damage or corrosion.
Step 4: Insert the Tool With the chosen tool in hand, gently insert it between the edge of the filter and the housing. Be mindful not to force the tool into tight spaces, as this may cause damage to the filter or the housing.
Step 5: Apply Pressure Once the tool is properly positioned, apply gentle pressure to pry the filter away from the housing. Work around the edges of the filter, gradually increasing the pressure as needed to loosen it from its stuck position.
Step 6: Rotate if Necessary If the filter is stuck at an angle or appears to be wedged tightly within the housing, try rotating it slightly while applying pressure with the tool. Rotating the filter can help to dislodge any debris or adhesive that may be causing it to stick.
Step 7: Work Carefully Exercise caution and patience throughout the removal process to avoid causing damage to the filter or the housing. Take breaks as needed to reassess the situation and adjust your approach if necessary.
Step 8: Continue Prying Continue to pry the filter away from the housing, working methodically around the edges until it begins to loosen. Avoid using excessive force, as this may result in damage to the filter or the furnace components.
Step 9: Remove the Filter Once the filter has been successfully loosened from the housing, carefully remove it from the furnace. Inspect the filter for any signs of damage or wear, and dispose of it responsibly if necessary.
Step 10: Clean Up Clean any debris or lubricant from the filter housing and surrounding area using a soft cloth or brush. Ensure that the housing is clear of any obstructions before installing a new filter.
Preventative Maintenance Tips
Regular Inspections
- Regularly inspect your furnace filter housing and replace filters according to manufacturer recommendations to prevent them from becoming stuck.
Proper Installation
- Ensure filters are installed correctly and securely to prevent misalignment and sticking.
Routine Cleaning
- Keep the filter housing and surrounding area clean to prevent debris buildup that can contribute to sticking.
Informative Table: Comparison of Methods for Removing Stuck Furnace Filters
| Method | Description | Usage |
|---|---|---|
| Filter Removal Tool | Specially designed tool for gripping filters | Insert into housing and apply pressure to remove filter |
| Lubrication | Use of lubricants to reduce friction | Apply around filter edges and attempt removal |
| Pry Bar or Screwdriver | Use of tools to gently pry filter | Insert tool between filter and housing and apply pressure |
| Professional Assistance | Seek help from HVAC technician | Contact professional if DIY methods are unsuccessful |
Conclusion
Removing a stuck furnace filter may seem daunting, but with the right methods and techniques, it can be accomplished safely and effectively.
Whether using specialized tools, lubrication, or seeking professional assistance, addressing a stuck filter promptly is essential to maintain the efficiency and longevity of your HVAC system. Also, look for proper furnace code.
By following preventative maintenance tips and staying proactive with filter changes, you can minimize the risk of filters becoming stuck in the future and ensure smooth operation of your heating and cooling system.