Fix a Broken Bed Headboard: Your Ultimate DIY Repair Guide
A broken headboard can instantly downgrade your bedroom’s aesthetic, transforming a restful sanctuary into a space that feels neglected. Beyond appearances, a damaged headboard can be a genuine nuisance, causing instability, annoying noises, or even posing a safety risk. The good news is that you don’t have to live with it or rush to buy a new bed set.
Most headboard issues, from minor cracks to significant structural breaks, are surprisingly fixable with a bit of patience and the right approach. This guide will walk you through everything you need to know to diagnose the problem, gather your tools, and execute a durable, professional-quality repair, regardless of your headboard’s material.
You'll Learn About
First, Assess the Damage: What Are You Dealing With?
Before you can begin any repair, a thorough inspection is critical. Understanding the material and the specific type of damage will dictate your repair strategy. Different materials have unique failure points and require distinct tools and techniques for a successful fix.
Take the time to carefully examine the entire headboard, not just the most obvious break. Look for stress fractures, loose joints, and any collateral damage that might compromise the structure. A small, visible crack could be a symptom of a larger, hidden issue like a weakened joint elsewhere on the frame.
Common Headboard Materials and Breaks
Headboards are typically made from wood, metal, or are upholstered over a frame. Wooden headboards are the most common and are susceptible to a range of issues. You might find splits along the grain, deep cracks in the posts, broken decorative elements, or wobbly legs where they connect to the bed frame.
Metal headboards often suffer from bent frames, broken welds at the joints, or stripped bolts that cause instability. Upholstered headboards present their own challenges, which can include torn fabric, detached buttons or tufting, and, most critically, a broken internal frame, which is usually made of wood.
Essential Tools and Materials for Your Headboard Repair
Having the right supplies on hand before you start will make the repair process smooth and efficient. While the specific items will vary based on the damage, some tools are universally helpful for furniture repair. Investing in a few key items can save you countless headaches on this and future home projects.
The table below outlines the essential tools and materials you’ll likely need, categorized by the type of headboard you’re repairing. This will help you build a shopping list and ensure you’re prepared for the task ahead.
| Item | Primary Use | Repair Type |
|---|---|---|
| Wood Glue (PVA) | Bonding cracked or split wood pieces. | Wood, Upholstered Frame |
| Clamps (Bar, C, or Ratchet Straps) | Holding glued wood pieces together securely while they dry. | Wood, Upholstered Frame |
| Screwdriver/Drill | Tightening, removing, and driving screws. | All Types |
| Wood Filler/Epoxy Putty | Filling gaps, stripped screw holes, and cosmetic imperfections. | Wood |
| Metal Braces/Mending Plates | Reinforcing broken legs, posts, or frame joints. | Wood, Upholstered Frame |
| Rubber Mallet | Straightening bent metal without damaging the finish. | Metal |
| High-Strength Metal Epoxy (e.g., J-B Weld) | Bonding broken metal pieces or reinforcing weak welds. | Metal |
| Fabric Glue/Iron-On Patches | Mending small rips or tears in fabric. | Upholstered |
| Staple Gun | Re-attaching fabric to an upholstered headboard frame. | Upholstered |
| Sandpaper (Various Grits) | Smoothing wood filler and preparing surfaces for finishing. | Wood |
Step-by-Step Guide: How to Fix a Wooden Headboard
Wooden headboards are highly reparable, and most issues can be solved with some basic woodworking techniques. From wobbles to full breaks, a systematic approach will ensure a lasting fix that restores both function and beauty to your bed.
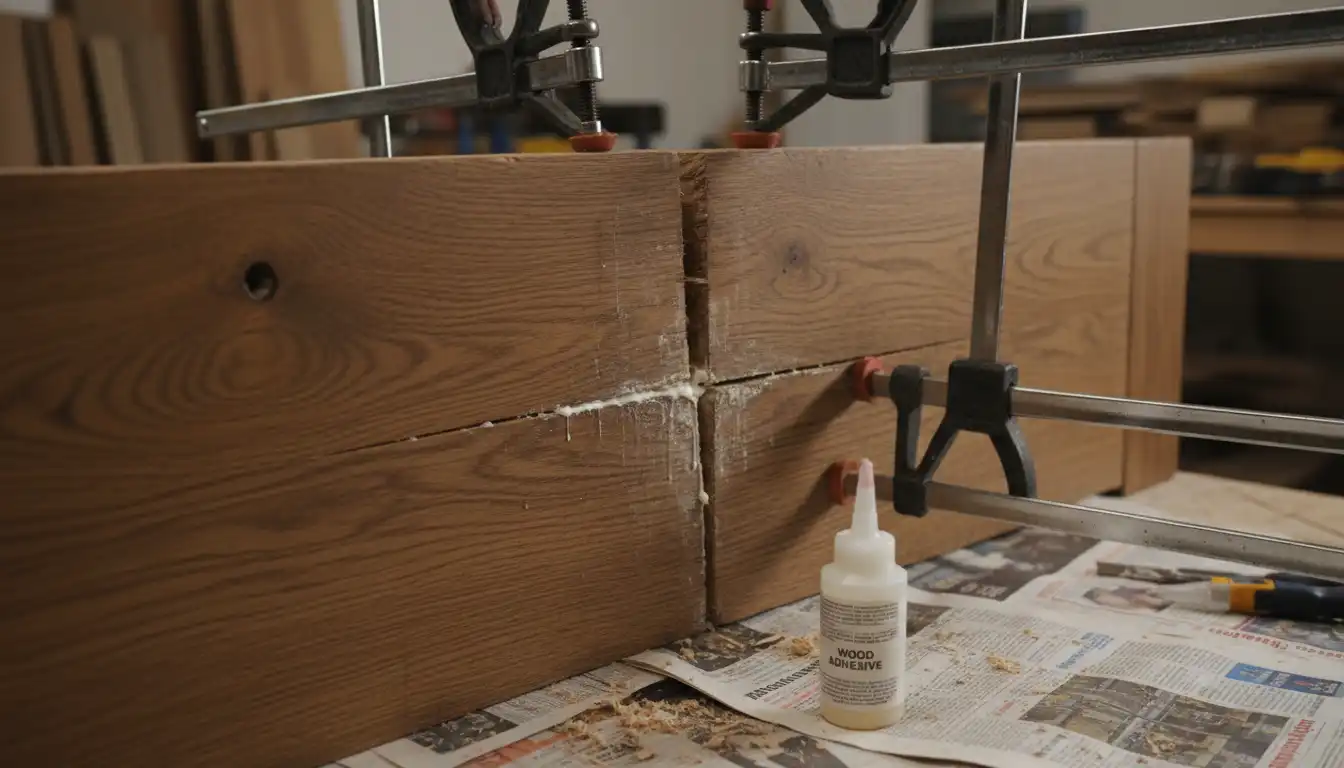
Fixing Cracks and Splits
For a clean crack or split where the two pieces of wood fit together perfectly, high-quality wood glue is your best friend. The key to a strong bond is clean surfaces and firm, consistent pressure. First, clean any dust or debris from inside the crack using a small brush or compressed air.
Apply a generous amount of wood glue to both surfaces of the break. Press the pieces together firmly and use clamps to hold them in place. Wipe away any excess glue that squeezes out with a damp cloth immediately, as dried glue can be difficult to remove and may interfere with the final finish.
Repairing a Broken Leg or Post
A completely broken leg or post is a more serious structural problem, but it is still very manageable. After gluing the broken pieces back together, the repair must be reinforced to handle future stress. This is where metal mending plates or braces are essential.
Choose a brace that is appropriately sized for the break. Position it on the back or least visible side of the headboard, spanning the crack. Mark the screw holes, drill pilot holes to prevent the wood from splitting, and then secure the brace with screws. For an even stronger repair, you can use two braces to “sandwich” the broken leg.
Solving the Wobbly Headboard Mystery
A wobbly headboard is one of the most common bedroom complaints. The fix is often surprisingly simple: check the bolts that connect the headboard legs to the metal bed frame. Over time, these can loosen. Simply tightening them with a wrench may solve the problem instantly.
If the bolts are tight but the wobble persists, the issue may be stripped screw holes in the wooden leg. To fix this, remove the bolt and fill the hole with a wood-friendly epoxy putty or by gluing in wooden toothpicks or a small dowel. Once the filler has completely cured, you can drill a new pilot hole and re-insert the screw for a tight, secure fit.
Tackling Metal Headboard Repairs
Metal headboards are durable, but they are not immune to damage. Bends and broken welds are the most common culprits behind a faulty metal headboard. While some repairs may require professional tools, many issues can be addressed with some clever DIY solutions.
Straightening Bent Metal
For minor bends in a hollow metal tube or frame, you can often gently tap it back into shape. Always use a rubber mallet instead of a metal hammer to avoid denting the surface or chipping the paint. Placing a block of scrap wood over the bend can also help distribute the force of the mallet and protect the finish.
Work slowly and apply moderate force, checking your progress frequently. Attempting to straighten a severe bend too quickly can cause the metal to crease or break. If the bend is significant, it may be best to consult a metal fabrication shop.
Securing Loose or Broken Welds
A broken weld is a critical failure point. While professional welding is the ideal solution, it’s not a practical option for most homeowners. For a strong and reliable DIY alternative, you can use a high-strength, two-part metal epoxy.
Clean the area around the broken weld thoroughly with a wire brush to remove any rust or loose paint. Mix the epoxy according to the manufacturer’s instructions and apply it generously to the joint, ensuring it fills any gaps. Clamp the pieces in place if possible and allow the epoxy to cure completely, which can take up to 24 hours.
Reviving Your Upholstered Headboard
Upholstered headboards offer comfort and style, but their soft surfaces can be prone to tears, and their hidden frames can break just like any other. Luckily, both the fabric and the frame can be repaired to restore your headboard’s plush appearance.
Mending Rips and Tears in Fabric
For small rips, a specialty fabric glue can often do the trick. Apply it carefully to the edges of the tear and press them together. For a stronger, less visible repair on a larger tear, you may be able to apply an iron-on patch to the *inside* of the fabric, pulling the torn edges together from behind.
If the damage is too extensive, reupholstering is a fantastic option. While it sounds intimidating, recovering a simple headboard is a very achievable DIY project. It gives you the opportunity to completely refresh your bedroom’s style with a new fabric color or pattern.
Fixing a Broken Internal Frame
If your upholstered headboard feels floppy or has lost its shape, the internal frame is likely broken. To access it, you will need to carefully remove the dust cover fabric on the back, which is usually held on by staples. Use pliers or a staple remover to pry them out.
Once the frame is exposed, you can repair it using the same methods for a wooden headboard. Use wood glue and clamps for cracks, and add metal braces for reinforcement. After the frame is sturdy, simply use a staple gun to re-attach the dust cover, pulling it taut for a clean finish.
The Unspoken Culprit: Why Your Headboard Broke in the First Place
Understanding the root cause of the damage is key to preventing a repeat performance. A repair is only as good as the conditions it lives in. Many headboard failures are not sudden events but the result of chronic, underlying stress on the frame.
Often, instability comes from the ground up. An uneven floor can cause the entire bed to sit at a slight angle, putting constant, uneven pressure on the joints connecting the headboard and frame. In rooms with challenging layouts, such as those with low 7ft ceilings, furniture is often placed in tight spots, increasing the risk of damage during movement or cleaning.
Another frequent cause is improper assembly. If bolts were not fully tightened or if the wrong size hardware was used, the joints will have too much play, leading to wear and tear over time. Finally, consider how the headboard is used. Leaning heavily against it with pillows without any wall support can place a significant load on the legs and mounting bolts.
Beyond the Fix: Refinishing and Upgrading Your Repaired Headboard
A repair doesn’t have to be just a repair; it can be an opportunity for a creative upgrade. Once you’ve restored the structural integrity of your headboard, consider giving it a cosmetic facelift. This can turn a frustrating break into a positive transformation for your bedroom.
For a wooden headboard, a fresh coat of paint or a new stain can completely change its character. You could go for a bold, modern color or a classic, rich wood tone. For upholstered headboards, as mentioned, reupholstering opens up a world of design possibilities.
Don’t be afraid to add new details. You can install decorative nailhead trim around the border of an upholstered headboard for a high-end look. For wooden headboards, you could add carved appliques or other decorative moldings to give a plain piece a more intricate, custom appearance.
Your Bed, Restored: Enjoying a Sturdy and Stylish Headboard
Fixing a broken headboard is a deeply satisfying project that saves money and keeps a perfectly good piece of furniture out of the landfill. By carefully assessing the damage, using the right tools, and applying proven repair techniques, you can restore your headboard to its former glory.
Remember that a successful repair is built on a foundation of thorough preparation and patience. A strong, stable, and stylish headboard not only completes the look of your bed but also contributes to a more restful and secure sleeping environment. Enjoy the peace of mind that comes with a solid, wobble-free bed, fixed by your own two hands.