How to Finish a Basement With Low Air-ducts?
HVAC ductwork is an essential component of any building’s heating, ventilation, and air conditioning (HVAC) system. It is used to distribute air throughout the building and ensure that all areas are adequately heated and cooled. However, in some cases, the ductwork can be an obstacle when it comes to finishing a basement or other space.
In this article, we will discuss some solutions for dealing with low air ducts in a basement, including boxing them in, relocating them, using them as a design feature, installing a suspended ceiling, and installing a bulkhead. By understanding the options available and working with a qualified HVAC professional, you can successfully finish your basement and add valuable living space to your home.
You'll Learn About
How to Finish a Basement With Low Air-ducts?
There are several methods for finishing basement with low air ducts.
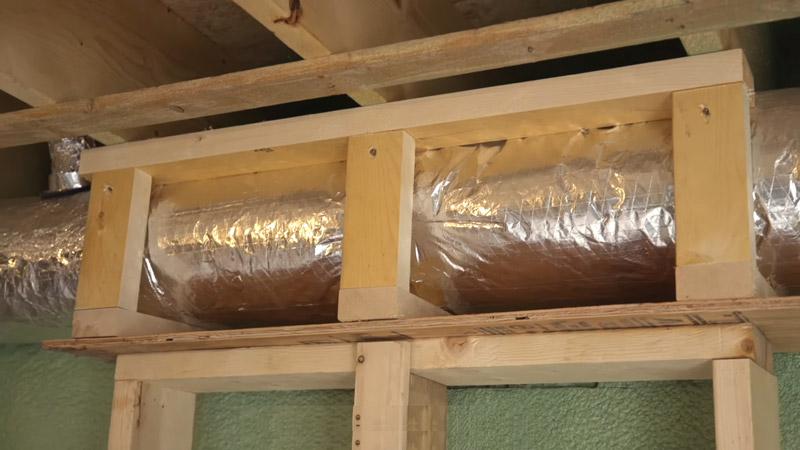
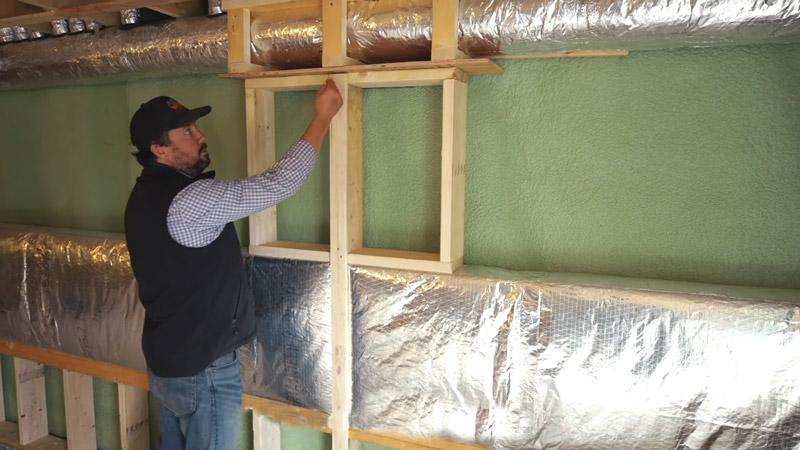
- Box in the air ducts: One option for finishing a basement with low air ducts is to box them in. This involves framing in the ducts with wood or other materials and covering them with drywall or another finish. This can help to create a more finished look and allow you to use the space above the ducts for other purposes.
- Relocate the air ducts: Another option is to relocate the air ducts to a different location in the basement, such as along the walls or in the ceiling. This can be a more complex and expensive solution, but it can also provide the most flexibility in terms of how you finish the space.
- Use the air ducts as a design feature: Instead of trying to hide or relocate the air ducts, you could consider using them as a design feature. For example, you could paint the ducts a contrasting color and incorporate them into the overall design of the space.
- Install a suspended ceiling: Another option is to install a suspended ceiling below the air ducts. This can help to create a more finished look and provide additional space above the ducts for storage or other purposes.
- Install a bulkhead: A bulkhead is a box-like structure that can be installed around the air ducts to cover them and create a more finished look. This can be a cost-effective solution, but it may also limit your ability to use the space above the ducts for other purposes.
Box in the air ducts
One option for finishing a basement with low air ducts is to box them in. This involves framing the ducts with wood or other materials and covering them with drywall or another finish. This can help to create a more finished look and allow you to use the space above the ducts for other purposes.
To box in the air ducts, you will need the following tools and materials:
- Measuring tape
- Pencil or pen
- Straight edge or level
- Saw (circular, jigsaw, or hand saw)
- Screw gun or drill
- Screws or nails
- Wood (for framing)
- Drywall or other finish material
Here is a step-by-step guide to boxing in the air ducts:
- Measure the width and height of the air ducts.
- Using the measurements, cut pieces of wood to fit around the ducts. These will form the frame for the box.
- Use the screw gun or drill to attach the frame pieces to the ceiling and floor, making sure they are level and square.
- Cut pieces of drywall or other finish material to fit inside the frame. Attach the pieces to the frame using screws or nails.
- Once the box is complete, you can add additional finishes, such as paint or texture, to match the rest of the basement.
Relocate the air ducts
Relocating the air ducts in a basement is a more complex solution that can provide the most flexibility in terms of how you finish the space. It involves moving the air ducts to a different location in the basement, such as along the walls or in the ceiling.
To relocate the air ducts, you will need a few tools and materials, including:
- Measuring tape
- Pencil or pen
- Drywall saw
- Hammer
- Nails or screws
- Duct tape
- HVAC foil tape
Here is a step-by-step guide for relocating the air ducts in a basement:
- Measure the existing air ducts and determine the new location where you want to move them. Make sure the new location will provide adequate airflow and ventilation.
- Use a drywall saw to cut an opening in the ceiling or wall where the new air ducts will be located. Make sure the opening is large enough to accommodate the ducts.
- Disconnect the existing air ducts from the HVAC system and carefully remove them from the old location.
- Install the new air ducts in the new location, using nails or screws to secure them to the ceiling or wall.
- Use duct tape and HVAC foil tape to seal the joints between the air ducts and ensure a tight fit.
- Reconnect the air ducts to the HVAC system and test the airflow to make sure it is adequate.
- Install drywall or other materials to cover the opening where the air ducts were removed, and finish the space as desired.
By following these steps, you can successfully relocate the air ducts in a basement and create additional space for finishing. It is important to work with a qualified HVAC professional to ensure the air ducts are installed properly and provide adequate ventilation.
Use the air ducts as a design feature
Using the air ducts as a design feature in a finished basement can be a creative and cost-effective solution. It involves incorporating the air ducts into the overall design of the space, rather than trying to hide or relocate them.
To use the air ducts as a design feature, you will need the following tools and materials:
- Paint and paint brushes
- Masking tape
- Drop cloths
- Ladder
Here is a step-by-step guide for using the air ducts as a design feature in a finished basement:
- Clean the air ducts thoroughly to remove any dust or debris.
- Use masking tape and drop cloths to protect the surrounding surfaces from paint splatters.
- Use a ladder to access the air ducts and apply a coat of paint to them. You can use a contrasting color to make the ducts stand out or choose a color that matches the rest of the space.
- Allow the paint to dry completely, then remove the masking tape and drop cloths.
- Finish the rest of the space as desired, incorporating the painted air ducts into the overall design. You can use furniture and decor to highlight the ducts and create a unique and interesting look.
By following these steps, you can use the air ducts as a design feature in a finished basement. This can be a cost-effective solution that allows you to add character and interest to the space. It is important to use high-quality paint and apply multiple coats for the best results.
Install a suspended ceiling
Installing a suspended ceiling below the air ducts in a basement is a common solution for finishing the space. A suspended ceiling, also known as a drop ceiling, is a grid-like structure that is hung from the ceiling and can be used to hide the air ducts and create a more finished look.
To install a suspended ceiling, you will need the following tools and materials:
- Measuring tape
- Pencil or pen
- Suspended ceiling grid kit
- Suspended ceiling tiles
- Suspended ceiling hangers
- Ceiling tile adhesive
- Ladder
Here is a step-by-step guide for installing a suspended ceiling in a basement with low air ducts:
- Measure the dimensions of the space and determine the size of the suspended ceiling grid and tiles needed.
- Install the suspended ceiling grid using the hangers and ceiling tile adhesive, according to the manufacturer’s instructions. Make sure the grid is level and evenly spaced.
- Cut the suspended ceiling tiles to fit the grid, using a utility knife or other cutting tool.
- Install the ceiling tiles in the grid, using the ceiling tile adhesive to secure them in place.
- Use a ladder to access the air ducts and make any necessary adjustments to ensure they are hidden by the suspended ceiling.
- Finish the space as desired, incorporating the suspended ceiling into the overall design.
By following these steps, you can install a suspended ceiling in a basement with low air ducts. This can create a more finished look and provide additional space above the ducts for storage or other purposes. It is important to carefully measure and plan the installation, and to follow the manufacturer’s instructions for the best results.
Install a bulkhead
Installing a bulkhead around the air ducts in a basement is a cost-effective solution for finishing the space. A bulkhead is a box-like structure that can be installed around the air ducts to cover them and create a more finished look.
To install a bulkhead, you will need the following tools and materials:
- Measuring tape
- Pencil or pen
- Miter saw
- Nails or screws
- Drywall or other materials for the bulkhead
Here is a step-by-step guide for installing a bulkhead around air ducts in a basement:
- Measure the dimensions of the air ducts and determine the size of the bulkhead needed.
- Use a miter saw to cut the pieces for the bulkhead frame, according to the measurements. Assemble the frame using nails or screws.
- Install the bulkhead frame around the air ducts, using nails or screws to secure it in place.
- Cut and attach the drywall or other materials to the frame, using nails or screws.
- Use joint compound and a putty knife to smooth out any seams and create a seamless finish.
- Sand and paint the bulkhead to match the rest of the space.
By following these steps, you can install a bulkhead around the air ducts in a basement. This can provide a cost-effective solution for creating a more finished look and covering the ducts. It is important to carefully measure and plan the installation, and to use high-quality materials for the best results.
Which Method is the Best?
It is difficult to determine which method is the best for dealing with low air ducts in a basement, as it depends on the specific situation and the preferences of the homeowner. Each method has its own advantages and disadvantages, and the best solution may vary depending on the space and the budget.
Here is a comparison table of the different methods for dealing with low air ducts in a basement:
| Method | Advantages | Disadvantages |
|---|---|---|
| Box in the air ducts | Cost-effective, can create a more finished look | Limited flexibility, may not provide additional space |
| Relocate the air ducts | Provides the most flexibility, can create additional space | Complex and expensive, may require a qualified HVAC professional |
| Use the air ducts as a design feature | Cost-effective, can add character and interest to the space | May not provide additional space |
| Install a suspended ceiling | Can create a more finished look, provides additional space | Can be expensive and time-consuming to install |
| Install a bulkhead | Cost-effective, can create a more finished look | Limited flexibility, may not provide additional space |
Overall, the best method for dealing with low air ducts in a basement will depend on the specific situation and the goals of the homeowner. It is important to carefully consider the advantages and disadvantages of each method and consult with a qualified HVAC professional to determine the best solution.
Frequently Asked Questions
Q: Can air ducts be relocated in a finished basement?
A: Yes, it is possible to relocate air ducts in a finished basement. However, it is a more complex and expensive solution that may require the help of a qualified HVAC professional. It is important to carefully plan the relocation and ensure that the new location will provide adequate airflow and ventilation.
Q: Can air ducts be boxed in to finish a basement?
A: Yes, it is possible to box in air ducts to finish a basement. This involves framing in the ducts with wood or other materials and covering them with drywall or another finish. This can create a more finished look and allow you to use the space above the ducts for other purposes.
Q: Can a suspended ceiling be installed below air ducts in a basement?
A: Yes, a suspended ceiling can be installed below air ducts in a basement. A suspended ceiling, also known as a drop ceiling, is a grid-like structure that is hung from the ceiling and can be used to hide the air ducts and create a more finished look. This can provide additional space above the ducts for storage or other purposes.
Q: Can a bulkhead be installed around air ducts in a basement?
A: Yes, a bulkhead can be installed around air ducts in a basement. A bulkhead is a box-like structure that can be installed around the air ducts to cover them and create a more finished look. This can be a cost-effective solution, but it may also limit your ability to use the space above the ducts for other purposes.
Q: Why is Sink Backing Up From Neighbors?
A: There could be a few reasons why a sink might be backing up from a neighbor’s property. One potential reason is that there is a blockage in the drain or sewer line that is causing water to back up into your sink. This blockage could be caused by a buildup of grease, soap, or other debris in the pipe.
Another potential reason is that there is a problem with the plumbing in the neighbor’s property, such as a damaged or broken pipe. In either case, it is important to address the issue as soon as possible to prevent further damage to your plumbing system.
Q: Why should you clean a stinky drain?
A: As for why you should clean a stinky drain, the primary reason is to prevent unpleasant odors from emanating from your sink. Over time, organic matter can accumulate in the drain and begin to break down, creating unpleasant smells. In addition, bacteria and other microorganisms can grow in the moist environment of a drain, further contributing to unpleasant odors. Cleaning the drain regularly can help to remove this buildup and prevent the development of bad smells.
Final Words
Low air ducts in a basement can be a challenge when it comes to finishing the space. However, there are several solutions available, including boxing in the ducts, relocating them, using them as a design feature, installing a suspended ceiling, and installing a bulkhead. By understanding the options and working with a qualified HVAC professional, you can successfully finish your basement and add valuable living space to your home.