Connect Outbuilding to Septic? Avoid These Costly Mistakes!
Adding a bathroom or kitchen to a workshop, guest house, or shed transforms its utility. It turns a simple structure into a fully functional living or workspace.
However, the dream of a plumbed outbuilding quickly meets the reality of wastewater management. The most pressing question becomes how to handle the new plumbing, and for many homeowners, the answer seems simple: connect it to the existing septic system.
This project is far more complex than just digging a trench and laying some pipe. A single misstep can lead to catastrophic failures, including sewage backups, a failed drain field, and thousands of dollars in repairs.
You'll Learn About
Why Connecting an Outbuilding is a Game-Changer
An outbuilding with plumbing instantly increases your property’s value and functionality. It can become a rental unit (ADU), a comfortable office, or a private retreat for guests.
The convenience of having a sink or toilet in your workshop or studio can’t be overstated. This upgrade eliminates trips back to the main house, boosting productivity and comfort.
Successfully connecting to your septic system is the most efficient and long-term solution for waste management, avoiding the hassle and recurring costs of alternatives.
First, The Crucial Question: Can Your Septic System Handle It?
Before you buy a single piece of PVC pipe, you must determine if your current septic system can support the additional load. An undersized system is a recipe for disaster.
Overwhelming your system can lead to solids being pushed into the drain field, causing irreversible clogging. This is a costly and messy failure that can require a complete system replacement.
Calculating Your System’s Load
Septic systems are sized based on the number of bedrooms in the main house, which estimates the potential daily wastewater flow. Adding a new bathroom, especially one with a shower, significantly increases this flow.
You need to know the size of your septic tank (in gallons) and the capacity of your leach field. This information is often on file with your local health or building department from the original installation permits.
If you’re unsure, a septic professional can perform an inspection to assess the tank’s condition and the drain field’s health. They can help you calculate your current usage and determine if there’s enough surplus capacity for the outbuilding.
The Role of Your Drain Field
The drain field, or leach field, is the unsung hero of your septic system. It’s where the liquid effluent from the tank is naturally treated and dispersed into the soil.
If your drain field is already struggling to handle the load from the main house, adding more wastewater will cause it to fail. Signs of a struggling drain field include soggy ground or unusually green grass over the area.
The soil type also plays a critical role. Clay-heavy soils drain slower than sandy soils, and this was factored into the original design. Increasing the water volume can saturate less permeable soils beyond their capacity.
Consulting with Professionals is Non-Negotiable
Before proceeding, you must contact your local health department or septic authority. They will have specific codes and regulations regarding additions to a septic system.
They will inform you whether your project is even permissible and what permits you’ll need to pull. Skipping this step can result in hefty fines and being forced to remove the entire connection.
A licensed septic installer or plumber will be your most valuable resource. They can perform the necessary calculations, design a compliant system, and ensure the installation is done correctly.
The Great Debate: Gravity-Fed vs. a Pump-Up Ejector System
Once you’ve confirmed your septic system can handle the load, the next big decision is how to get the waste from the outbuilding to the septic tank. This primarily depends on elevation and distance.
The outbuilding’s drain outlet must be higher than the septic tank’s inlet port to allow for a consistent downward slope. Any uphill trajectory immediately rules out a simple gravity-fed system.
Option 1: The Simplicity of a Gravity-Fed System
A gravity-fed system is the ideal scenario. It’s simpler, cheaper, and has no moving parts to fail, relying entirely on gravity to transport wastewater.
For this to work, you need a consistent downward slope of at least 1/4 inch per foot of pipe. This is non-negotiable; any less, and solids will settle in the line, causing inevitable clogs.
This option is only viable if the outbuilding is situated uphill from the septic tank and the distance isn’t so great that the required trench depth becomes impractical.
Option 2: The Power of a Sewage Ejector Pump System
If your outbuilding is downhill, on the same level, or too far for a consistent slope, you will need a sewage ejector pump system. This is also known as a lift station or pump-up system.
This system consists of a sealed basin (a small tank) that collects the waste from the outbuilding. When the waste reaches a certain level, a pump inside the basin automatically kicks on, grinding up solids and pumping the slurry under pressure to the septic tank through a smaller-diameter pipe.
While more complex and expensive to install, a pump system is a reliable and effective solution for overcoming topographical challenges. These are often required for basement bathrooms as well.
| Feature | Gravity-Fed System | Sewage Pump System |
|---|---|---|
| Ideal For | Outbuildings uphill from the septic tank with a clear, downward slope. | Outbuildings that are downhill, level with, or far from the septic tank. |
| Installation Cost | Lower | Higher (due to pump, basin, electrical work) |
| Complexity | Simple (trenching and piping) | Complex (requires basin, pump, check valve, alarm, electrical) |
| Maintenance | Minimal (occasional line cleaning) | Moderate (pump requires periodic inspection and eventual replacement) |
| Reliability | Very High (no moving parts) | High (but dependent on electricity and pump health) |
| Power Dependent | No | Yes, will not function during a power outage. |
Choosing Your Weapon: Effluent Pump vs. Grinder Pump
If you need a pump system, you must select the right type of pump for the job. The two main categories are effluent pumps and grinder pumps, and they are not interchangeable.
Choosing the wrong one can lead to constant clogs and premature pump failure. The decision depends entirely on what kind of waste you are moving.
Understanding Effluent Pumps
Effluent pumps are designed to move “gray water” or pre-treated liquid waste (effluent). They can handle small, soft solids up to about 3/4 inch in diameter.
This makes them suitable for an outbuilding with only a sink or a shower. However, if you have a toilet, an effluent pump is the wrong choice and will quickly become clogged with toilet paper and solid waste.
When You Need a Grinder Pump
A grinder pump is a more powerful and robust unit designed to handle raw sewage. It features cutting blades that macerate or grind waste and toilet paper into a fine slurry.
This slurry can then be easily pumped through a small-diameter pipe over long distances or uphill without clogging. If your outbuilding has a toilet, a grinder pump is mandatory.
While more expensive, a grinder pump ensures the reliable operation of any outbuilding that includes a full bathroom.
Your Step-by-Step Guide to Connecting the Outbuilding
This overview provides a general guide to the installation process. Always follow local codes and the manufacturer’s instructions for any components you purchase.
Safety is paramount. Call 811 before you dig to have underground utility lines marked. Trench collapses are a serious risk, so never work in an unstable trench.
Step 1: Secure All Necessary Permits
We’ve said it before, but it’s the most critical step. Present your plans to your local building or health authority and get their approval before you do anything else.
Your permit may specify the type of pipe to use, the required trench depth, and inspection schedules. The project is not complete until it has passed a final inspection.
Step 2: Precisely Locate Your Septic Tank and Lines
You need to know exactly where your septic tank is and the location of its inlet port. You also need to find the main sewer line running from your house to the tank.
You can often get a diagram of your system from the health department. If not, a septic professional can use a camera scope or soil probe to locate the components for you.
Damaging your existing tank or drain field during excavation can cause severe problems, including a foundation-destabilizing leak. If you ever notice issues like a sinking toilet, it’s a sign that water damage underneath could be compromising the structure, a situation you want to avoid at all costs.
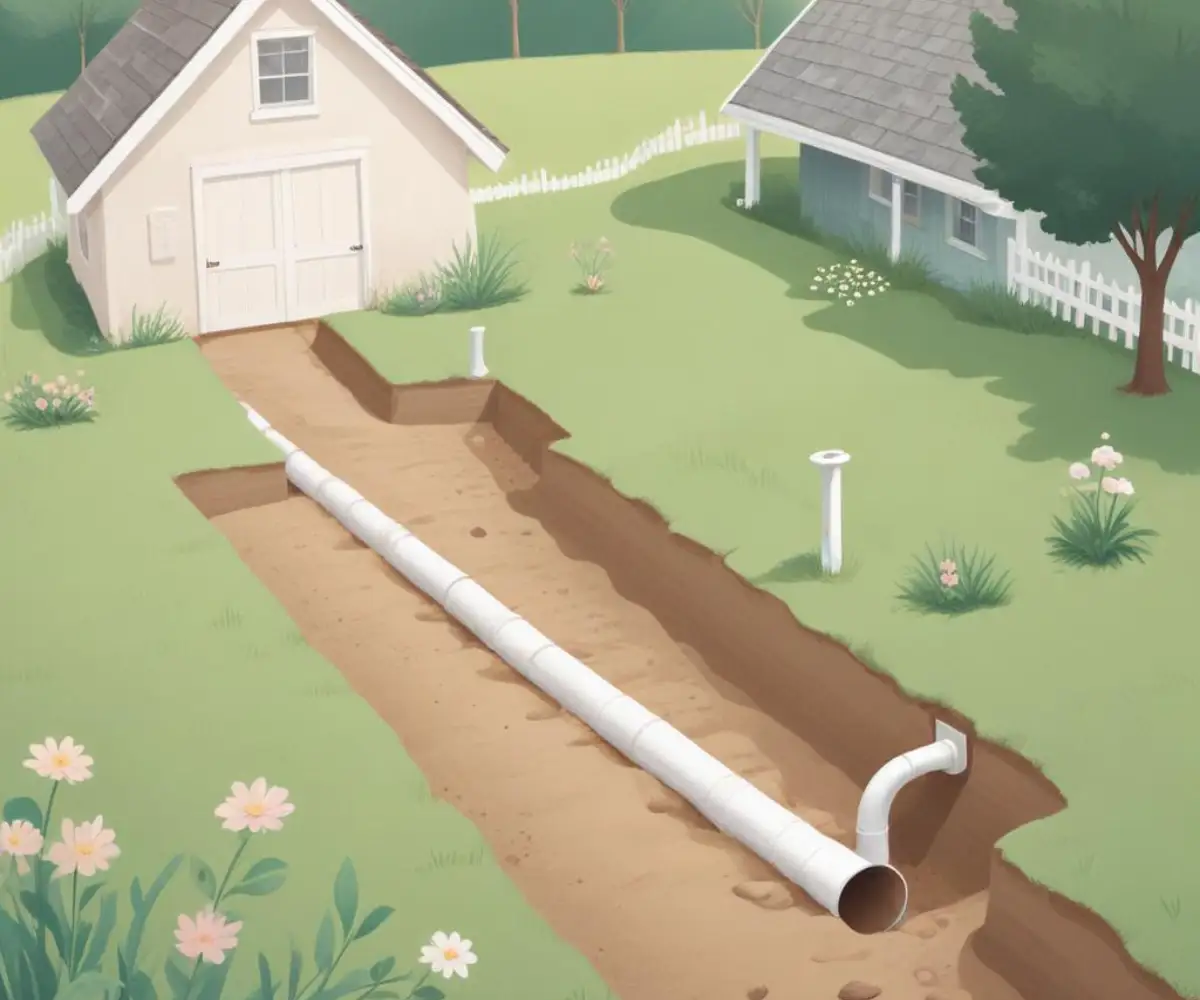
Step 3: Plan Your Trench Route and Depth
Plan the shortest, straightest path possible from the outbuilding to the septic connection point. Avoid trees, and try to minimize turns, which can hinder flow.
For a gravity line, the depth is dictated by the 1/4 inch per foot slope. For a pump system, the trench only needs to be deep enough to get below the frost line to prevent freezing in winter.
Step 4: Install the Plumbing and Bed the Pipe
Once the trench is dug, it should be bedded with about 2-4 inches of sand or pea gravel. This creates a stable, uniform base that protects the pipe from sharp rocks.
Lay your Schedule 40 PVC pipe, ensuring all connections are properly primed and cemented. For a gravity line, use a level to verify your slope every few feet.
Step 5: Making the Critical Connection
The new line from the outbuilding should connect to the main sewer line from the house, not directly into the septic tank lid. The connection should be made using a Y-shaped fitting, not a T-shaped one, to ensure a smooth, sweeping flow of waste towards the tank.
This is a critical juncture that must be sealed perfectly to prevent leaks and root intrusion. It’s often the point where professional help is most valuable.
In some scenarios, particularly with older systems, a full conversion might be considered. Understanding if you can convert a holding tank to a septic tank is a separate but equally complex process that requires deep regulatory and technical knowledge.
Step 6: Backfilling and Final Inspection
Before you completely bury the pipe, it’s wise to have the work inspected by the local authority if required. Some jurisdictions want to see the pipe in the trench before it’s covered.
Once approved, carefully backfill the trench, first covering the pipe with more sand or gravel to protect it, then with the excavated soil. Gently compact the soil to prevent future settling.
Common Mistakes That Can Lead to Septic Catastrophe
Many DIY enthusiasts with good intentions have turned a plumbing project into a septic nightmare. Avoiding these common pitfalls is key to a successful connection.
Ignoring Local Codes and Permits
The most frequent and costly mistake is failing to involve the local authorities. An unpermitted connection can void your homeowner’s insurance, lead to massive fines, and create huge problems when you try to sell your property.
Incorrect Pipe Slope: The #1 Gravity-Fed Failure
Even a slight miscalculation in the slope of a gravity-fed line will cause it to fail. Too little slope, and solids stop moving. Too much slope, and the liquids run away, leaving the solids behind. Both scenarios lead to a complete blockage.
Choosing the Wrong Pump or Basin Size
Installing an effluent pump for a toilet or using a basin that’s too small for the expected flow will cause the pump to fail. An undersized basin leads to “short cycling,” where the pump turns on and off too frequently, burning out the motor.
Damaging the Existing System During Connection
Cracking the main sewer line or the septic tank itself during excavation can lead to leaks that undermine the soil and your foundation. These leaks also allow groundwater to infiltrate your system, hydraulically overloading the drain field.
The Hidden Costs: What to Budget For
The price of this project can vary dramatically based on several factors. It’s important to look beyond the cost of pipe and glue.
Key cost drivers include the distance from the outbuilding to the tank, the need for a pump system (which can add $1,000-$3,000+), permit fees, and the cost of professional labor for excavation and plumbing.
Don’t forget potential secondary costs like landscape repair after the trenching is complete. Budgeting realistically from the start prevents sticker shock later.
Long-Term Care: Keeping Your Expanded System Healthy
Adding an outbuilding will likely increase the frequency with which you need to have your septic tank pumped. More water usage means the tank fills with solids faster.
Monitor your system’s performance closely after the connection is complete. Be mindful of what goes down the drains in both the main house and the outbuilding.
It’s also crucial to maintain the delicate bacterial balance within your septic tank. Never pour harsh chemicals down the drain, and always be mindful of how to dispose of bleach water outside and away from your septic system to avoid killing the beneficial bacteria that break down waste.