Cedar Ceiling Stain: Your Guide to a Flawless Finish
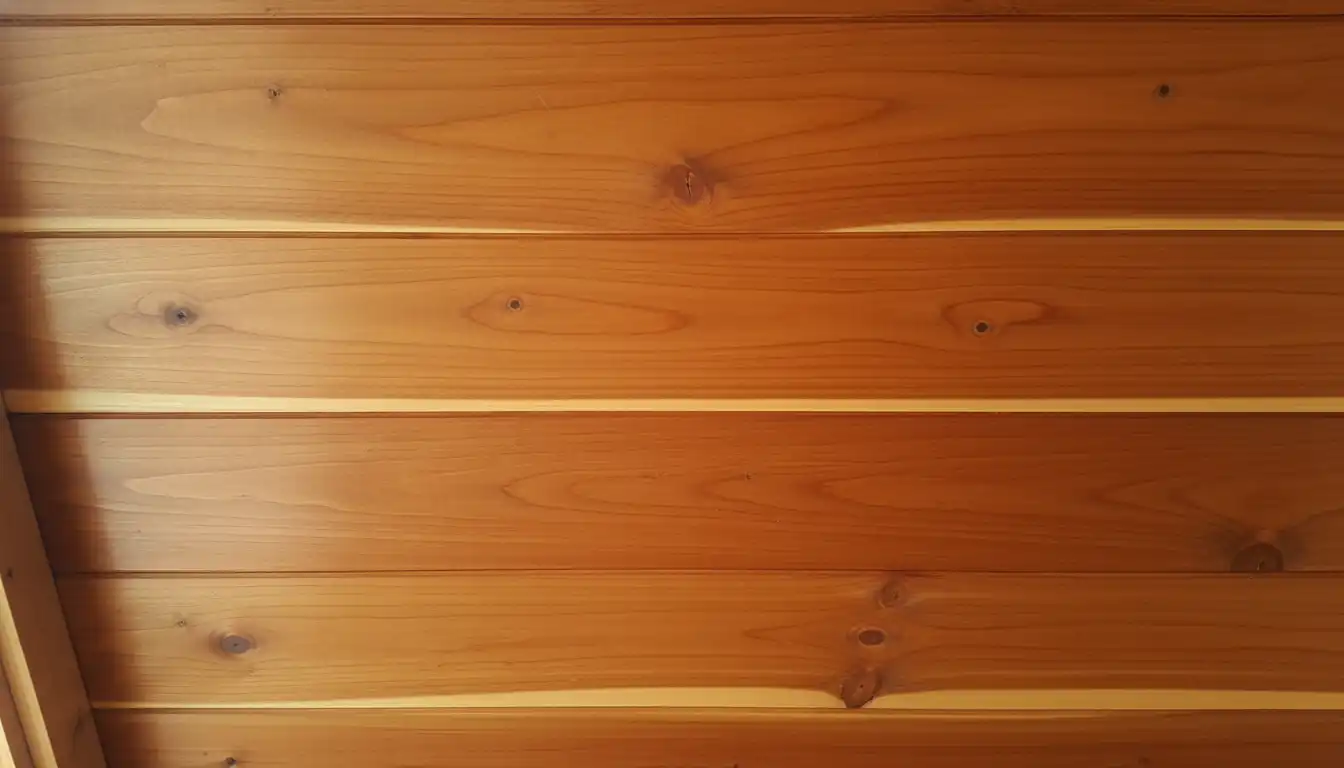
A tongue and groove cedar ceiling is a stunning architectural feature, adding warmth, character, and a touch of rustic elegance to any room. However, the prospect of staining this beautiful wood can be daunting. Many homeowners fear ending up with a finish that’s too dark, blotchy, or worse, ruined by unsightly yellow-brown streaks.
The core issue lies in the unique properties of cedar itself. It’s a soft, porous wood with a high concentration of natural oils and tannins. If not handled correctly, these characteristics can turn a dream project into a lasting frustration.
You'll Learn About
The Hidden Challenge: Understanding Cedar and Tannin Bleed
The primary obstacle to a perfect cedar ceiling stain is a phenomenon called tannin bleed. Tannins are natural, water-soluble extractives found within cedar. When moisture from a water-based stain or primer activates these tannins, they migrate to the surface, creating yellowish or brownish stains that “bleed” through the final finish.
This is a common issue with many types of wood, but cedar and redwood are particularly notorious for it. The problem is often compounded by humidity fluctuations within the home, which can accelerate the movement of these tannins to the wood’s surface. Think of it as the wood creating its own internal stain that mars your intended color.
Furthermore, cedar’s varying density can lead to uneven stain absorption. Denser areas of the wood will absorb less stain, while softer, more porous sections will drink it in, resulting in a blotchy, inconsistent appearance. This is why proper surface preparation and product selection are not just recommended; they are absolutely essential for a professional-quality result.
The Cost of Inaction: Why Proper Staining Matters
Ignoring the specific needs of cedar can lead to several problems. An improperly stained ceiling can look amateurish, diminishing the value and aesthetic appeal of the space. Over time, an unsealed or poorly sealed ceiling can also absorb moisture, potentially leading to mildew growth or warping.
Fixing a botched stain job is significantly more difficult and costly than doing it right the first time. It often involves aggressive chemical stripping or extensive sanding, both of which are challenging tasks when working overhead. Starting with the right knowledge and technique saves immense time, effort, and disappointment.
Your Most Critical Decision: Choosing the Right Cedar Stain
The stain you choose will dictate the final look, durability, and application process. For interior cedar ceilings, the primary choices are oil-based, water-based, and gel stains. Each has distinct advantages and disadvantages that must be weighed carefully.
Understanding these differences is the first step toward a beautiful, long-lasting finish. The choice impacts everything from odor during application to the final depth of color and resistance to future issues like tannin bleed.
Comparing Stain Types for Cedar Ceilings
The following table breaks down the key characteristics of the three main types of stain suitable for your cedar ceiling project. This comparison will help you select the product that best fits your skill level, desired aesthetic, and project environment.
| Stain Type | Pros | Cons | Best For |
|---|---|---|---|
| Oil-Based Penetrating Stain | Deeply penetrates wood for a rich, deep color. Slow drying time allows for more workability and less risk of lap marks. Naturally blocks some tannins. | Strong odor during application and curing. Requires mineral spirits for cleanup. Can be prone to dripping on overhead surfaces. | Achieving a rich, traditional look where ventilation is not a concern. Enhancing the natural grain of the wood. |
| Water-Based Acrylic Stain | Low odor and easy cleanup with soap and water. Dries quickly, allowing for faster project completion. More resistant to mold and mildew. | Can raise the wood grain. Fast drying time can lead to lap marks if not applied carefully. Can cause severe tannin bleed if a proper primer is not used. | Projects where low VOCs and fast cleanup are priorities. Best used with a high-quality stain-blocking primer. |
| Gel Stain | Thick, pudding-like consistency minimizes drips, making it ideal for vertical or overhead surfaces. Provides a very even color, hiding variations in wood porosity. | Does not penetrate as deeply, sitting more on the surface. Can obscure some of the natural wood grain. | Beginners who are concerned about drips and achieving a uniform, blotch-free finish on a porous wood like cedar. |
The Pro’s Playbook: A Step-by-Step Staining Guide
Achieving a flawless finish on your cedar ceiling is a methodical process. Rushing any step will compromise the final result. Follow this professional playbook to ensure your ceiling looks stunning for years to come.
From cleaning the surface to applying the final protective coat, each phase is critical. Proper execution will prevent common pitfalls and highlight the natural beauty of the wood.
Step 1: Preparation is Everything
First, ensure the cedar is clean and free of dust, cobwebs, or grime. Use a vacuum with a brush attachment, followed by a wipe-down with a tack cloth. If the wood is new and unfinished, a light sanding with 150 to 180-grit sandpaper is recommended. The goal is to open the wood pores for the primer and stain, not to make it perfectly smooth.
Be careful not to over-sand, as this can polish the wood and prevent the stain from penetrating properly. After sanding, thoroughly remove all dust with a tack cloth or vacuum. This preparation is foundational for an even finish and proper product adhesion.
Step 2: The Non-Negotiable Primer Coat
This is the most crucial step for preventing tannin bleed. Do not skip this step, especially if using a water-based stain. To permanently block tannins, you must use a dedicated stain-blocking primer. The most effective types for cedar are oil-based or shellac-based primers.
These primers create an impermeable barrier between the wood and the topcoat, sealing the tannins within the cedar. This is the same principle used to prevent issues like old paint bleeding through new paint, where a barrier coat is essential. Apply one to two thin, even coats of the primer and allow it to dry completely according to the manufacturer’s instructions.
Step 3: Applying the Stain with Finesse
With the surface primed and ready, it’s time to apply the stain. Work in small, manageable sections to maintain a “wet edge,” which prevents lap marks. Apply the stain with a quality natural bristle brush, a foam brush, or a stain pad, always moving in the direction of the wood grain.
Allow the stain to penetrate for the time recommended on the can, then wipe away the excess with a clean, lint-free rag. The amount of time you let the stain sit before wiping will determine the depth of the color. For a lighter, more natural look, wipe it off sooner.
Step 4: The Protective Topcoat
While some stains have a built-in sealer, applying a separate topcoat offers superior protection and durability. A clear polyurethane or lacquer will protect the stained wood from dust, moisture, and minor abrasions, making it much easier to clean in the long run. This is particularly important for ceilings in kitchens or bathrooms where moisture levels are higher.
Choose a finish with the desired sheen—satin, semi-gloss, or gloss. Apply two to three thin coats, lightly sanding with 220-grit sandpaper between coats for the smoothest finish. This final layer locks in the beauty of your work and is a vital part of many home improvement projects, much like properly sealing a sunroom wall panel.
Troubleshooting Common Cedar Staining Disasters
Even with careful planning, issues can arise. Understanding how to address them can save a project from failure. Here are solutions to the most common problems encountered when staining cedar ceilings.
Help! My Stain is Blotchchy!
If you skipped the primer and your stain looks blotchy, the cause is uneven absorption. To fix this, you may need to apply a second coat of stain, sometimes using a gel stain on the second pass to even out the color. For future projects, using a pre-stain wood conditioner before staining can help promote even absorption on porous woods.
Tannins Are Still Bleeding Through!
If you see yellow or brown discoloration after staining, it means the primer was not sufficient to block the tannins. The fix is to apply a coat of shellac-based sealer directly over the dried stain. This will seal the tannins and prevent further bleeding. You may then need to apply another light coat of stain or proceed directly to your protective topcoat.
Long-Term Care and Maintaining the Glow
Once your cedar ceiling is beautifully stained and sealed, maintenance is minimal. Regular dusting with a soft cloth or vacuum attachment will keep it looking fresh. For cleaning, use a mild solution of water and a pH-neutral wood cleaner, but avoid harsh chemicals.
Just as you would maintain the finish on a corner lot fence to protect it from the elements, periodic inspection of your ceiling’s finish ensures its longevity. In most indoor environments, a properly applied finish can last for decades without needing reapplication.