8×8 Galley Kitchen Layout: Unlock Your Tiny Kitchen’s Grand Potential
The dreaded 8×8 kitchen. At a mere 64 square feet, it can feel more like a closet than the heart of your home. This compact footprint presents a significant design challenge, often leading to feelings of claustrophobia, chronic counter clutter, and a frustrating lack of storage. For many, the core problem is wrestling with a layout that feels inherently limiting, making meal prep a chore and hosting guests an impossibility.
This feeling of being cramped isn’t just an inconvenience; it can impact your daily routine and diminish the joy of cooking. The constant shuffle of appliances, the lack of prep space, and the inability for more than one person to comfortably exist in the space are common pain points. But the solution isn’t to knock down walls; it’s to embrace the efficiency of the galley layout and optimize every single inch with strategic design.
A well-designed 8×8 galley kitchen layout can transform this tiny area into a powerhouse of functionality and style. By focusing on smart layout principles, visual expansion techniques, and innovative storage, you can overcome the challenges of a small footprint. This guide provides actionable, expert-backed solutions to unlock the grand potential hidden within your compact kitchen.
You'll Learn About
The Foundation: Mastering the Galley Layout in 64 Square Feet
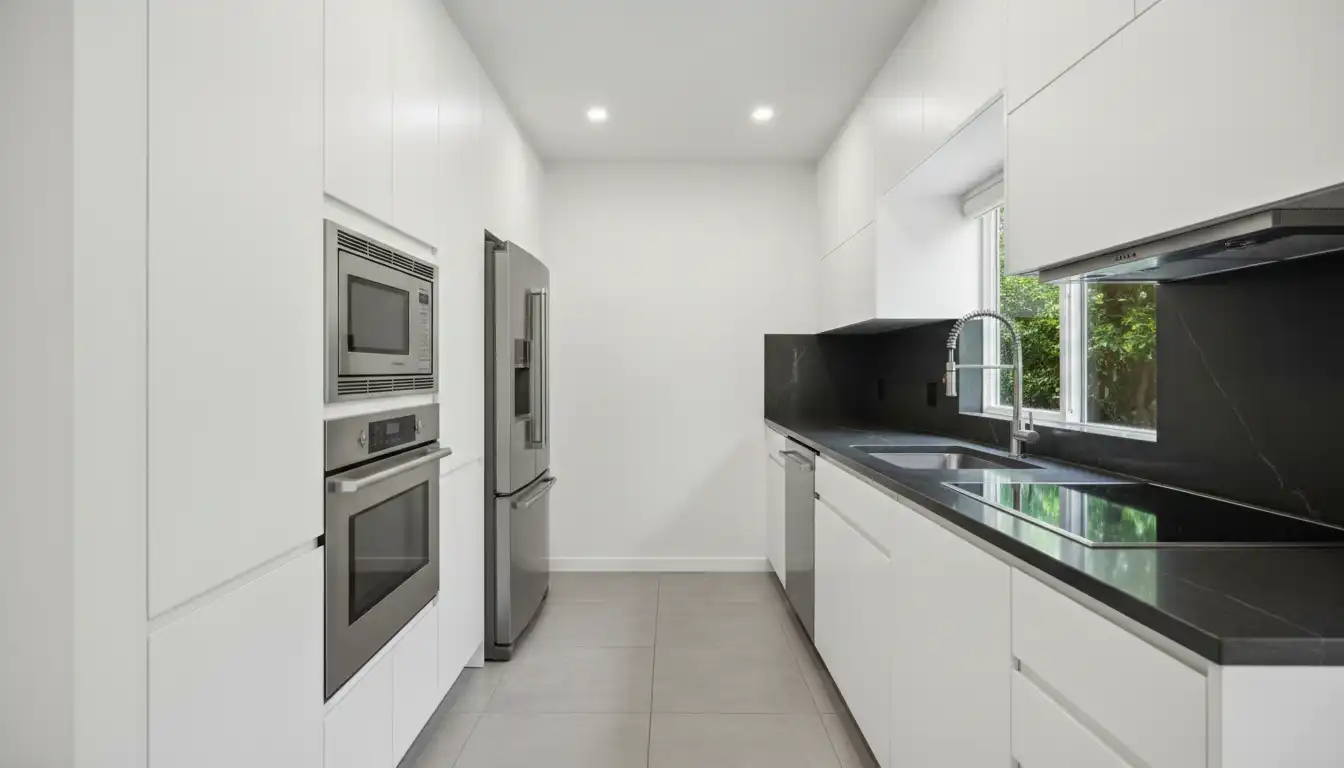
The term “galley kitchen” originates from the compact, efficient kitchens on ships and trains. It’s defined by two parallel runs of countertops with a central corridor. In an 8×8 space, this layout is one of the most effective ways to organize your kitchen, creating a natural and ergonomic workflow.
The primary goal is to establish an efficient work triangle, the imaginary lines connecting the sink, refrigerator, and stove. In a galley layout, these three key components are conveniently close, minimizing steps and streamlining the cooking process. To achieve this, it’s often best to place the refrigerator and stove on opposite walls, with the sink located centrally on one of the runs.
One of the most critical measurements in your 8×8 galley kitchen layout is the width of the central walkway. To ensure comfort and safety, aim for a minimum clearance of 36 to 48 inches between the two opposing countertops. Less than 36 inches can feel cramped, making it difficult to open appliance doors or for two people to pass each other. More than 48 inches in such a small kitchen can make the work triangle less efficient.
Symmetrical vs. Asymmetrical Design
Within the galley framework, you can choose between a symmetrical or asymmetrical layout. A symmetrical design features two facing countertops of equal length, creating a balanced and harmonious look. An asymmetrical layout, however, allows for more flexibility by varying the lengths of the countertops, which can be useful for accommodating a tall pantry cabinet on one end or creating a more open feel.
Consider the traffic flow. If your galley kitchen serves as a pass-through to another room, ensure the layout doesn’t create bottlenecks. The placement of the refrigerator, often the most frequently accessed appliance, should be near the entrance to prevent traffic from disrupting the main cooking zone.
The Illusion of Space: Visual Tricks to Make Your Kitchen Feel Bigger
Once the foundational layout is set, the next step is to employ design strategies that create a sense of openness. A small kitchen doesn’t have to feel small. Through the clever use of color, light, and materials, you can visually expand the boundaries of your 8×8 space.
Light color palettes are your greatest ally. Whites, creams, soft grays, and pale blues reflect light, making the kitchen feel airy and more expansive. Using a consistent, light color for both cabinets and walls creates a seamless look, preventing the visual breaks that can make a room feel chopped up. A satin or semi-gloss finish on paint and cabinets will also help bounce light around the room.
Harnessing the Power of Light and Reflection
Lighting is one of the most transformative elements in kitchen design. A single, central overhead fixture will cast shadows and make a narrow galley kitchen feel like a tunnel. Instead, implement a layered lighting strategy:
- Ambient Lighting: Use recessed lights or sleek, flush-mount ceiling fixtures to provide even, overall illumination.
- Task Lighting: Install under-cabinet LED strips to brighten your countertops. This is non-negotiable for functionality and eliminating dark corners.
- Accent Lighting: Consider adding subtle lighting inside glass-front cabinets or toe-kick lighting at the base of your cabinets to create depth and a floating effect.
Reflective surfaces are another key tool. Glossy cabinet fronts, polished countertops, a mirrored or glass backsplash, and stainless steel appliances all work to reflect light and create the illusion of a larger space. Even your flooring choice can contribute. Options like glue-down vinyl plank in a light finish can provide a durable, seamless surface that enhances the feeling of spaciousness.
Storage Revolution: Beyond Basic Cabinets
In an 8×8 kitchen, storage is the ultimate currency. Standard cabinets alone won’t be enough to tame the clutter. The key is to think vertically and utilize every unconventional space to its fullest potential.
Install cabinets that extend all the way to the ceiling. This not only provides a significant amount of extra storage for less-frequently used items but also draws the eye upward, creating an illusion of height. Consider a mix of closed cabinets and open shelving. While closed cabinets hide clutter, a few strategically placed open shelves can prevent the space from feeling too heavy and boxy, offering a place to display attractive dishware or plants.
Unlocking Hidden Storage Opportunities
Think beyond the main cabinet boxes and explore innovative storage solutions that maximize efficiency. These can be integrated into your initial design or retrofitted into existing cabinetry.
- Pull-Out Pantries: These tall, narrow units slide out to reveal deep, accessible storage, perfect for cans, spices, and dry goods.
- Toe-Kick Drawers: The space beneath your base cabinets is often wasted. Installing shallow toe-kick drawers is a brilliant way to store flat items like baking sheets, serving platters, or placemats.
- Appliance Garages: Keep your countertops clear by designating a cabinet with a lift-up or retractable door to house small appliances like toasters and blenders.
- Wall-Mounted Storage: Utilize empty wall space with magnetic knife strips, utensil rails, and pegboards. A pegboard is incredibly versatile, allowing you to hang pots, pans, and various tools.
Choosing high-quality cabinetry and hardware is a crucial investment. It’s wise to approach this with the same diligence as any other major purchase. Just as you would carefully read medallion-flooring-reviews_gem1 before committing to a floor, thoroughly research your cabinet manufacturer to ensure long-term durability and satisfaction.
| Storage Solution | Best For | Pros | Cons |
|---|---|---|---|
| Vertical Pull-Out Pantry | Dry goods, cans, spices | Highly space-efficient, easy access to all items | Can be expensive, requires professional installation |
| Open Shelving | Displaying attractive dishware, everyday items | Makes space feel more open, quick access | Requires frequent dusting, can look cluttered if not curated |
| Toe-Kick Drawers | Baking sheets, platters, shallow items | Utilizes completely wasted space | Limited height, can be difficult to access |
| Appliance Garage | Toasters, blenders, coffee makers | Keeps countertops clutter-free | Sacrifices a portion of counter-level cabinet space |
| Wall Pegboard | Pots, pans, utensils, various tools | Extremely versatile and customizable | Can create visual clutter if over-filled |
Smart Appliances and Fixtures for a Compact Space
Standard-sized appliances can overwhelm an 8×8 kitchen, consuming valuable cabinet and counter space. Fortunately, the market for compact and smart appliances has expanded significantly, offering powerful performance in a smaller footprint.
Look for “apartment-sized” or compact appliances. An 18-inch dishwasher can perform just as well as a standard 24-inch model while saving you crucial cabinet space. A 24-inch wide refrigerator, particularly a counter-depth model, will sit nearly flush with your cabinetry, creating a seamless look and improving traffic flow. Consider combination appliances, such as a microwave that also functions as a convection oven or an over-the-range microwave that incorporates a vent hood.
Integrated and Multi-Functional Designs
Integrated appliances, which are concealed behind custom cabinet panels, are an excellent choice for a small galley kitchen. This creates a streamlined, uninterrupted wall of cabinetry, which enhances the feeling of spaciousness. Beyond appliances, choose fixtures that are multi-functional. A sink with an integrated cutting board and colander attachments can instantly add to your usable prep surface. A faucet with a pull-down sprayer combines form and function, eliminating the need for a separate side sprayer.
Materials and Finishes: The Final Touches
The materials you choose for your countertops, backsplash, and flooring play a vital role in the kitchen’s overall aesthetic and functionality. In a small space, every surface has a significant visual impact.
For countertops, light-colored quartz, marble, or laminate are excellent choices. They reflect light and contribute to the bright, airy feel you’re aiming for. A waterfall countertop, where the material extends down the side of the end cabinet, can create a clean, continuous line that makes the space feel more polished and deliberate.
The backsplash is an opportunity to add personality without overwhelming the space. Large-format tiles will have fewer grout lines, creating a less busy, more seamless appearance. A reflective material like glass tile or a single slab of polished stone can also help to bounce light around. When installing these elements, achieving a perfect finish is key. Ensuring a proper seal between the countertop and the backsplash is critical to prevent moisture issues, a task that involves understanding the nuances between materials like those detailed in a discussion of backer rod vs spray foam for sealing gaps.
Conclusion: A Small Kitchen with Grand Ambitions
An 8×8 galley kitchen layout is not a design sentence for a cramped and cluttered life. It is a challenge that, when met with smart planning and creative solutions, can result in a remarkably efficient, stylish, and enjoyable cooking space. The constraints of the 64-square-foot footprint force a focus on what is truly essential, leading to a highly organized and ergonomic environment.
By establishing a functional layout, employing visual tricks to create an illusion of space, revolutionizing your approach to storage, and selecting appropriately scaled appliances and materials, you can transform your tiny kitchen. Embrace the efficiency of the galley design and unlock the hidden potential within your compact space. With the right strategies, your small kitchen will not only meet your daily needs but will become a part of your home you are proud to show off.