Wrapping Beams with Cedar: Your Ugly Beams Are Begging for This Upgrade
That structural beam in your living room or on your porch does an important job, but let’s be honest. It is not winning any beauty contests. Whether it’s a laminated veneer lumber (LVL) beam, a steel I-beam, or just a clunky, painted-over piece of wood, it can disrupt the entire aesthetic of your space.
You want warmth, character, and a touch of rustic elegance. You are looking at an industrial necessity. Fortunately, there is a stunning and achievable solution: wrapping beams with cedar.
You'll Learn About
Why That Exposed Beam is an Eyesore (And What to Do About It)
Modern construction relies on engineered beams for their strength and reliability. The problem is they are designed for function, not form. Their raw, unfinished look can make a room feel incomplete, as if it is still under construction.
Painting them often just draws more attention to their unappealing shape. This is where the transformative power of a cedar wrap comes in, turning a structural requirement into a stunning architectural feature.
Cedar Beam Wraps: The Ultimate Transformation for Your Home
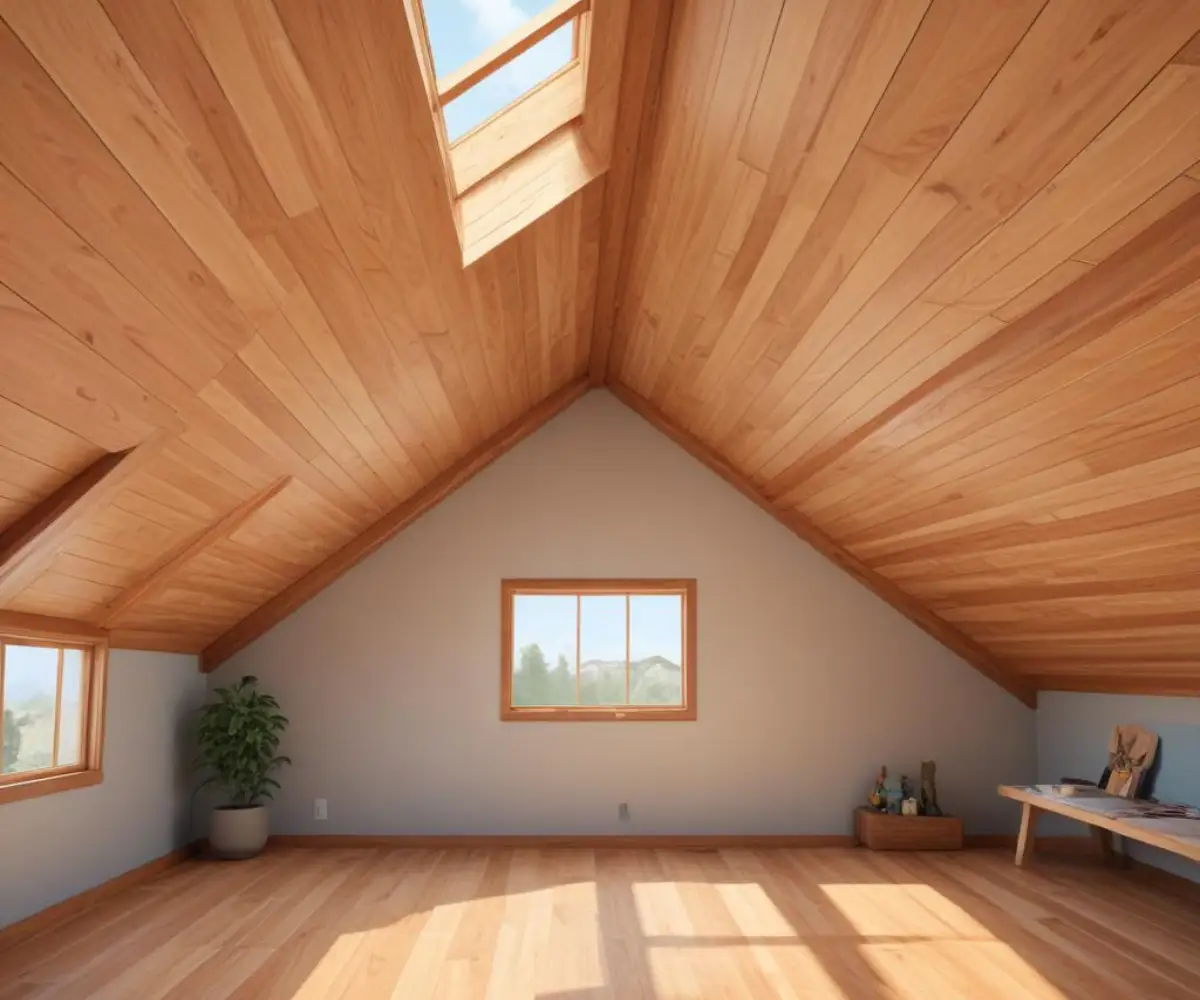
A cedar beam wrap, also known as a box beam, is a three or four-sided wooden box that encases an existing structural beam. It gives the appearance of a solid, rustic timber beam for a fraction of the cost and complexity. This single project can dramatically increase the warmth and visual appeal of your home.
The natural beauty of cedar wood, with its rich tones and intricate grain patterns, complements a wide range of styles. From modern farmhouse to rustic lodge, a cedar-wrapped beam feels intentional and high-end, instantly elevating your interior design.
Choosing Your Weapon: Selecting the Perfect Cedar
The success of your project begins at the lumberyard. The type of cedar you select will define the final look and feel of your new beam. Take the time to choose boards that are straight, flat, and free of significant defects.
Consider the overall design of your room. The goal is to select a wood that complements your existing decor while making a statement. This choice is as crucial as picking the right finish for a honed porcelain countertop; it sets the tone for the entire space.
Grade & Appearance: Clear vs. Knotty
Cedar is typically sold in two main appearance grades: clear and knotty. Clear cedar has a uniform color and grain with very few (if any) knots. This creates a clean, sophisticated, and modern look.
Knotty cedar, as the name implies, features knots of various sizes and colors. This grade provides a more rustic, informal, and character-rich appearance, perfect for farmhouse or cabin-style designs.
Board Dimensions: 1x vs. 5/4 Stock
You will typically use 1-inch thick boards (referred to as “1x” stock, which is actually about 3/4-inch thick). For a more substantial, robust look, you can opt for “5/4” stock, which is a true 1-inch thick. Thicker boards can be more forgiving and add a sense of heft to the final beam.
Ensure you purchase boards that are wide enough to cover the height of your beam plus the thickness of the bottom board. It is always better to have to rip a board down to size than to not have enough width.
The Pro’s Secret: Pre-Installation Steps Nobody Talks About
Here is a critical step that separates professional results from amateur mistakes: wood acclimation. Wood is a natural material that expands and contracts based on the temperature and humidity of its environment. You must let your cedar boards acclimate inside your home for at least 72 hours, and ideally for a week.
Lay the boards flat in the same room where they will be installed, with spacers between them to allow for air circulation. This allows the wood’s moisture content to equalize with your home’s environment. Skipping this step is the number one cause of ugly gaps appearing at the seams weeks or months after installation as the wood shrinks.
| Tool or Material | Primary Purpose | Pro-Tip |
|---|---|---|
| Cedar Boards | The wrapping material itself. | Buy about 15-20% more than your measurements to account for mistakes. |
| Miter Saw | Cutting precise 45-degree angles for seamless corners. | A 12-inch sliding compound miter saw provides the most capacity and accuracy. |
| Brad Nailer | Securing the cedar boards together and to the beam. | Use 18-gauge brad nails that are long enough to penetrate both cedar boards. |
| Wood Glue | Creating a powerful bond at the mitered joints. | A quality brand like Titebond II or III will create a joint that is stronger than the wood itself. |
| Tape Measure & Pencil | Accurate measurements. | Measure twice, cut once. Measure the beam in multiple places as it may not be uniform. |
| Clamps | Holding mitered corners tightly together while the glue dries. | Band clamps or corner clamps are excellent for assembling the box beam. |
| Wood Filler | Hiding nail holes for a flawless finish. | Choose a filler that is specifically designed to match cedar. |
| Sander/Sandpaper | Smoothing joints and preparing for finish. | Use 120-grit followed by 220-grit for an ultra-smooth surface. |
Step-by-Step Guide: How to Wrap Beams with Cedar Like a Pro
With your materials gathered and your wood acclimated, you are ready to begin the transformation. Work methodically and focus on precision, especially with your cuts. A patient approach will yield a beautiful, professional-looking result.
Safety is paramount. Always wear safety glasses when cutting or nailing wood. If you are unsure about any step, consult a professional.
Step 1: Meticulous Measurement is Non-Negotiable
Your existing beam is likely not perfectly square or uniform in size. Measure the height and width of the beam at several points along its length and use the largest measurements. This ensures your wrap will fit over the entire beam without any tight spots.
You will be creating a box with three or four sides. For a beam against a ceiling, a three-sided box (bottom and two sides) is sufficient. A freestanding beam will require a four-sided box.
Step 2: The Perfect Cut: Mastering the Miter Joint
To create the illusion of a solid beam, the corners must be seamless. This is achieved with 45-degree miter cuts. Set your miter saw precisely to 45 degrees. A test cut on a piece of scrap wood is always a good idea.
The bottom board of your wrap will have two mitered edges. The side boards will each have one mitered edge where they meet the bottom board. The top edges of the side boards, which meet the ceiling, will be square (90-degree) cuts.
Step 3: Assembling Your Three-Sided Box
It is far easier to assemble the wrap on the ground before installing it. Lay your bottom piece on a flat surface. Apply a thin, even bead of high-quality wood glue along one of its mitered edges.
Press the corresponding mitered edge of a side piece into the glue, forming a perfect corner. Use your brad nailer to drive nails every 8-10 inches through the side piece into the edge of the bottom piece. Repeat for the other side to form a U-shaped channel.
Step 4: Hoisting and Securing the Wrap
This is usually a two-person job. Lift the assembled three-sided wrap into place, fitting it snugly over the existing beam and against the ceiling. The fit should be snug but not forced.
Secure the wrap by nailing through the side pieces directly into the structural beam. Angle your nails slightly to ensure a strong grip. If you are wrapping a steel beam, you will first need to attach a wooden frame (cleats) to it that you can nail into.
Step 5: Capping it Off with the Final Piece
If you are creating a four-sided beam, the last step is to measure, cut, and install the top piece. This is often the trickiest part due to the limited space. Apply glue to the top edges of the side pieces and carefully nail the final board into place.
For a three-sided beam against a ceiling, your work is nearly done. Use wood filler to patch all the nail holes, let it dry completely, and then give the entire beam a light sanding to smooth all surfaces and joints.
Wrapping Exterior Beams: A Whole Different Ball Game
Using cedar to wrap exterior beams, such as on a porch, requires special consideration. Moisture is the enemy. You cannot simply wrap the beam tightly, as this will trap water and lead to rot in both the wrap and the structural beam it covers.
A crucial technique is to create a rainscreen gap. This involves installing furring strips on the structural post first, which creates a small air gap between the post and the cedar wrap. This gap allows any moisture that gets behind the wrap to drain out and allows air to circulate, keeping everything dry. This is a vital step when tackling a project like this, much like understanding the structural load when replacing wrought iron porch columns.
Finishing Touches: To Stain or Not to Stain?
You have several options for finishing your new cedar beam. One of cedar’s best qualities is its natural resistance to decay and insects, so a finish is not strictly necessary for interior applications. However, a finish can protect the wood and enhance its color.
A clear, water-based polyurethane or lacquer will protect the wood without altering its natural color significantly. An oil-based finish will darken the cedar and give it a rich, warm amber glow. Stains can be used to achieve a specific color to match other wood tones in your home.
Common Mistakes to Avoid at All Costs
This project is very rewarding, but a few common missteps can lead to frustration. Being aware of them beforehand is the key to a smooth and successful installation. A little forethought prevents a lot of rework.
Sometimes, home improvement can reveal other issues. For instance, working in a basement or crawlspace might uncover signs of pests, in which case a professional service like a have a heart trap rental could be necessary.
Mistake #1: Skipping Wood Acclimation
As mentioned before, this is the cardinal sin of woodworking. Bringing wood from a damp lumberyard and immediately installing it in a dry, heated home will cause it to shrink. This shrinkage will pull your perfect miter joints apart, leaving unsightly gaps.
There is no shortcut for this process. Let the wood sit in your home for several days. Patience at this stage will pay off for years to come.
Mistake #2: Inaccurate Measurements
Even a 1/16-inch error in your measurements can translate into a noticeable gap in a mitered corner. Use a quality tape measure and double-check every number before you make a cut. Remember to account for the thickness of the cedar boards themselves in your calculations.
Measure the beam you are wrapping in at least three different places. Beams can sag or have slight variations, so always build your box to accommodate the largest dimensions.
Mistake #3: Relying Only on Nails
Brad nails are great for holding pieces in place while the glue dries, but they offer very little long-term structural strength. Wood glue is what truly holds your miter joints together. A properly glued joint is incredibly strong.
Apply a consistent bead of glue to the entire length of the joint. When you press the pieces together, you should see a tiny bit of squeeze-out, which you can wipe away with a damp cloth. This indicates you have used enough glue for a solid bond.
Frequently Asked Questions About Cedar Beam Wraps
Many homeowners have questions about the specifics of this popular project. Here are answers to some of the most common inquiries.
Understanding the details can help you plan your project budget and timeline more effectively.
How much does it cost to wrap a beam in cedar?
The cost varies widely based on the size of the beam and the grade of cedar you choose. Materials (cedar, glue, nails, finish) can range from $10 to $30+ per linear foot. Professional installation can add another $20 to $50 per linear foot depending on labor rates in your area.
Can I wrap a steel I-beam with cedar?
Yes, absolutely. Since you cannot nail directly into steel, you must first attach a wooden frame to it. This is typically done by building a “ladder” frame of 2x4s that fits snugly around the I-beam, which is then attached to the floor joists. The cedar wrap is then nailed to this wooden frame.
How do I maintain my cedar-wrapped beams?
Maintenance is minimal. For interior beams, a simple dusting is all that is usually required. For exterior beams, you may need to reapply your chosen sealer or finish every few years to protect it from the elements and maintain its color.
Conclusion: A Project That Pays in Beauty and Value
Wrapping a structural beam with cedar is more than just a cover-up; it is a design choice that adds immense character, warmth, and value to your home. It turns a functional necessity into a beautiful focal point. It is a high-impact DIY project that is well within the reach of a determined homeowner.
By following these steps, paying close attention to detail, and avoiding common pitfalls, you can create a stunning architectural element that looks like it has always been a part of your home. You can successfully hide an eyesore and craft a masterpiece in its place.