Worst Concrete Job Ever? How to Spot & Fix a Total Disaster
There’s a unique sinking feeling that comes with seeing a freshly poured concrete project go wrong. Whether it’s a new patio, driveway, or walkway, you expect a smooth, durable, and flawless surface. When what you get is a mess of cracks, uneven spots, and rough patches, it’s more than just disappointing—it’s a problem that can devalue your home and lead to bigger issues down the line.
Many homeowners are left wondering what went wrong and, more importantly, what can be done. This guide is designed to empower you. You will learn to identify the telltale signs of a botched concrete job, understand the root causes, and discover actionable solutions to fix the mess before it becomes a catastrophe.
You'll Learn About
The Telltale Signs of a Botched Concrete Job
Not all concrete flaws are created equal. Some are merely cosmetic annoyances, while others are red flags for serious structural problems. Knowing the difference is the first step toward finding a solution.
Surface-Level Sins
These are the issues you can see and feel right away. While they may seem superficial, they often point to deeper problems with the installation process.
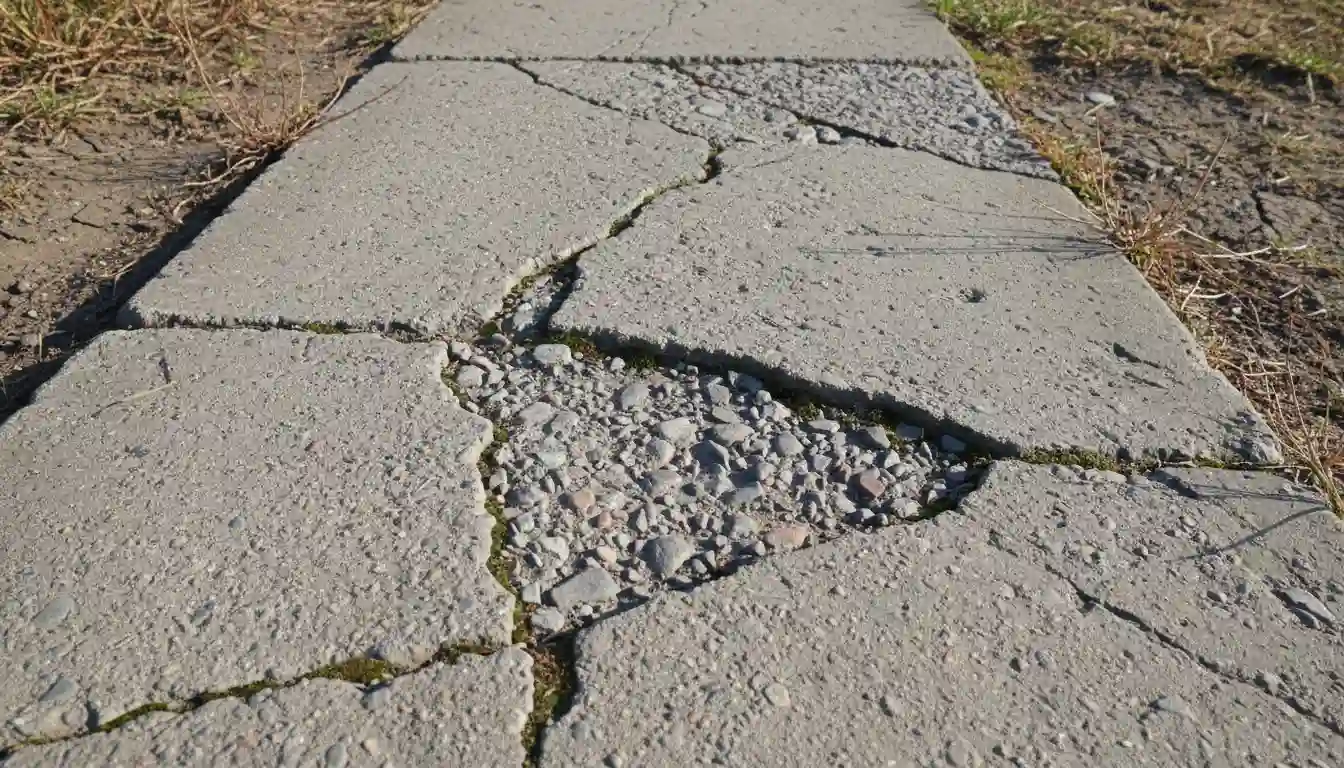
Widespread Cracking: While fine hairline cracks can be a normal part of the concrete curing process, a web of spider-web cracks (known as crazing) or large, deep cracks appearing soon after the pour are not. These often indicate the concrete mix was too wet or it dried too quickly.
Poor Finishing: A professional concrete surface should be uniform. Signs of a bad finish include obvious trowel marks, inconsistent broom finishes, and a rough, unfinished texture. This often happens when the finishing process is rushed or done at the wrong time.
Discoloration and Stains: Blotchy, inconsistent color across the slab can be a sign of an improper mix or uneven curing. You might also see a white, powdery residue called efflorescence, which occurs when water moving through the slab brings salt to the surface.
Spalling and Pitting: If the surface of your concrete is flaking, chipping, or has small pits, this is known as spalling. It’s a clear sign of a weak surface, often caused by a poor mix, improper curing in cold weather, or finishing the surface with water present.
Deeper, More Sinister Problems
These issues go beyond the surface and often point to fundamental failures in the project’s foundation or structural support.
Uneven Surfaces and Poor Drainage: One of the most common signs of a bad job is “bird baths”—low spots where water pools after it rains. A properly installed slab should be graded to ensure water runs off and away from your home’s foundation.
Heaving and Sinking: If sections of your concrete are lifting up (heaving) or sinking, the problem almost always lies underneath. This indicates that the subgrade—the ground beneath the slab—was not properly prepared and compacted.
Crumbling Edges and Corners: The edges of a concrete slab are particularly vulnerable. If they are chipping or crumbling easily, it’s a strong indicator that the concrete mix was weak or the forms were removed too early.
Why Did This Happen? Uncovering the Root Causes
Understanding why your concrete failed is crucial, whether you’re seeking a fix or ensuring it never happens again. Most concrete disasters can be traced back to a few key mistakes made during the installation process.
The Foundation of Failure: Improper Subgrade Preparation
This is the single most critical and most commonly skipped step. Concrete is strong, but it needs a stable, uniform base to rest on. If the ground beneath the slab is not properly compacted, it will settle over time, causing the concrete above to sink and crack.
A professional job involves removing topsoil, laying down a base of compacted gravel, and ensuring the entire area is level and stable before a single drop of concrete is poured.
A Bad Recipe: The Concrete Mix-Up
The strength and durability of concrete depend entirely on the correct ratio of cement, sand, aggregate, and water.
Too Much Water is the #1 Enemy: Adding excess water to the mix makes it easier to pour and spread, but it drastically weakens the final product. As the extra water evaporates, it creates voids within the concrete, leading to shrinkage, cracking, and a weak, porous surface.
Incorrect Proportions or Low-Quality Materials: Skimping on cement or using dirty sand or aggregate compromises the chemical reaction needed for strong concrete. This results in a slab that can’t stand up to traffic, weather, or time.
Rushing the Job: Improper Curing and Timing
Concrete doesn’t just “dry”; it undergoes a chemical process called curing, where it gains its strength. This process is highly sensitive to the environment.
Pouring in Bad Weather: Pouring concrete on a day that’s too hot, too cold, or rainy can ruin the job. Extreme heat causes the surface to dry too fast, leading to cracking, while freezing temperatures can stop the curing process altogether.
Skipping Proper Curing: A new slab must be kept continuously moist for several days to cure properly. Failing to do this by covering it or misting it with water can weaken the surface, making it prone to spalling and discoloration.
Lack of Reinforcement
Concrete has immense compressive strength (resisting being crushed) but very little tensile strength (resisting being pulled apart). Reinforcement like steel rebar or wire mesh is added to give it that tensile strength. Omitting reinforcement, especially in driveways and larger slabs, is a recipe for structural failure and large cracks.
The Fix-It Plan: From Patching to Total Replacement
Once you’ve identified the problems, the next step is determining the best course of action. Some issues can be fixed with DIY-friendly solutions, while others will require calling in a professional.
Can This Concrete Be Saved? Assessing the Damage
The right repair strategy depends entirely on the type and severity of the damage. A few hairline cracks are a world away from a slab that’s sinking and broken in half. This table can help you determine the best path forward.
| Problem | Severity | Potential Fix | DIY or Pro? |
|---|---|---|---|
| Hairline Cracks (< 1/8″ wide) | Low | Concrete crack sealer or sealant | DIY |
| Poor Finish / Discoloration | Low-Medium | Grinding, Staining, or Resurfacing | DIY/Pro |
| Spalling / Pitting (Shallow) | Medium | Patching compound or Resurfacer | DIY |
| Large Cracks (> 1/4″ wide) | High | Epoxy/Polyurethane injection, Grinding | Pro |
| Sinking / Heaving Slab | High | Slab jacking (Mudjacking or Foam) | Pro |
| Widespread Structural Failure | Severe | Demolition and Replacement | Pro |
DIY-Friendly Repairs for Minor Issues
For cosmetic problems on a structurally sound slab, a few options can make a huge difference.
Crack Repair: For small cracks, flexible concrete sealants can be used to prevent water from getting in and making the problem worse, especially during freeze-thaw cycles.
Concrete Resurfacing: If the surface is ugly but the slab is stable, a concrete resurfacer can be a great option. This involves applying a thin, cement-based overlay that bonds to the old concrete, creating a brand new, durable surface. This is often much cheaper than a full replacement.
When to Wave the White Flag: Calling a Professional
Do not attempt to DIY major structural problems. If your slab is sinking, heaving, or has large, deep cracks, it’s time to call in an expert. They have specialized tools and techniques that can sometimes save a slab without requiring a full replacement.
Professional solutions might include slab jacking, where a slurry or polyurethane foam is injected underneath the slab to lift it back into place. However, if the subgrade has completely failed or the concrete is too deteriorated, the only correct solution is to tear it out and start over. If you find yourself in this situation, ensure the new installation is done correctly, which may even involve advanced techniques like those needed when drilling concrete for fence posts to ensure stability.
The Ultimate Defense: How to AVOID a Concrete Catastrophe
The best way to deal with a terrible concrete job is to prevent it from happening in the first place. Whether you’re hiring a contractor or tackling a project yourself, knowledge is your best defense.
Vetting Your Concrete Contractor
Hiring the right professional is the most important decision you’ll make. A low bid can be tempting, but it often leads to cut corners and a disastrous outcome. Always ask potential contractors these critical questions:
- Are you licensed and insured? This is non-negotiable and protects you from liability.
- Can I see examples of your past work and speak to references? A reputable contractor will be proud to show off their projects.
- What is your process for subgrade preparation? If they don’t mention compacting a gravel base, run.
- What concrete mix (PSI strength) do you use? For a driveway, it should be at least 4,000 PSI.
- How and when will you place control joints? These planned cuts help control where cracking occurs.
- What is your curing process? They should have a clear plan for protecting the slab after the pour.
- Will you use reinforcement (rebar or wire mesh)? For most patios and all driveways, the answer should be yes.
Understanding the “Right” Way
Even if you hire a pro, understanding the fundamentals of a good concrete job helps you spot red flags. A successful project always includes a stable, compacted base, the correct concrete mix with minimal water, proper reinforcement, strategically placed control joints, and a meticulous curing process. Anything less is a gamble.
Conclusion: From Disaster to Durable
A bad concrete job can be a homeowner’s nightmare, but it doesn’t have to be a permanent one. By learning to identify the signs of poor workmanship, you can assess the severity of the problem and choose the right solution. For minor cosmetic flaws, a DIY repair or resurfacing can restore your concrete’s appearance and function.
For deeper, structural issues, investing in a professional repair or replacement is the only way to ensure a safe and long-lasting result. Armed with this knowledge, you can move forward confidently, turning that concrete catastrophe into a durable, valuable part of your home and garden.