Wood Stain Hardened in Can? Your Ultimate Revival Guide
There are few things more frustrating for a DIY enthusiast than starting a project with enthusiasm, only to be stopped in your tracks. You reach for a can of wood stain, ready to bring life to a piece of furniture or new flooring, and find a solid, useless hockey puck of hardened material inside.
This common problem can feel like a waste of money and a major setback. Before you toss that can in the trash, know that there is often a simple and effective way to rescue it.
This guide will walk you through the science of why stain hardens, how to assess if your can is salvageable, and the step-by-step process to bring it back to a smooth, usable consistency.
You'll Learn About
Why Does Wood Stain Harden in the Can? The Science of Oxidation
Understanding why your wood stain turned into a solid block is the first step in preventing it from happening again. The primary culprit behind this frustrating transformation is a chemical process called oxidation.
Most wood stains, particularly oil-based varieties, are designed to cure and harden when exposed to oxygen. This is what allows them to form a durable, protective layer on your wood projects. When the can is not sealed perfectly, that same process happens right inside the container.
Another key factor is the evaporation of solvents. Solvents are the liquids that keep the stain’s pigments and binders in a fluid, spreadable state. As air leaks into the can, these solvents slowly evaporate, leaving the solid components behind to clump together and harden.
The Most Common Causes of Hardened Stain
Several simple mistakes can accelerate the hardening process. The most frequent issue is an improper seal on the lid, often caused by dried stain gunking up the rim and preventing an airtight closure.
Having too much empty space, or “headspace,” in the can also introduces more oxygen, giving the stain more fuel to cure. Finally, storing the can in a place with fluctuating temperatures, like a hot garage or shed, can speed up the chemical reactions responsible for hardening.
First Step: Assess the Damage – Is Your Stain Salvageable?
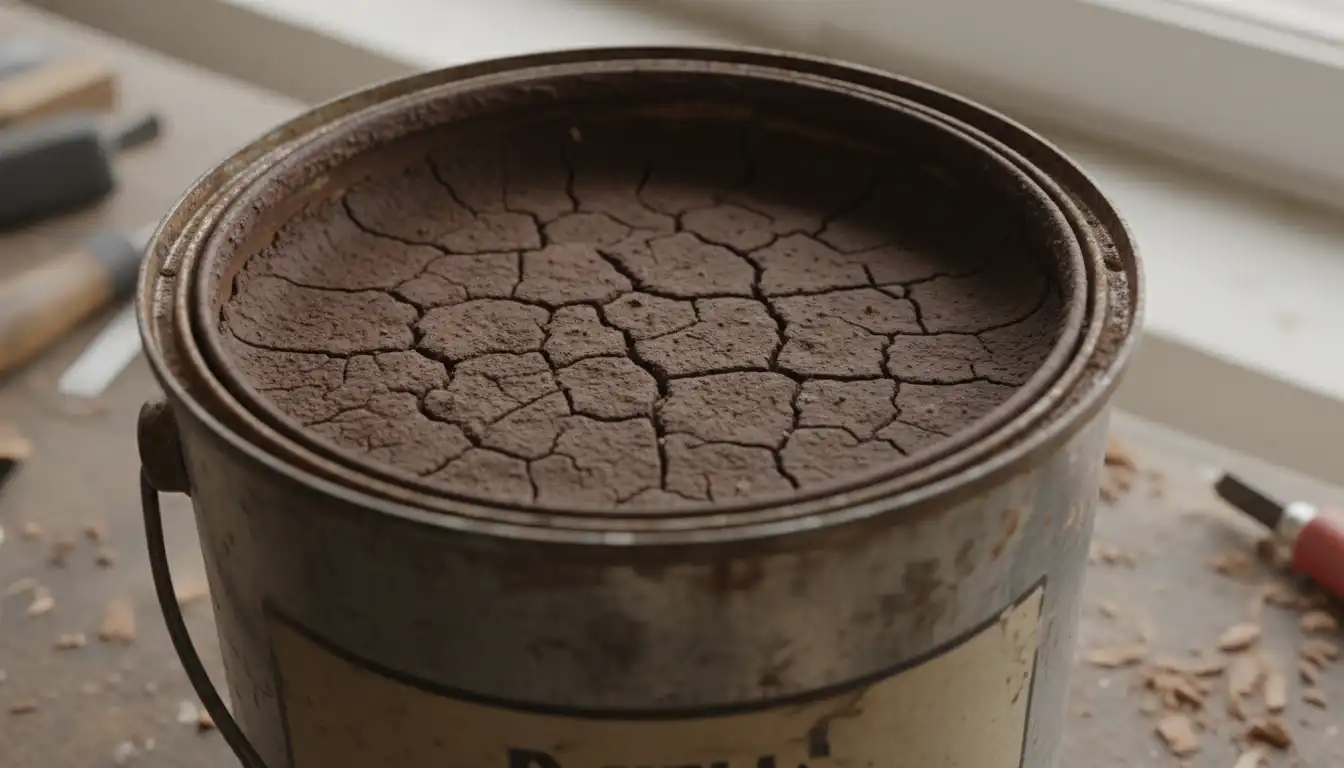
Not every can of hardened stain can be saved. The first critical step is to determine if you have a candidate for revival or a lost cause. The answer lies in the degree of hardening.
You can quickly diagnose the situation with a simple “poke test.” Take a screwdriver or a sturdy stir stick and press it firmly into the center of the stain’s surface. The results will tell you what to do next.
If the tool only breaks through a thick, rubbery skin on top but finds liquid stain underneath, your chances of success are very high. If the entire can is filled with a thick, gummy, or sludgy material, revival is possible but will require more effort. However, if the can is solid as a rock all the way through, it is fully cured and cannot be reconstituted. At that point, it’s time to learn about proper disposal.
The Revival Process: How to Soften Hardened Wood Stain
If you’ve determined your stain is salvageable, you can proceed with the revival process. This requires the right materials, a bit of patience, and a focus on safety.
Before you begin, ensure you are working in a well-ventilated area, preferably outdoors or in a garage with the doors open. Wear chemical-resistant gloves and safety glasses to protect your skin and eyes from splashes. Remember that stain and its solvents are flammable, so keep them far away from any open flames or sources of ignition.
Step 1: Remove the Hardened Top Layer
If your stain has a solid skin on top, this layer must be removed. It is already cured and will not dissolve back into the liquid. Carefully use a utility knife to cut around the inside edge of the can.
Once you’ve cut all the way around, you should be able to pry the solid disk of stain out with a screwdriver. This hardened piece is unusable and should be set aside for proper disposal.
Step 2: Choose the Correct Solvent
This is the most critical step in the entire process. Adding the wrong type of solvent will not work and may ruin the remaining stain. The solvent you need depends entirely on the base of your wood stain.
To find out what type of stain you have, simply check the cleanup instructions on the can’s label. This is the most reliable indicator. For oil-based stains, the label will recommend cleaning up with mineral spirits or paint thinner. For water-based stains, it will say to use soap and water.
For oil-based stains, your best options are mineral spirits, paint thinner, or naphtha. Mineral spirits are the standard choice. For water-based stains, you will use small amounts of distilled water. For less common lacquer-based stains, you must use lacquer thinner.
Step 3: Reconstitute the Stain Slowly
With the hardened skin removed and the correct solvent in hand, you can begin the revival. Start by pouring a very small amount of solvent into the can—just enough to cover the surface of the remaining thick stain.
Begin stirring with a clean stir stick. At first, it will be clumpy and resistant, but as you continue to stir, the solvent will slowly start to break down the binders and pigments. Be patient and stir thoroughly for at least 10 to 15 minutes.
Gradually add more solvent in small increments, stirring continuously, until you reach the stain’s original consistency. Do not add too much solvent at once, as this can make the stain too thin, affecting its color and performance.
Step 4: Filter for a Flawless Finish
This final step is one that many people skip, often to their regret. Even after thorough mixing, the revived stain will likely contain small, hidden lumps of semi-hardened material.
If these lumps make it onto your project, they will create an uneven, unprofessional finish. To prevent this, you must filter the stain. Pour the entire batch of revived stain through a paint strainer or a few layers of cheesecloth into a second, clean container.
This guarantees a perfectly smooth liquid, ready for application. Ensuring a perfect finish is crucial, especially on large, visible surfaces, a concern often echoed in real wood floors reviews where the quality of the stain job is a major topic.
The Ultimate Prevention Strategy: How to Store Wood Stain Correctly
Reviving stain is useful, but preventing it from hardening in the first place is even better. Proper storage is simple and will save you significant time and money on future projects. The key is to deny the stain what it needs to cure: oxygen.
First, always clean the rim of the can thoroughly before replacing the lid. Use a rag with a bit of mineral spirits (for oil-based stains) to wipe away any residue. This ensures the lid can form a truly airtight seal.
Next, minimize the amount of air in the can. If you’ve used more than half of the stain, consider decanting the rest into a smaller, airtight glass or metal container. The less empty space, the less oxygen there is to cause problems.
Advanced Tricks for Long-Term Storage
For a DIYer-approved trick, try storing the can upside down after sealing it tightly. The liquid stain will press against the lid from the inside, creating a perfect seal that prevents any air from leaking in. Just be absolutely sure the lid is hammered on tight before you flip it.
Another excellent method is to place a piece of plastic wrap over the can’s opening before putting on the lid. The plastic acts as a gasket, creating an even better seal. These simple habits will keep your stain fresh and ready for your next project.
| Stain Type | Correct Solvent for Revival | Primary Prevention Tip | Secondary Prevention Tip |
|---|---|---|---|
| Oil-Based | Mineral Spirits or Paint Thinner | Clean can rim before sealing tightly. | Store the can upside down. |
| Water-Based | Distilled Water | Use a layer of plastic wrap under the lid. | Decant into a smaller airtight container. |
| Lacquer-Based | Lacquer Thinner | Ensure the lid is hammered on securely. | Store in a cool, temperature-stable location. |
Disposing of Hardened Stain and Solvents Safely
Responsible disposal is a critical part of any home improvement project. Wood stains and solvents are considered hazardous materials and should never be poured down the drain or on the ground.
If your stain has hardened completely into a solid block, it is often considered inert and may be disposable with your regular household trash. However, you must check your local municipal regulations first, as rules can vary.
Any leftover liquid stain, solvents, or cloths soaked in these materials must be taken to a local hazardous waste disposal facility. These sites are equipped to handle these chemicals safely, preventing environmental contamination.
A Note on Performance: Will Revived Stain Work the Same?
A common question is whether a revived stain will perform as well as a new can. If you have successfully returned the stain to its original consistency and filtered it properly, the performance should be very close to the original.
However, adding solvent can sometimes slightly alter the drying time. For this reason, it is absolutely essential to test the revived stain on a piece of scrap wood before applying it to your main project. This allows you to check the color, absorption, and drying time to ensure it meets your expectations.
This testing phase is non-negotiable for critical projects like finishing a large piece of furniture or staining a floor, where consistency is key. Taking the time to test can be the difference between a beautiful result and a frustrating one, a sentiment shared by those who invest in premium materials and consult detailed guides like Välinge Flooring reviews before starting a major installation. This is a mindset of reusing what you have, a creative alternative to trying to sell hardwood flooring scraps or leftovers.
The “Unspoken” Factor: Why Old Stain Might Fail
While solvent evaporation and oxidation are the primary reasons for hardening, there is a more subtle factor at play with very old stain. Over a long period, typically five years or more, the chemical binders within the stain can begin to break down.
These binders are what allow the stain to adhere to the wood and cure into a durable finish. Even if you can successfully re-liquefy a very old stain, its binders may have degraded to a point where they can no longer function properly.
This can result in a finish that remains tacky indefinitely, fails to cure, or offers poor durability. For an heirloom piece or a high-traffic surface, the small cost of a fresh can of stain is often the wisest investment to guarantee a professional and long-lasting result.
Conclusion: From a Hardened Mess to a Perfect Finish
Discovering a hardened can of wood stain is no longer a project-ending disaster. By understanding the cause, you can take clear, actionable steps to assess, revive, and filter your stain back to life.
Remember the key steps: remove the solid skin, use the correct solvent for your stain’s base, mix slowly and patiently, and always filter out any hidden lumps. More importantly, adopt proper storage habits to prevent the problem from ever happening again.
By cleaning the can’s rim and minimizing its exposure to air, you can ensure your materials are always ready when inspiration strikes. This simple knowledge transforms a frustrating problem into a solvable challenge, saving you money and empowering you to achieve a perfect finish every time.