Wheel Rusted to Axle? The #1 Trick to Break It Free, Fast!
There are few workshop frustrations as maddening as a wheel that’s completely seized. You’ve removed the lug nuts, you’re ready to get to work, but the wheel won’t budge. It’s fused to the axle hub with a bond of rust that feels stronger than steel.
This is a remarkably common problem for vehicles, trailers, and even smaller equipment like snowblowers and lawn tractors. The combination of moisture, road salt, and dissimilar metals creates the perfect storm for corrosion, effectively welding your wheel in place. Trying to simply pull it off is a recipe for a strained back and a lost afternoon.
Fortunately, with the right tools, techniques, and a dose of patience, you can win this battle. This guide will walk you through the safest and most effective methods to remove a wheel rusted to an axle, and more importantly, how to prevent it from ever happening again.
You'll Learn About
Understanding Why Your Wheel is Stuck: The Science of Seizure
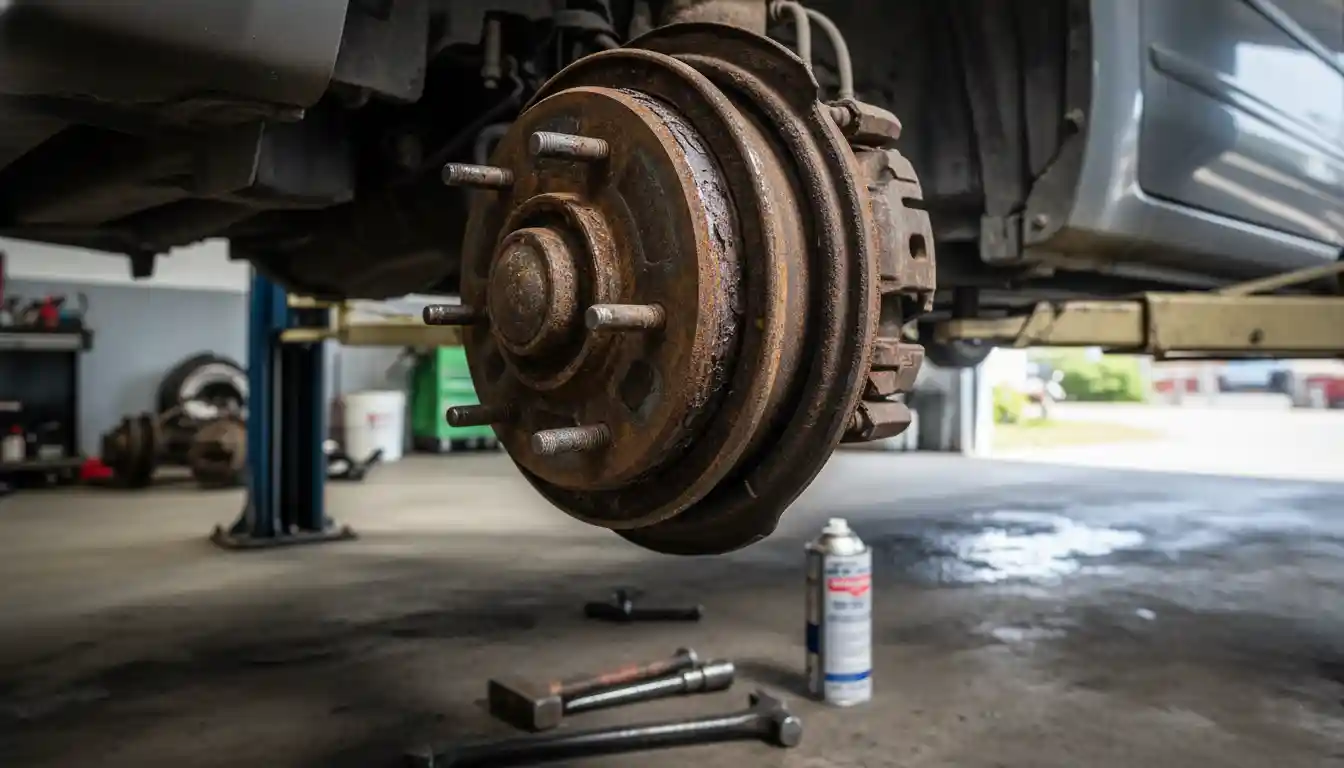
Before you grab the biggest hammer you can find, it’s helpful to understand what’s holding your wheel so tightly. The culprit is almost always corrosion, but it can manifest in a few different ways. The primary cause is simple oxidation—rust—forming between the steel hub assembly and the back of the wheel.
Another powerful force at play, especially with aluminum alloy wheels on steel hubs, is galvanic corrosion. When two different metals are in contact in the presence of an electrolyte (like salty water), they create a battery-like reaction where one metal corrodes much faster than the other. This process creates a stubborn bond of corrosion that locks the two surfaces together.
Many modern vehicles use a hub-centric design, where the wheel is centered by a tightly machined ring on the hub. While this provides a smoother ride, that tight tolerance leaves very little room for error. Once rust begins to form in this tiny gap, it expands and acts like a powerful wedge, seizing the wheel with immense force.
Safety First: Preparing for the Removal Process
Attempting to remove a stuck wheel involves applying significant force, so safety is non-negotiable. Rushing this process can lead to injury or damage to your vehicle or equipment. Before you begin, gather the necessary tools and ensure you are working in a safe environment.
Always work on a flat, level, and solid surface like a concrete garage floor. Chock the wheels on the opposite end of the vehicle to prevent any rolling. Most importantly, never, ever work on a vehicle supported only by a jack. Always use properly rated jack stands to secure the vehicle before you begin applying force to the wheel.
Having the right tools on hand will make the job infinitely easier and safer. Below is a table of essential equipment for this task.
| Tool | Primary Purpose | Pro-Tip |
|---|---|---|
| Penetrating Oil (e.g., PB B’laster, Kroil) | Dissolving rust and lubricating the seized parts. | Choose a high-quality oil with a capillary action that allows it to creep into tight spaces. |
| Jack and Jack Stands | Safely lifting and supporting the vehicle. | Ensure your jack stands are rated for the weight of your vehicle and place them on a solid frame point. |
| Lug Wrench / Breaker Bar | Removing lug nuts. | Always loosen the lug nuts while the tire is still on the ground to prevent the wheel from spinning. |
| Dead Blow Hammer / Rubber Mallet | Applying force without damaging the wheel’s surface. | A dead blow hammer delivers impact without rebound, making it more effective and safer. |
| Sledgehammer (3-5 lbs) | Applying significant shock and vibration. | This is for striking the tire, not the metal wheel itself, to break the rust bond. |
| Wire Brush (Steel or Brass) | Cleaning rust from the hub and wheel surfaces. | A drill-mounted wire wheel can speed up this process significantly for prevention. |
| Safety Glasses and Gloves | Protecting yourself from flying debris and chemicals. | Rust flakes and chemical spray can easily cause eye injury. This is mandatory. |
| Anti-Seize Lubricant | Preventing future seizing. | A thin coat on the hub surface is the single best way to avoid this problem in the future. |
The Step-by-Step Guide to Removing a Rusted Wheel
With your workspace prepared and tools at the ready, you can begin the removal process. The key is to start with the least aggressive methods first and escalate only as needed. Patience is your most valuable asset here.
Step 1: Apply Penetrating Oil Generously
The first and most crucial step is to let chemistry do the heavy lifting. Generously spray a high-quality penetrating oil on the entire hub area. Focus the spray on the seam where the back of the wheel meets the flat surface of the hub.
Also, spray around the base of each lug stud, as rust often forms there as well. Don’t be shy with the application. Once sprayed, let the oil sit for at least 15-30 minutes. For severely rusted wheels, letting it soak for several hours or even overnight can make a world of difference.
Step 2: Use Percussion to Your Advantage
After the penetrating oil has had time to work, it’s time to introduce some vibration and shock. This helps the oil penetrate deeper into the corroded surfaces and can break the initial rust bond. Using a dead blow hammer or a regular hammer with a block of wood as a buffer, strike the back of the wheel rim in several spots.
Work your way around the wheel, delivering firm, sharp blows. This is often enough to free a moderately stuck wheel. If it remains stubborn, move on to the next technique.
Step 3: The Sledgehammer and Tire Method
This is one of the most effective and widely used methods for breaking a seized wheel free. It uses the tire itself to absorb and distribute the impact, shocking the entire assembly without damaging the metal rim. Take a small sledgehammer and strike the rubber sidewall of the tire firmly.
Rotate the wheel a quarter turn and strike it again. Continue this process, hitting the tire at the 12 o’clock, 3 o’clock, 6 o’clock, and 9 o’clock positions. The jarring force transmitted through the tire is incredibly effective at shattering the brittle rust bond holding the wheel to the hub.
Step 4: The Rotational Force Technique
If brute force isn’t working, it’s time to use leverage. This method is safer than other last-resort options. Thread two opposite lug nuts back onto the studs, but leave them loose by two or three full turns. This ensures the wheel won’t fall off but has room to move.
Carefully lower the vehicle off the jack stands just enough so that the tire makes firm contact with the ground but doesn’t bear the full weight of the car. Now, from the side of the vehicle, firmly rock the top of the wheel back and forth. The combination of the vehicle’s weight and this rotational force can often provide the final push needed to break the wheel loose. You will often hear a loud “pop” when the corrosion bond finally breaks.
Step 5: Applying Heat (The Expert’s Method)
This should be considered a last resort, as it involves significant risk if done improperly. Using a propane or MAPP gas torch, carefully heat the hub face of the wheel in the area directly around the center bore. The goal is to heat the aluminum or steel of the wheel, causing it to expand faster than the steel hub it’s attached to.
Keep the flame moving constantly to distribute the heat evenly and avoid damaging the wheel’s finish. Be extremely careful to avoid heating the hub bearing, any rubber seals, or the tire itself. After a minute or two of heating, a few taps with a hammer will often be enough to pop the wheel free. This method requires a high degree of caution and is not for beginners.
Prevention: The Most Important Step of All
Once you’ve successfully removed the wheel, your job is only half done. Taking a few extra minutes for preparation now will save you from ever having to repeat this frustrating process again. The key is to create a barrier that prevents rust from forming in the first place.
Using a wire brush or a drill-mounted wire wheel, thoroughly clean all mating surfaces. Scour all the rust off the flat face of the hub and the center ring. Then, do the same for the back of the wheel, paying close attention to the center bore and the flat area that sits against the hub.
Once the surfaces are clean and free of debris, apply a very thin layer of anti-seize lubricant to the flat face of the vehicle’s hub. This compound is designed to withstand high temperatures and pressure, and it creates a barrier that prevents the two metal surfaces from corroding together. However, it is critically important where you apply it. Never apply anti-seize to the lug studs or their threads. Doing so can act as a lubricant, leading to inaccurate torque readings and dangerously over-tightened lug nuts, which can cause the studs to stretch or even fail.
Special Considerations for Small Equipment
The same principles apply to smaller machines, but they can present unique challenges. Equipment like an old Simplicity 755 snowblower or a lawn tractor often sits for long periods, accumulating moisture. Their axles may also have keyways or cotter pins that can become additional seizure points.
For these machines, liberal use of penetrating oil and patience is even more critical. If you’re wrestling with a tire issue on such equipment, you might find that once you get the wheel off, you have another problem on your hands. Dealing with a snowblower tire that’s come off the rim, for instance, requires its own set of techniques for remounting and sealing.
Furthermore, adjusting components after re-assembly is key to performance. On a snowblower, ensuring the machine doesn’t scrape the pavement involves setting the height correctly, a process simplified by having quick-adjust snowblower skids that are free and not seized by rust themselves.
Conclusion: Winning the War Against Rust
A wheel rusted to an axle can bring any project to a grinding halt. However, by understanding the forces at play and approaching the problem systematically, you can safely and effectively remove even the most stubborn wheel. Remember to prioritize safety, start with the least aggressive methods, and be patient.
The most valuable part of this entire process is the preventative maintenance you perform after the wheel is off. A thoroughly cleaned hub and a thin, properly applied layer of anti-seize lubricant is the ultimate guarantee that you will never have to fight this battle again. Your future self will thank you for it.