What to Do With an Old Nutone Intercom System Now?
The presence of an old NuTone intercom system can often be an architectural challenge, leaving homeowners with outdated technology and unsightly wall units. Instead of simply tearing it out, there are several resourceful and cost-effective ways to manage or upgrade this legacy system. These solutions range from modernizing the existing wiring to completely replacing the units with contemporary, feature-rich smart home devices.
You'll Learn About
That Ugly Box on Your Wall Is an Opportunity in Disguise
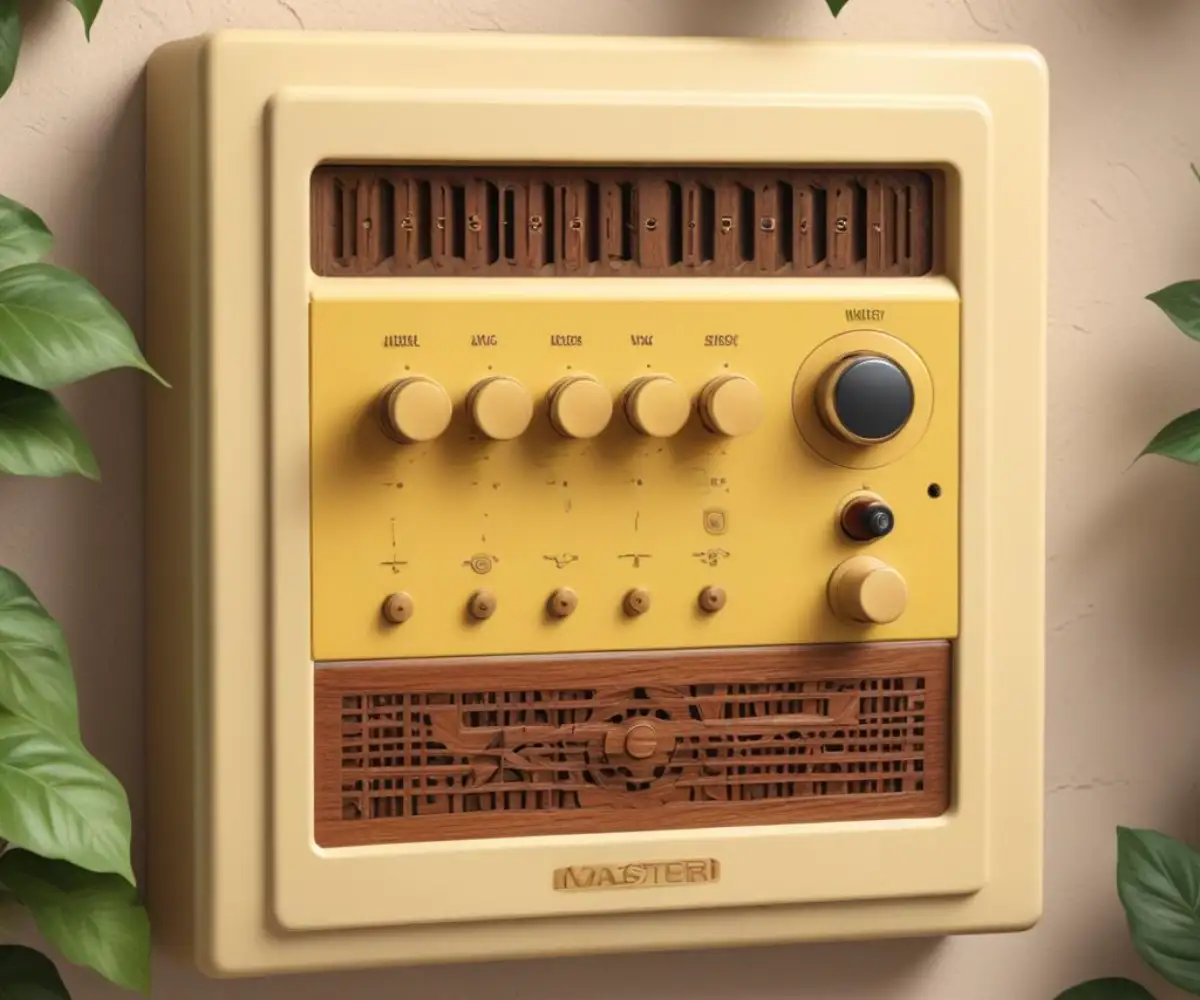
There it is. That yellowed, plastic box on your wall, a relic from a bygone era of home technology. For decades, a NuTone intercom system was the peak of household convenience, but now it likely sits silent, collecting dust.
Many homeowners see this outdated unit as an eyesore that needs to be ripped out. But removing it leaves a gaping hole and a wiring puzzle. Before you take a sledgehammer to your wall, understand that this old system presents a unique opportunity.
Why Old Intercoms Pose a Unique Challenge
These systems were not simple installations. They have a central master station, several substations in different rooms, and a web of low-voltage wiring running through your walls. This complexity is precisely why dealing with them can be so daunting.
The good news is that the hard work—running the wires—has already been done for you. This guide will explore all your options, from simple removal to clever upgrades that can modernize your home in ways you never expected.
First, Decide Your Path: Repair, Replace, Remove, or Repurpose?
Your journey begins with a fundamental choice based on your budget, DIY comfort level, and home goals. Each path offers distinct advantages.
Consider whether you want to restore vintage charm, install modern technology, achieve a clean, minimalist look, or create a unique custom feature. Your answer will determine the right course of action.
Assessing the State of Your Current System
Begin by evaluating what you have. Is there any sign of life, like a low hum or crackle? A persistent humming sound can sometimes be a fixable issue related to the transformer or wiring. For specific models like the 3003 series, troubleshooting might be an option if you enjoy vintage tech. You can learn more about tackling specific issues in our guide to repairing a NuTone 3003 Intercom Humming.
However, for most, the technology is too obsolete to justify the cost and effort of sourcing rare parts. If the unit is completely dead or you desire modern features, it’s time to look at other solutions.
The Upgrade Path: Replacing Your Old Nutone Intercom
For many, the most logical step is to replace the old unit with a modern system. This is often simpler than you think because you can leverage the existing wiring. This saves you from the complex and costly process of running new wires through your walls.
Modern intercoms do more than just broadcast voices. They can stream music, connect to your phone via Bluetooth, and integrate with other smart home devices.
Choosing a Modern Retrofit System
Several companies make “retrofit” systems designed specifically to fit into the existing openings left by old NuTone and M&S master stations. These systems are designed for easy installation using the original wiring.
Look for kits that include a new master station and room stations that match the size of your old ones. This minimizes the amount of wall patching required. These modern upgrades can transform that dated box into a whole-home music and communication hub. For a deep dive into your options, explore our 9 Genius Ideas for That Old Box.
The Clean Slate: How to Completely Remove the Intercom System
Sometimes, the best solution is a clean slate. If you prefer a minimalist look or have no need for a built-in audio system, complete removal is your best bet. This project is more involved but is well within the reach of a determined DIYer.
The biggest challenge isn’t removing the units themselves, but rather what you do with the holes they leave behind. Proper wall patching is key to a professional-looking result.
Step 1: Power Down for Safety
This is the most important step. Your intercom system is connected to your home’s electrical system. Go to your breaker box and shut off the circuit that powers the intercom.
Use a voltage tester at the master unit to confirm that the power is completely off before you touch any wires. Safety must always be your first priority.
Step 2: Remove the Master Station and Room Units
The master station is typically held in a rough-in box in the wall with a few screws. Carefully remove the faceplate and unscrew the main unit from the box. You will see a tangle of wires connected to the back.
Disconnect the wires, taking a picture beforehand just in case you need to reference it. Do the same for all the smaller room stations. These are usually simpler to remove.
Step 3: Secure the Old Wiring
Once the units are removed, you are left with the old wiring. Since it’s low-voltage, it doesn’t pose the same risk as standard electrical wiring. However, you should still make it safe.
The best practice is to cap each wire individually with a small wire nut or electrical tape. Then, carefully push the secured wires back into the wall cavity. Do not just cut them and leave them exposed.
Step 4: Patch the Holes in the Wall
This is where your project can either look professional or amateur. You will need to patch the drywall or plaster where the intercom units used to be. For a large hole from a master station, you’ll need to create a new surface.
Cut a piece of drywall to fit the opening and secure it to a piece of wood placed inside the wall cavity for support. From there, you will apply joint compound, sand, and prime before painting to match your wall. This process is similar to other wall projects, like installing wainscoting on plaster walls, which also requires careful wall preparation.
The Creative Path: Genius Ways to Repurpose That Intercom Box
This is where you can turn a problem into a standout feature. The cavity in your wall is a valuable piece of real estate. Instead of just covering it up, transform it into something useful and modern.
These innovative solutions add functionality that feels like it was custom-built for your home, all while solving the problem of that old box.
Create a Centralized Smart Home Hub
The location of a master intercom station is often a prime, central spot in the home. This makes it the perfect place for a smart home control panel. You can mount a tablet, like an iPad Mini or a Google Nest Hub, directly into the wall cavity.
Use a recessed tablet mount to create a flush, built-in look. This gives your family a central place to control lights, thermostats, music, and security cameras. It’s a high-impact upgrade that brings your home firmly into the 21st century.
Install a Discreet In-Wall Charging Station
Tired of countertop clutter from charging phones and devices? Convert the old intercom box into a hidden charging station. This is a surprisingly straightforward project with huge practical benefits.
An electrician can help you run a standard electrical line to the box (if one isn’t already there for the old transformer). Install a recessed outlet with built-in USB ports. You can then create a small, shelved nook for a truly clean and custom charging solution.
Design a Unique Recessed Storage Nook
Everyone can use a bit more storage, especially for small, easy-to-lose items. Transform the empty box into a recessed shelf, a hidden key holder, or a small display case for art.
You can build a simple custom box to line the cavity and add a frame around the opening. For a truly hidden effect, you can even mount a piece of artwork on a hinge over the opening, creating a secret compartment.
Comparing Your Options: Cost, Difficulty, and Benefits
To help you decide, here is a direct comparison of the different approaches you can take with your old Nutone intercom system. This table breaks down the key factors to consider for each option.
| Option | Estimated Cost | DIY Difficulty | Key Benefit | Best For… |
|---|---|---|---|---|
| Repair Existing System | $50 – $400+ | Moderate to High | Retains vintage character and functionality. | Homeowners who value authenticity and have a working or partially working system. |
| Replace with Modern Intercom | $300 – $1,000+ | Moderate | Adds modern features like music streaming using existing wires. | Those who want an integrated whole-home audio and communication system. |
| Remove and Patch Wall | $50 – $200 | Moderate | Provides a clean, modern look and completely removes old tech. | Minimalists and those who prefer a clean, uninterrupted wall surface. |
| Repurpose as a Smart Hub | $200 – $600 | Moderate | Creates a high-tech, centralized control center for your home. | Tech-savvy homeowners who want to integrate smart home technology seamlessly. |
| Repurpose as a Charging Station | $100 – $300 | High (Requires Electrical Work) | Hides device clutter and adds significant daily convenience. | Anyone looking for a practical, custom-feel upgrade to reduce clutter. |
Your Old Intercom Is Not a Problem, It’s a Project
That old NuTone intercom on your wall doesn’t have to be a source of frustration. Whether you choose to repair, replace, remove, or repurpose it, you have the power to transform that relic into a feature that better suits your modern life.
By viewing the existing wiring and wall opening as assets, you can tackle this project with confidence. You can either restore a piece of your home’s history or use it as a launchpad for its technological future.
Final Words
Ultimately, an old NuTone intercom system should be viewed not as a nuisance but as a hidden infrastructural asset, providing pre-wired channels throughout your home. Whether you opt for a sleek, modern replacement or pivot to a cutting-edge smart home control network, the core goal is to update the technology while maintaining the structure. By thoughtfully repurposing these components, you can enhance your home’s functionality, increase its technological sophistication, and boost its overall appeal in a surprisingly efficient manner.