Schluter Strip for 3/8 Tile: The #1 Sizing Mistake to Avoid
You’ve selected the perfect 3/8 inch tile, visualizing a flawless, professional finish. But a single, deceptively simple component stands between you and that vision: the edge trim. Choosing the wrong size Schluter strip is one of the most common and costly mistakes in a tiling project, turning a dream wall or floor into a landscape of sharp edges, unsightly lips, and disappointing results.
This isn’t just about aesthetics. An incorrectly sized trim compromises the integrity of your entire installation, leaving your tile edges vulnerable to chipping, cracking, and moisture damage. Getting this one detail right is crucial for a durable, long-lasting, and beautiful finish that elevates your space from amateur to architectural.
You'll Learn About
The Golden Rule of Sizing a Schluter Strip for 3/8″ Tile
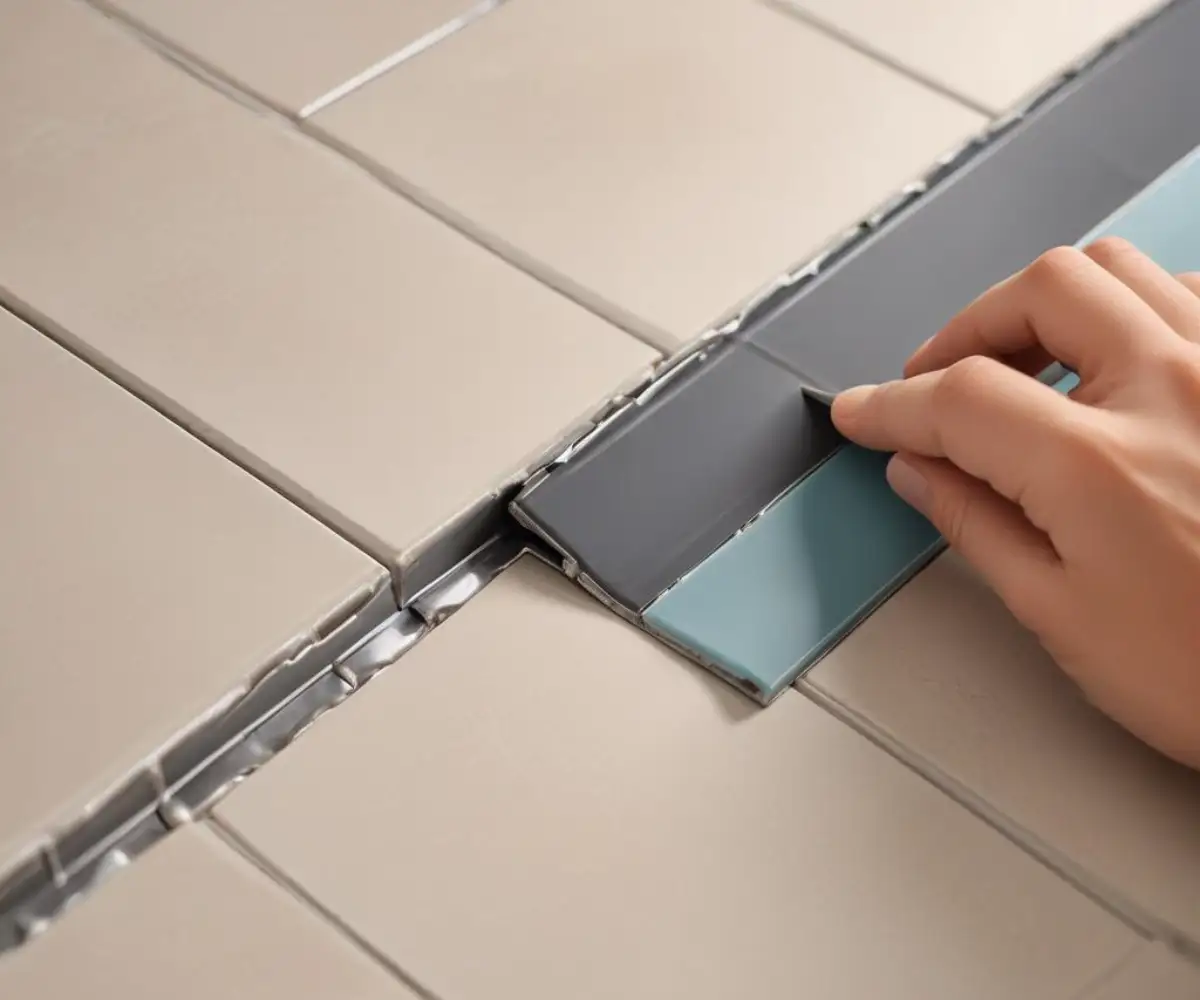
When it comes to selecting the right size Schluter strip, there is one paramount rule that cuts through all the confusion: the profile height must match the tile thickness. It is a direct, one-to-one relationship. If your tile is 3/8 inches thick, you need a 3/8 inch Schluter strip.
In the world of Schluter, this is most commonly referred to by its metric equivalent. A 3/8 inch tile is approximately 10 millimeters (mm) thick. Therefore, you will be looking for a Schluter profile with “100” in its product code, which designates a 10 mm height.
The Great Thin-Set Debate: Why You Don’t Size Up
A frequent and critical point of confusion is whether to account for the layer of thin-set mortar underneath the tile. Many people assume they need a taller profile to accommodate this extra height. This is a myth and a recipe for a poor finish. The design of the Schluter strip already accounts for the installation process.
The profile features a perforated anchoring leg. This leg is designed to be pressed into the thin-set mortar, right alongside the tile. The tile is then set so its surface is perfectly flush with the top of the trim. Sizing up will create a metal lip that stands proud of the tile surface, creating a trip hazard on floors and a visually jarring flaw on walls.
Choosing Your Profile: It’s More Than Just Size
Once you’ve locked in the correct 10 mm (3/8″) height, the next decision is the profile shape. This choice is primarily about aesthetics and the style you wish to achieve. Each profile type offers a different look and feel, protecting the tile edge while contributing to the overall design.
The three most popular profiles—Jolly, Rondec, and Quadec—offer distinct styles for finishing the edge of your 3/8″ tile installation. Understanding their differences is key to achieving your desired look, from minimalist to bold.
Comparing the Most Common Profile Styles
Your choice of profile will define the final character of the tile edge. Whether you prefer a barely-there line, a soft curve, or a strong angle, there’s a profile designed to meet your aesthetic goals while providing essential protection for your tile.
To help simplify the decision, the table below breaks down the key features and typical applications for the most common Schluter profiles suitable for your 3/8 inch tile.
| Profile Name | Edge Shape | Best For | Material Options |
|---|---|---|---|
| Schluter-JOLLY | Flat, 90-Degree Angle | Creating a clean, minimalist, and discreet edge on walls. | Aluminum, PVC, Color-Coated Aluminum |
| Schluter-RONDEC | Symmetrically Rounded | A softer, more traditional look that is safe for countertops and external corners. | Stainless Steel, Aluminum, Brass, PVC |
| Schluter-QUADEC | Square, 90-Degree Angle | A bold, modern finish that pairs well with contemporary and large-format tiles. | Stainless Steel, Aluminum, Textured Finishes |
| Schluter-SCHIENE | L-Angle with Flat Top | Versatile for floor transitions to same-height surfaces (e.g., carpet) and wall edging. | Stainless Steel, Aluminum, Brass |
A Step-by-Step Guide to Perfect Profile Selection
Navigating the selection process can be straightforward if you follow a logical sequence. By confirming your tile’s true thickness and considering your project’s aesthetic and functional needs, you can choose with confidence.
Step 1: Verify Your Tile’s True Thickness
Never assume your 3/8″ tile is exactly 3/8″ thick. Manufacturing tolerances can lead to slight variations. This is especially true for handmade tiles or natural stone, which can have noticeable differences from piece to piece. Use a digital caliper to measure several tiles from your batch to find the true average thickness.
This small step is critical. A tile that is slightly thicker than 10 mm may require the next size up (11 mm or 7/16″) to sit flush. Conversely, a slightly thinner tile will result in the 10 mm profile standing too proud.
Step 2: Decide on the Profile Shape and Material
Referencing the table above, choose the profile shape that best matches your design vision. For a sleek kitchen backsplash, a Jolly or Quadec profile in a metallic finish might be perfect. For a high-traffic floor corner, the durable and rounded Rondec in stainless steel could be a more practical and safer choice.
Consider the environment. For wet areas like showers, stainless steel or PVC profiles offer superior corrosion resistance compared to standard aluminum. The material you choose impacts not only the look but also the longevity of the installation.
Common Sizing Disasters and How to Prevent Them
Even with the best intentions, mistakes can happen. Understanding the consequences of incorrect sizing can help you avoid these pitfalls and know what to do if you find yourself in a tricky situation.
Disaster #1: The Profile is Too Tall
This is the most frequent sizing error, often caused by the misguided idea of allowing extra room for thin-set. The result is a metal edge that sits higher than the tile surface. This creates a noticeable and unpleasant lip that collects dirt, acts as a trip hazard, and simply looks unprofessional.
If you discover this after the fact, the only proper fix is to remove the affected tiles and trim and reinstall with the correct size. Attempting to build up the tile with extra mortar can create voids and lead to a weak bond, compromising the entire installation.
Disaster #2: The Profile is Too Short
Choosing a profile that is shorter than the tile thickness leaves the sharp, unglazed edge of the tile exposed. This completely defeats the purpose of using an edge trim. The exposed edge is highly susceptible to chipping and damage, and the uneven transition makes it difficult to create a clean grout or caulk line.
Unfortunately, there is no viable fix for a profile that is too short. The tile and trim must be removed and replaced. This underscores the importance of measuring twice and confirming your tile thickness before making a purchase.
Advanced Considerations for a Truly Professional Job
Beyond basic sizing, a few advanced considerations can elevate your project. Properly planning for transitions and understanding the role of underlayment are hallmarks of a high-quality, durable installation.
Seamlessly Managing Transitions
Schluter strips excel at creating clean breaks and transitions between different materials. When tile meets another flooring type, the right profile provides a clean, protected edge. For complex scenarios, such as a modern tile to shiplap transition, a Quadec or Schiene profile can provide the perfect architectural finish.
The key is to ensure the adjacent material is at the same height or that you select a specialized transition profile designed to handle the height difference gracefully.
Protecting Your Foundation
The most beautiful tile job will fail if the substrate is unstable. Tile edging protects the perimeter, but the entire foundation needs to be sound. Using the best crack isolation membrane is a critical step to prevent underlying movement from transferring through and cracking your tiles and grout lines.
Think of it as a complete system. The edge trim provides the finishing touch, but the integrity of the installation starts with what’s underneath.
Filling the Gaps
In some installations, you may encounter awkward gaps at the edge of a tile run, especially against uneven walls or custom cabinetry. While a Schluter profile defines the main edge, smaller voids may need to be addressed before caulking. In these cases, exploring a backer rod alternative can help you properly fill the space to ensure a flexible, watertight seal.
Your Blueprint for Success
The secret to choosing the right size Schluter strip for your 3/8″ tile is refreshingly simple: let the tile dictate the size. By precisely matching the profile height to your tile’s actual thickness—which is 10 mm for a standard 3/8″ tile—you lay the groundwork for a perfect, flush finish.
Resist the temptation to overthink it or compensate for mortar. Trust the system’s design. By pairing this fundamental rule with the right profile shape and material for your project, you empower yourself to achieve a result that is not only beautiful but also built to last.