Vinyl Siding Identification: Find Your Match Before It’s Gone!
There’s a sinking feeling that every homeowner knows. It’s the moment you spot it: a crack, a hole, or a warped panel on your beautiful vinyl siding. The repair itself seems simple, but then the real challenge begins.
You head to the hardware store, confident you can find a replacement. But as you stand before a wall of endless siding options, you realize you have no idea what you’re looking for. This is the core problem of vinyl siding identification.
Without the right information, you risk creating a mismatched patch that sticks out like a sore thumb. A poor match can significantly decrease your home’s curb appeal and value. This guide provides a clear, step-by-step process to identify your exact siding.
You'll Learn About
Why Is Finding Matching Vinyl Siding So Difficult?
Identifying old vinyl siding feels like a puzzle with missing pieces. Several factors contribute to this common frustration. The market is flooded with dozens of manufacturers, each offering multiple product lines.
These product lines are then split into various profiles, textures, and a dizzying array of colors. To make matters worse, manufacturers frequently update or discontinue their products, making a perfect match for a 10-year-old siding nearly impossible to find on a shelf.
Furthermore, the sun plays a significant role. Years of exposure to UV rays can cause colors to fade. A brand-new panel, even if it’s the correct brand and color, might look noticeably different from the weathered siding on your home.
Your Step-by-Step Vinyl Siding Identification Guide
Solving this puzzle requires a methodical approach. Don’t rely on memory or a simple photograph on your phone. Follow these detailed steps to gather the evidence you need to find a perfect, or near-perfect, replacement panel for your home’s exterior.
Start with a Physical Sample
A physical sample of your siding is the single most important tool in your search. A clean, undamaged piece is your ground truth. Look for leftover panels from the original installation, often stored in an attic, shed, or garage.
If you can’t find any extras, you may need to carefully remove a damaged panel. Be gentle to avoid breaking the locking leg or nail hem, as these are critical for identification. This sample is what you will take to distributors for a side-by-side comparison.
The Hunt for Manufacturer Markings
Your next step is to play detective and search for identifying marks. Carefully examine the back of your siding sample. Manufacturers often stamp or print information that can lead you directly to the source.
You might find the manufacturer’s name, a product line, or a series of numbers. These are often easier to spot on the nailing hem at the top of the panel. For a deep dive into deciphering these, our guide on vinyl siding manufacturer codes can be an invaluable resource.
Even without a clear code, look for subtle clues. The specific shape of the weep holes or the design of the locking mechanism can be unique identifiers that an experienced professional at a siding supply house might recognize.
Deconstructing the Siding Profile
The profile is the shape and style of the siding panel. This is one of the most visible characteristics and must be matched correctly. The most common profiles include traditional clapboard, the grooved dutch lap, and the vertical board & batten.
Each profile is designed to create a specific shadow line and overall aesthetic. Using the wrong profile will be immediately obvious, even if the color is a perfect match. A close inspection of how the panels overlap and lock together is key.
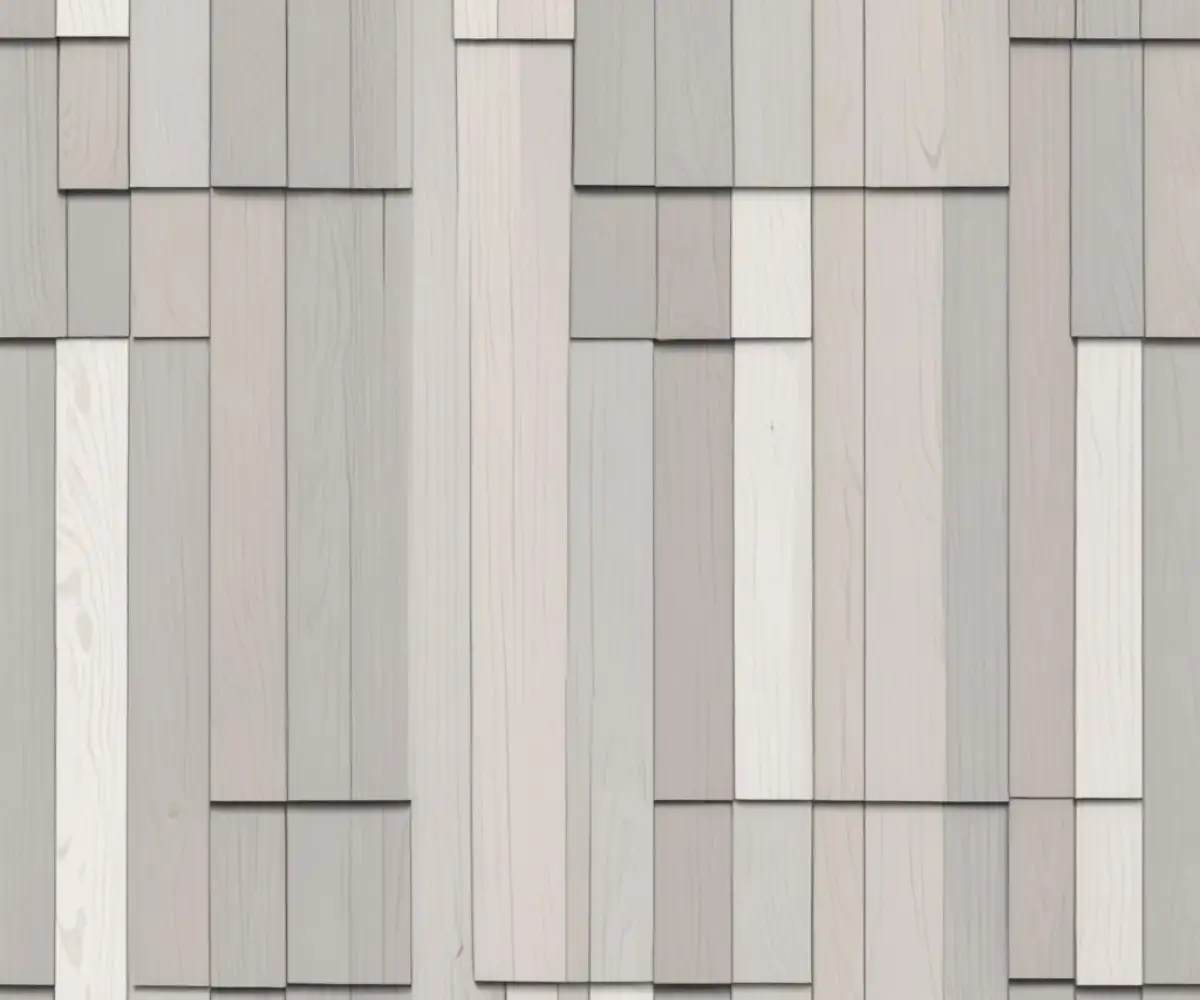
Understanding these fundamental differences is crucial. A simple dutch lap has a very different shadow line than a clapboard panel, which completely changes the look of a wall. Referencing a profile chart can help you quickly narrow down your options.
| Profile Type | Description | Common Uses |
|---|---|---|
| Clapboard (Traditional) | Flat, overlapping panels with a clean, classic look. Also known as a “lap” profile. | The most common style, used on a wide variety of traditional home designs. |
| Dutch Lap | Features a distinctive groove or “bead” at the top of each panel, creating a strong shadow line. | Adds architectural detail and is popular for creating a more historic or traditional appearance. |
| Board & Batten | Vertical panels with a wide board and a narrow, raised strip (batten) covering the seam. | Often used to create a rustic, farmhouse-style look or as an accent on gables. |
| Shake & Shingle | Designed to mimic the look of natural wood shakes or shingles, often with varied edges. | Used for accent areas like gables or entire homes for a rustic, textured appearance. |
Measuring for a Perfect Fit
With the profile identified, you need to take precise measurements. The most important measurement is the “exposure” or face height. This is the visible height of a single panel from the bottom of its curve to the bottom of the panel above it.
Common exposures are 4 inches, 4.5 inches, and 5 inches. You also need to measure the panel’s thickness and, crucially, the height and shape of the buttlock at the very bottom of the panel. This locking lip is what secures it to the panel below.
A mismatched buttlock design can prevent a new panel from securely attaching, even if the exposure measurement is correct. Don’t overlook this small but critical detail during your inspection.
The Art of Color and Texture Matching
You have the brand, the profile, and the dimensions. Now comes the most subjective part of the process: matching the color and texture. This requires a keen eye and an understanding of how materials change over time.
Beyond the Name: Getting the Color Right
Never trust a color name. One company’s “Shoreline Gray” can be vastly different from another’s. You must compare your physical sample to a new panel in natural daylight. Indoor, fluorescent lighting can drastically alter how colors appear.
Remember the fading factor. The siding on the south-facing side of your home will be lighter than the siding on the north side. If possible, get a sample from a less-exposed area to see something closer to the original color.
Feeling It Out: Decoding Textures
The final piece of the puzzle is the texture. Is your siding perfectly smooth, or does it have a simulated wood grain? If it has a grain, is it a deep, rustic texture or a more subtle, brushed finish?
Also, consider the gloss level. Run your hand over the panel and observe it in the light. A high-gloss siding will look very out of place next to older siding that has a matte finish. This subtle detail is often the difference between a seamless repair and an obvious patch.
When You Can’t Find an Exact Match: Your Plan B
Sometimes, despite your best efforts, you’ll discover your siding has been discontinued. Do not despair. You still have excellent options to complete a professional-looking repair without replacing all of your siding.
The Artful Repair: Stealing from Peter to Pay Paul
This is the best strategy for a seamless repair. Take siding from a less visible part of your house, such as behind the garage or a wall hidden by landscaping. Use these perfectly weathered and color-matched panels for the repair in the highly visible area.
Then, you can install the new, “close-enough” siding in that hidden spot. The slight difference in color or texture will be unnoticeable there, while your primary repair will be invisible.
Siding Distributors and Specialty Suppliers
Don’t limit your search to big-box home improvement stores. Take your sample to professional siding distributors in your area. The experts at these locations have years of experience and may recognize an obscure profile or color instantly.
They also have access to a much wider range of products and may know of a compatible product from a different manufacturer. Some online companies also specialize in identifying and sourcing discontinued siding, which can be a valuable last resort.
It’s also a crucial reminder to correctly identify your siding material from the start. Problems can arise from mistaking vinyl for other materials, such as older fiber cement which could have different repair needs. For instance, understanding the risks associated with certain older materials, like with Masonite board asbestos, underscores the importance of proper identification.
Be Proactive: Document Your Siding Now
The easiest time to identify your siding is before you ever need a repair. If you are building a new home or re-siding your current one, take proactive steps to document everything. This will save you immense future frustration.
Keep a few extra panels and store them flat in a safe, dark place like an attic or basement. Also, take a clear photo of the end of the box, which contains the manufacturer, product line, profile, and specific color information. Write this information down and keep it with your important home documents.
This simple act of preparation turns a future siding emergency into a minor inconvenience. Protecting your home’s exterior is key to its longevity, a principle that applies everywhere from the siding on your walls to ensuring you know how to seal garage floor edges to prevent moisture damage.