Vertical Crack in Crown Molding? Here’s the Permanent Fix
There are few things more frustrating than stepping back to admire your beautifully installed crown molding, only to spot an ugly vertical crack staring back at you. That clean, elegant line you worked so hard to create is now interrupted by a fissure that seems to draw all the attention. This common problem can make an otherwise flawless room feel unfinished and poorly maintained.
Whether it’s a hairline fracture or a noticeable gap, a vertical crack in your crown molding is more than just a cosmetic issue. It’s a sign that something is amiss—either with the material, the installation, or the environment in your home. This guide will walk you through exactly why these cracks appear and provide a definitive, step-by-step process to repair them for good, ensuring your trim work remains pristine for years to come.
You'll Learn About
Decoding the Damage: Why Vertical Cracks Form in Crown Molding
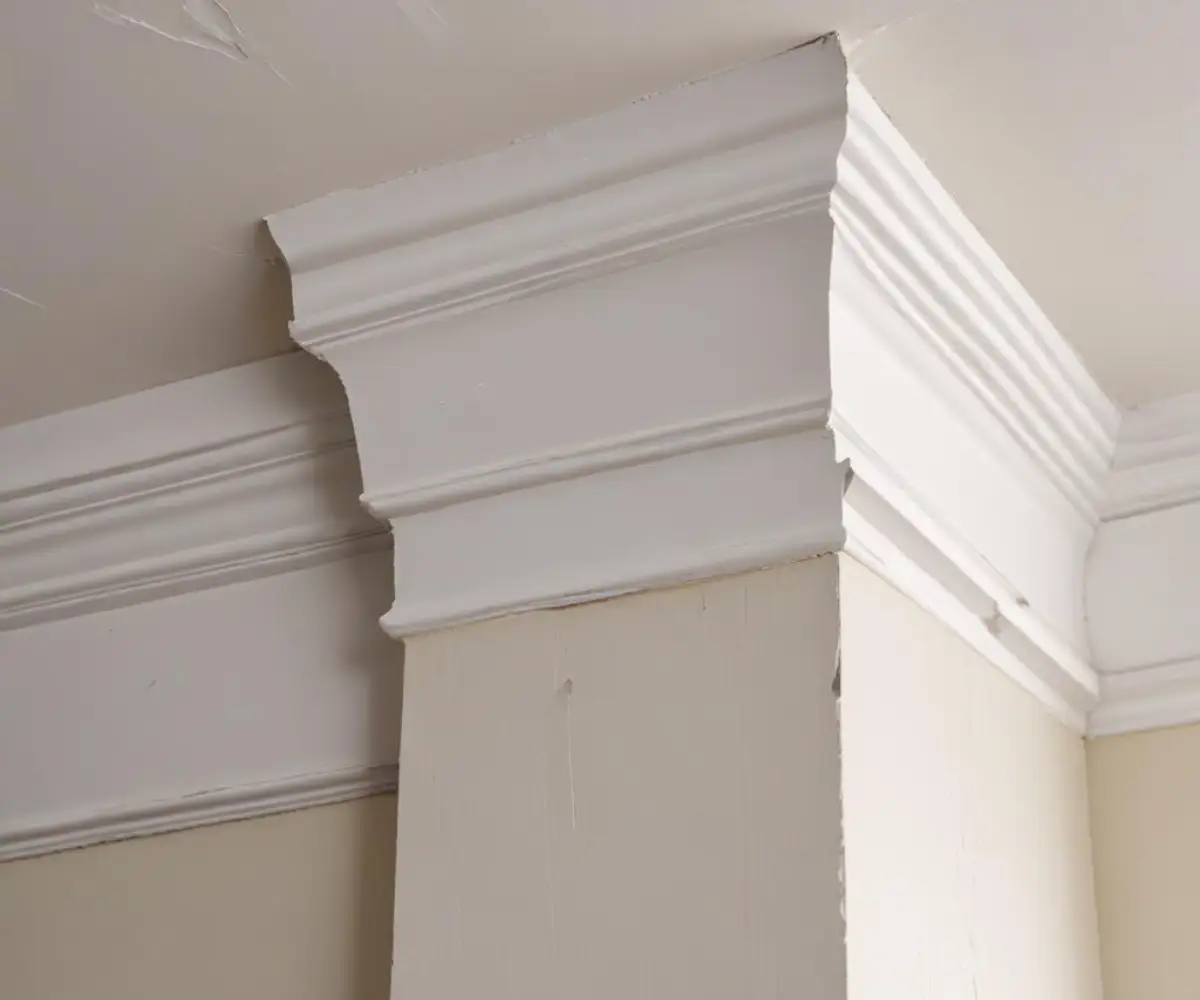
Understanding the root cause of the crack is the first step toward a permanent solution. Simply filling the gap without addressing the underlying issue is a temporary fix at best; the crack will almost certainly return. These vertical cracks typically appear at the joints where two pieces of molding meet, and they are primarily caused by a few key factors.
Material Movement: The Primary Culprit
The most common cause of vertical cracks is the natural expansion and contraction of the molding material itself. Wood and Medium-Density Fiberboard (MDF) are hygroscopic, meaning they absorb and release moisture from the air. As humidity levels change with the seasons, these materials swell and shrink.
During humid summers, the molding expands. In the dry winter months, when the heat is on, it contracts. This constant movement puts immense stress on the joints, and if they aren’t properly secured, they will inevitably pull apart and crack.
Installation Errors That Haunt Your Handiwork
Even the highest quality molding will fail if not installed correctly. Several common installation mistakes can lead directly to vertical cracks. An installer may have neglected to use wood glue at the joints, relying only on nails. Nails alone cannot withstand the seasonal movement of the material, allowing joints to separate easily.
Another frequent error is the use of simple butt joints (where two square-cut ends meet) on long walls. A scarf joint, which involves cutting the two ends at opposing 45-degree angles, creates a much larger surface area for glue and results in a stronger, less visible seam that is far less likely to crack. Poorly fastened molding that isn’t securely nailed into wall studs or ceiling joists can also shift and cause joints to fail.
Structural Settling and Shifts
While less common, minor settling of your home’s foundation and framing can put pressure on long, continuous runs of crown molding. This structural movement can twist or pull the trim, placing stress on the weakest points—the joints. While often mistaken for a major structural problem, these cracks are usually just the first sign of normal house settling.
It’s important to distinguish between a vertical crack within a joint and the entire assembly of crown molding separating from the ceiling, as the latter can sometimes indicate more significant movement. Managing all types of seams is crucial for a polished look, from molding to more complex intersections like a brick to drywall transition.
Gather Your Arsenal: Tools and Materials for a Flawless Repair
Before you begin the repair, gathering the right tools and materials is essential for a professional-grade finish. Having everything on hand will streamline the process and prevent interruptions. The table below outlines everything you’ll need, categorized for your convenience.
| Category | Item | Purpose |
|---|---|---|
| Preparation & Safety | Utility Knife or 5-in-1 Tool | To clean out old caulk and filler from the crack. |
| Drop Cloths | To protect floors and furniture from dust and paint. | |
| Safety Glasses | To protect your eyes from debris and dust. | |
| Repair & Filling | Finish Nailer (or Hammer & Nail Set) | To re-secure any loose molding sections. |
| High-Quality Flexible Caulk | For filling hairline cracks; choose a paintable, elastomeric formula. | |
| Wood Filler or Spackle | For filling wider gaps; choose a sandable, non-shrinking product. | |
| Putty Knife | To apply and smooth filler into the crack. | |
| Finishing | Fine-Grit Sanding Sponge (180-220 grit) | To sand the dried filler smooth without damaging the molding profile. |
| Tack Cloth or Damp Rag | To wipe away sanding dust before priming. | |
| High-Quality Primer | To seal the patch and prevent paint flashing. | |
| Matching Trim Paint | To blend the repair seamlessly with the existing molding. | |
| Small Angled Paintbrush | For precise application of primer and paint. |
The Ultimate Step-by-Step Guide to Fixing Vertical Crown Molding Cracks
With your tools and materials ready, you can now tackle the repair. Follow these steps carefully for a seamless, permanent fix that will make that ugly crack a distant memory. This detailed process ensures you address both the symptom and the cause.
Step 1: Meticulous Preparation is Non-Negotiable
The success of your repair depends heavily on proper preparation. Start by using a sharp utility knife or a painter’s 5-in-1 tool to carefully dig out any old, failed caulk or loose filler from inside the crack. You need to get back to a solid base for the new filler to adhere to properly.
Once the joint is clean, gently press on the molding on both sides of the crack. If you notice any movement or looseness, you must re-secure it. Use a finish nailer to drive a couple of 2-inch finish nails through the molding into the wall studs and ceiling joists on both sides of the joint. This crucial step prevents future movement and ensures the joint stays closed.
Step 2: Choose Your Filler Wisely
The type of filler you use depends on the size of the crack. For a hairline crack (less than 1/8 inch), a high-quality, flexible painter’s caulk is the best choice. Look for products labeled “elastomeric” or “big stretch,” as they are designed to accommodate movement without cracking.
For wider gaps, you’ll need a more substantial material like a paintable wood filler or a vinyl spackling compound. These products dry harder than caulk and can be sanded perfectly smooth, making them ideal for recreating the flat surface of the molding. When working with stained wood, choosing the right filler and technique is key; for specialized advice, our guide on caulking dark wood trim offers valuable insights.
Step 3: The Art of Application
If using caulk, apply a thin, continuous bead directly into the crack. Immediately smooth the bead with a damp finger or a caulk finishing tool to press it firmly into the joint and remove any excess. The goal is a perfectly smooth transition that is flush with the molding.
If using wood filler or spackle, use a flexible putty knife to press the material firmly into the gap. Slightly overfill the crack to account for any minor shrinkage as it dries. Make multiple passes if necessary for very deep gaps, allowing each layer to dry before applying the next.
Step 4: The Perfect Sanding Finish
Once the filler has completely cured (check the manufacturer’s instructions for drying times), it’s time to sand. This is where patience pays off. Use a fine-grit sanding sponge (220-grit is ideal) and sand the patch gently, following the contours of the molding profile.
Your goal is to make the filled area perfectly flush with the surrounding surface. Run your fingers over the repair; you should not be able to feel any ridge or depression. After sanding, wipe the entire area with a tack cloth or a damp rag to remove every trace of dust.
Step 5: Prime and Paint for an Invisible Repair
Do not skip the priming step. Applying a coat of high-quality primer over the sanded patch is essential to seal the filler and prevent a phenomenon called “flashing,” where the repaired spot has a different sheen than the rest of the paint. The primer ensures a uniform finish.
After the primer is dry, apply a thin, even coat of your matching trim paint. You may need two coats to achieve a perfect blend. Use a high-quality angled brush and “feather” the edges of the new paint into the old to create an invisible transition.
Proactive Protection: How to Prevent Crown Molding Cracks Before They Start
The best way to deal with cracks is to prevent them from ever happening. If you are planning a new crown molding installation, following these professional techniques will ensure your joints remain tight and crack-free for the life of your home.
Acclimatize Your Materials
Never install crown molding the day you bring it home. Let the wood or MDF boards sit inside the room where they will be installed for at least 48-72 hours. This allows the material to acclimatize to your home’s specific temperature and humidity levels, minimizing expansion and contraction after installation.
Master the Scarf Joint
For any wall longer than a single piece of molding, always use a scarf joint instead of a butt joint. By cutting the ends at opposing 45-degree angles, you create a stronger, interlocking seam that is far more resistant to separation. For an even stronger bond, apply wood glue to the entire surface of the cut before nailing the pieces together.
Glue is Your Best Friend
Think of nails as clamps that hold the joint together while the glue dries. Wood glue is the component that provides the long-term strength. Apply a thin layer of quality wood glue to every joint—inside corners, outside corners, and scarf joints—before fastening them. This creates a monolithic bond that moves as a single unit, drastically reducing the chance of a vertical crack.
Control Your Home’s Environment
Extreme swings in humidity are the enemy of all wood trim. Maintaining a relatively stable indoor humidity level throughout the year can significantly reduce the amount of stress on your crown molding joints. Using a whole-house humidifier in the winter and a dehumidifier in the summer can help create a more stable environment and protect all the woodwork in your home.