Upside Down Shelf Brackets: The Genius Hack You Need to Try
You have a beautiful piece of wood for a shelf and some stylish metal brackets. The conventional wisdom is clear: the bracket goes under the shelf for support. But what if you flipped the script? What if you installed the brackets upside down, creating a clean, modern, floating effect that showcases the shelf itself?
This unconventional approach is gaining traction in the world of interior design, but it raises a critical question for many DIY enthusiasts: is it safe? This article dives deep into the world of upside down shelf brackets, exploring the problems, the physics, and the step-by-step solutions to help you achieve this unique look without compromising on safety or stability.
You'll Learn About
The Core Problem: Style vs. Structural Integrity
The primary reason homeowners hesitate to install brackets in an inverted orientation is a valid concern about weight capacity and safety. Traditional bracket placement is all about compression; the weight of the shelf and its contents pushes down on the horizontal arm of the bracket, and the vertical arm pushes against the wall. This is a structurally sound and time-tested method.
When you flip a bracket, you change the physics at play. Instead of compression, the primary force becomes tension. The screws securing the bracket to the shelf are now carrying the entire load, pulling downwards. The top screw holding the bracket to the wall is also under immense pressure, constantly being pulled away from the wall. This shift in forces is the central problem we need to solve.
Why Even Consider It? The Allure of the Inverted Bracket
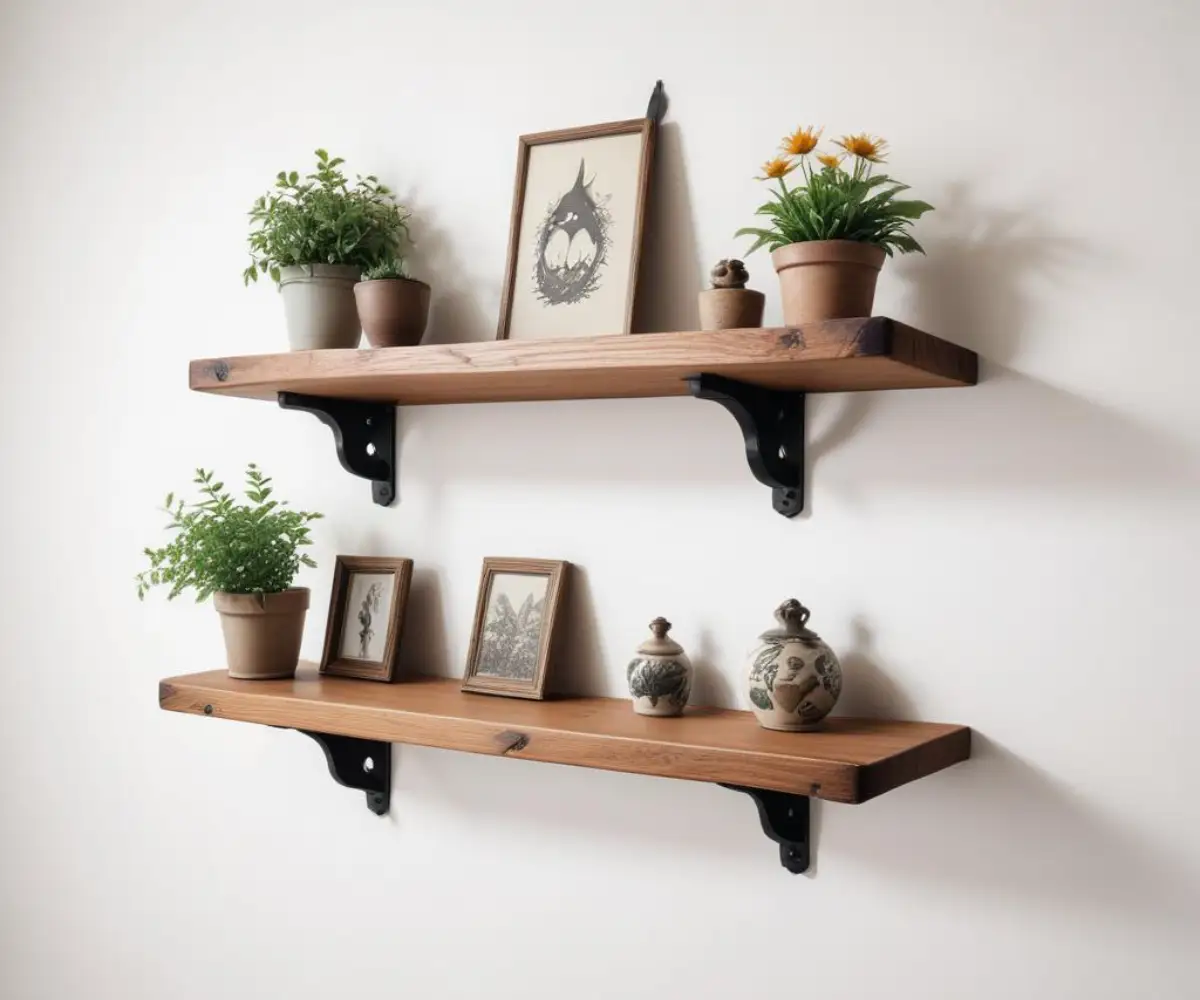
Despite the structural questions, the aesthetic benefits are undeniable. Mounting brackets upside down creates a minimalist, “floating” look that is highly sought after in modern and industrial design. The brackets can act as subtle bookends or simply frame the shelf, drawing more attention to the beauty of the wood and the items on display.
This method is perfect for creating the illusion of more space in smaller rooms or for achieving a clean, uncluttered look. It allows the shelf to be the hero, rather than the hardware supporting it. The challenge lies in achieving this look without risking a catastrophic shelf failure.
Are Upside Down Shelf Brackets Safe? A Deep Dive
The short answer is yes, they can be perfectly safe, but only if installed correctly with the right hardware and realistic weight expectations. The safety of an inverted bracket installation hinges on several key factors that you must address meticulously. Ignoring these can lead to sagging shelves or, worse, a complete collapse.
The entire weight of the shelf and its contents is transferred to the fasteners. This means the screws holding the shelf to the bracket and the screws holding the bracket to the wall are doing all the heavy lifting. In a standard installation, the bracket’s structure does most of the work.
Understanding the Forces at Play
In a conventional setup, the bottom of the bracket’s vertical arm acts as a fulcrum, pushing into the wall, while the top screw primarily prevents the bracket from tipping forward. When inverted, the top screw is now bearing a significant pulling force (tension), trying to rip it out of the wall. The screws in the shelf are also under constant downward tension.
Because of this, you cannot expect an upside-down bracket to hold the same amount of weight as a conventionally mounted one. The load capacity is fundamentally reduced. This method is ideal for decorative shelves, displaying photos, small plants, or a curated collection of paperbacks, but not for your entire encyclopedia set.
The Solution: A Step-by-Step Guide to Safe Installation
To overcome the structural challenges, you need a methodical approach that prioritizes a secure connection at every point. This isn’t the time for shortcuts. Follow these steps carefully to ensure a beautiful and durable result.
Step 1: Choose the Right Brackets and Hardware
Not all brackets are created equal, especially for this application. Opt for heavy-duty, solid steel L-brackets. Avoid thin, flimsy, or purely decorative brackets. The thicker the metal, the less likely it is to flex or bend under tension.
Equally important is your choice of hardware. Do not use the short, flimsy screws that often come packaged with brackets. You need longer, high-quality screws for both the wall and the shelf. For mounting to the wall, use screws long enough to penetrate at least 1.5 inches into solid wood studs.
Step 2: Locate Wall Studs—This is Non-Negotiable
For an inverted installation, mounting directly into wall studs is absolutely essential. Drywall anchors, even heavy-duty ones, are not sufficient to handle the pulling force this setup creates. Use a reliable stud finder to locate the center of the studs where you plan to hang your shelf.
If your desired shelf location doesn’t align with existing studs, you have two options: choose a different location or install a horizontal support board (a ledger board) first. Screw the ledger board securely into the studs, then attach your brackets to the ledger board. This provides the solid wood anchor you need.
Step 3: Pre-Drill Your Holes
Always pre-drill your pilot holes in both the wall studs and the underside of your shelf. This prevents the wood from splitting when you drive the screws in, ensuring a stronger, more secure grip. The pilot hole should be slightly smaller than the diameter of the screw’s shaft.
This is also a good time to consider larger home improvement questions. For instance, if you’re working on a bathroom project, you might find yourself wondering who to hire to regrout shower spaces for a complete refresh. Thinking about these details in advance can streamline your projects.
Step 4: Mount the Brackets to the Wall
With your pilot holes drilled, you can now mount the brackets to the wall. Use a level to ensure the brackets are perfectly straight and aligned with each other before driving the screws. Drive the screws until they are snug, but do not overtighten, as this can strip the wood and weaken the connection.
Ensure both brackets are perfectly level with one another. Place your level across the top of both brackets before proceeding. A slight misalignment can put uneven stress on the shelf and fasteners.
Step 5: Attach the Shelf to the Brackets
Place your shelf on top of the mounted brackets. From underneath, drive the appropriate wood screws through the bracket holes and into your pre-drilled pilot holes in the shelf. Ensure you’re using screws that are long enough for a secure hold but not so long that they poke through the top surface of your shelf.
Applying gentle pressure on top of the shelf while you drive the screws can help ensure a tight fit. The goal is to make the shelf and brackets function as a single, solid unit.
Comparing Installation Orientations
To make an informed decision, it’s helpful to see a direct comparison between the two mounting methods. Each has its place, depending on your aesthetic goals and functional needs.
| Feature | Standard (Under-Shelf) Installation | Upside Down (Over-Shelf) Installation |
|---|---|---|
| Primary Force | Compression & Shear | Tension & Shear |
| Weight Capacity | High (per manufacturer’s rating) | Lower (dependent on fastener strength) |
| Best Use Case | Heavy items: books, kitchenware, garage storage | Light to moderate items: decor, photos, small plants |
| Aesthetic | Traditional, visible support | Modern, minimalist, “floating” look |
| Key Installation Point | Anchoring securely to the wall | MUST anchor into solid wood studs |
Creative Applications and Design Ideas
Once you’ve mastered the technique, you can use upside down brackets in various creative ways. In a kitchen, they can create an open, airy feel for displaying spices or mugs. In a living room, they can frame a piece of reclaimed wood for a rustic-industrial focal point.
This method also works beautifully for creating a narrow entryway table or a minimalist bedside nightstand. Considering unconventional materials can elevate your design further. For example, some homeowners are exploring unique options like a pebble epoxy shower floor, showing that innovative materials can transform any space.
Avoiding Common Mistakes and Pitfalls
The biggest mistake is underestimating the forces involved. Do not overload the shelf. A good rule of thumb is to keep the weight well under 20-30 pounds per pair of brackets, though this can vary based on your specific hardware and installation quality.
Another common error is failing to use screws that are long enough, especially when mounting to the wall. The screw’s grip inside the stud is what provides the holding power. Finally, always use a level. An unlevel shelf not only looks bad but also distributes weight unevenly, creating stress points.
Understanding the limits of your home’s infrastructure is key to any successful DIY project. It’s similar to knowing basic home maintenance, like recognizing just how fragile water heaters are to avoid accidental damage during other projects. A holistic understanding of your home prevents costly mistakes.
Final Thoughts: A Stylish and Achievable Project
Installing shelf brackets upside down is more than just a quirky trend; it’s a legitimate design choice that can elevate the look of a room. By abandoning the traditional “support from below” mindset, you can create shelving that is both functional and artful. The key to success is not to defy physics, but to respect it.
By using high-quality materials, securing the brackets into solid wood studs, and being mindful of weight limits, you can confidently execute this project. You’ll be rewarded with a clean, modern, and stylish storage solution that will have guests asking, “How did you do that?”