Troy Bilt 2410 Fuel Shut Off Valve Issues? Fix Leaks Now!
A puddle of gasoline spreading under your Troy Bilt 2410 snowblower is more than just a messy inconvenience; it’s a critical failure demanding immediate attention. That small, seemingly insignificant fuel shut off valve is often the culprit, a gatekeeper that, when compromised, can lead to fuel leaks, no-start conditions, and engine damage. Understanding its function and failure points is the first step toward a reliable machine that’s ready for the next blizzard.
This component is designed to be a simple manual switch, allowing you to stop the flow of gasoline from the tank to the carburetor. This is crucial for maintenance, transport, and most importantly, for safe, long-term storage. However, its constant exposure to fuel, particularly modern ethanol-blended gasoline, makes it a prime candidate for degradation and failure.
You'll Learn About
The Unseen Enemy: Why Your Fuel Shut Off Valve Fails
The core problem often lies in the materials used for the valve’s seals and gaskets. Over time, these components can become brittle, crack, or deform, compromising their ability to create a tight seal. This degradation is significantly accelerated by the properties of ethanol, which is commonly found in today’s gasoline.
Ethanol is hygroscopic, meaning it attracts and absorbs water from the atmosphere. This water-laced fuel can cause corrosion inside your fuel system and can cause rubber and plastic components to swell, dry out, and crack prematurely. This chemical assault is the primary reason a perfectly good valve can begin to leak after just a few seasons.
Telltale Signs of a Failing Valve
Diagnosing a faulty fuel shut off valve is often straightforward. The most obvious symptom is a visible fuel leak, especially when the valve is in the “Off” position. You might notice a strong gasoline smell in the storage area or see drips forming on the garage floor. Another sign is an engine that refuses to start after storage, which can happen if the leaking valve has allowed the carburetor to flood.
Conversely, a valve that is clogged internally with debris or degraded material can prevent fuel from reaching the carburetor, leading to an engine that starts and then quickly dies. This fuel starvation mimics other carburetor problems, but a quick check of the valve should be your first diagnostic step. It’s a situation that can be frustrating, especially when you’re faced with a driveway full of snow.
Locating and Inspecting the Fuel Shut Off Valve
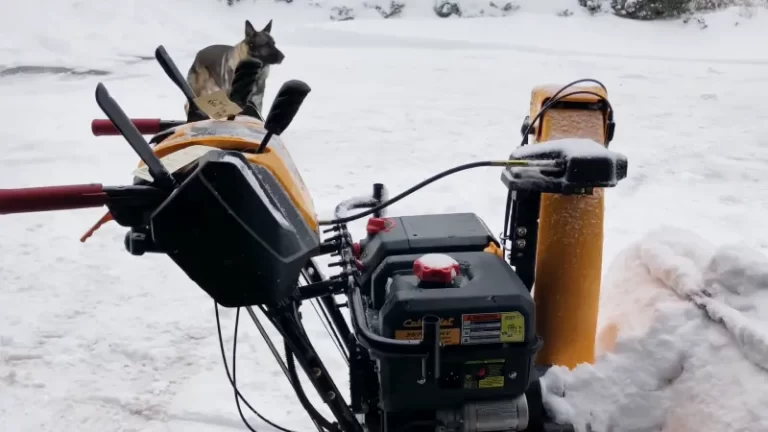
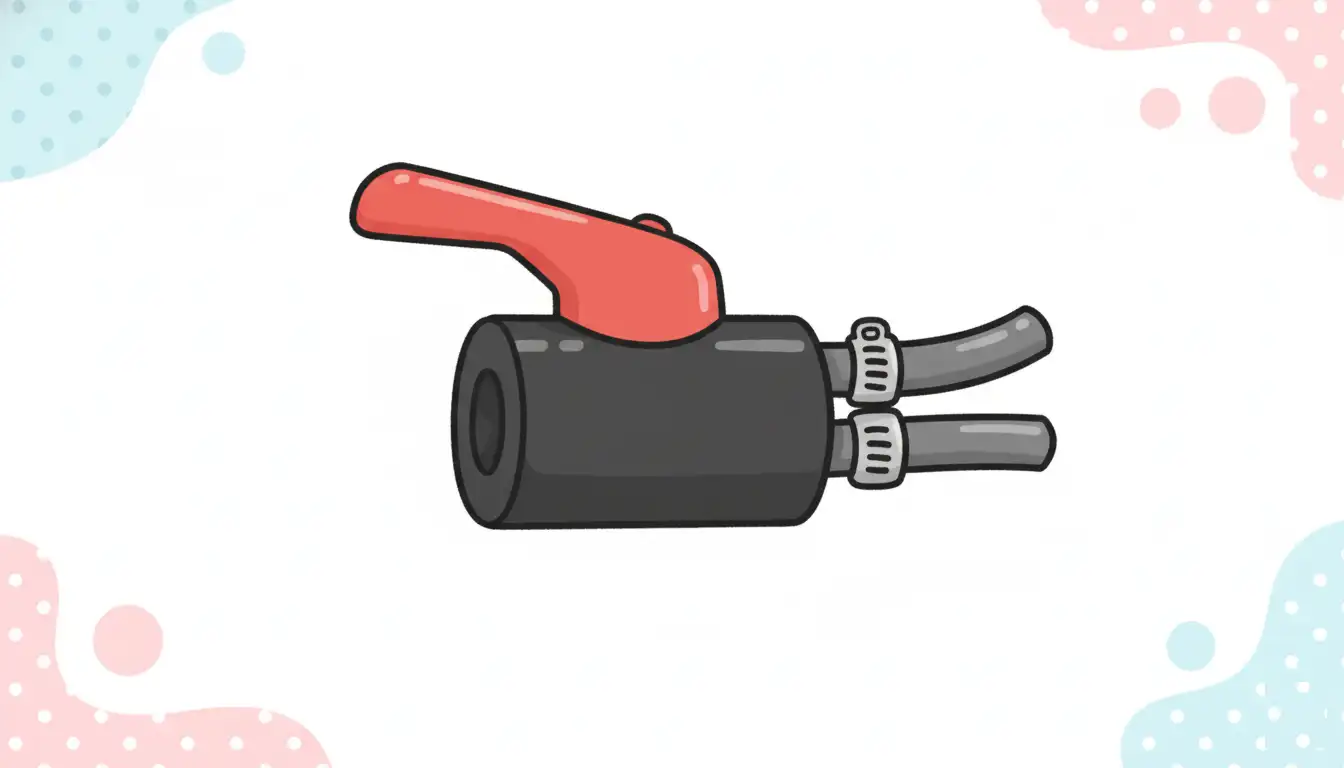
On the Troy Bilt 2410, the fuel shut off valve is typically an in-line component situated between the fuel tank and the carburetor. It’s usually a small, red or black plastic valve with a lever that rotates 90 degrees to open or close the fuel path. You will need to trace the black fuel line from the bottom of the gas tank to find its location.
A thorough inspection involves more than just looking for drips. With the engine off and cool, run your fingers along the valve and its connections to the fuel line. Feel for any wetness or the sticky residue of old gasoline. Gently wiggle the valve to ensure it is securely fitted and that the fuel lines are not loose or cracked at the connection points.
The Ultimate DIY Replacement Guide
Replacing the fuel shut off valve is a manageable task for most homeowners and can prevent a costly trip to the repair shop. Before you begin, ensure you are working in a well-ventilated area, away from any open flames or sparks. Safety is paramount when dealing with gasoline.
You will need to have a new, compatible fuel shut off valve, a pair of pliers, a rag, and a fuel-safe container to catch any spillage. It’s also a good idea to have replacement fuel line clamps on hand, as the original ones can lose their tension over time.
Essential Tools and Parts for the Job
Gathering the right components before you start will make the process smooth and efficient. While many aftermarket valves are available, using an OEM (Original Equipment Manufacturer) part often ensures the best fit and material compatibility. The wrong type of plastic or rubber can degrade quickly when exposed to gasoline.
Below is a table outlining the necessary items for a successful replacement, along with some recommendations. Having these ready will prevent interruptions and ensure the job is done correctly the first time.
| Tool/Part | Description | Pro-Tip |
|---|---|---|
| Replacement Fuel Shut Off Valve | Ensure it’s compatible with the Troy Bilt 2410 and rated for gasoline with ethanol. | OEM parts are recommended for longevity and material quality. |
| Needle-Nose Pliers | Used to remove and install spring-style hose clamps. | Pliers with angled tips can provide better access in tight spaces. |
| Fuel Line Clamps | To pinch off the fuel line and prevent gasoline from draining from the tank. | Specific fuel line clamping tools are inexpensive and work better than standard pliers. |
| Clean Rags | For wiping up spilled fuel and cleaning connection points. | Microfiber cloths are excellent for ensuring a clean, dry surface. |
| Safety Goggles and Gloves | Protect your eyes and skin from gasoline splashes. | Always wear personal protective equipment when working with fuel. |
Step-by-Step Replacement Instructions
With your tools and parts ready, you can begin the replacement. First, use the fuel line clamps to pinch the fuel line a few inches above the shut off valve. This will stop the flow of gas from the tank. It’s a critical step that prevents a significant spill. Forgetting this can be a dangerous mistake, not unlike what might happen if you were wondering is it illegal to turn your gas back on in a home setting—both involve risks with gas flow.
Next, place a rag and your container under the old valve. Use your pliers to squeeze the tabs on the hose clamps and slide them down the fuel line, away from the valve nipples. Carefully twist and pull the fuel lines off both sides of the old valve. Be prepared for a small amount of fuel to drain from the valve and the lower section of the line.
Install the new valve, ensuring the arrow on the valve body points in the direction of fuel flow—towards the carburetor. Secure the fuel lines onto the new valve’s nipples and slide the hose clamps back into position to secure them tightly. Remove the fuel line clamp from above the valve, and check for any leaks. Once confirmed that there are no leaks, you can start the engine to test its operation.
Beyond Replacement: Proactive Fuel System Care
Simply replacing a failed part is only half the battle. To prevent future issues, adopting a proactive maintenance routine for your snowblower’s fuel system is essential. This includes how you buy, treat, and store your fuel, especially during the long summer offseason.
The problems caused by ethanol are not unique to snowblowers; even a simple device like a torch for Coleman propane can suffer from valve issues if not maintained. Proper fuel management is a universal principle for all fuel-powered equipment.
The Hard Truth About Modern Gasoline
Today’s E10 gasoline can start to degrade in as little as 30 days. As it breaks down, it forms gums and varnish that can clog the tiny passages in your carburetor and coat the inside of your fuel valve, causing it to stick or fail. Using a high-quality fuel stabilizer is not optional; it’s a requirement for small engine health.
Add stabilizer to your gas can every time you fill it up. This ensures that every drop of fuel that enters your snowblower is treated and protected. This simple habit is the single most effective way to prevent the majority of fuel-related problems.
The Off-Season Storage Mistake Everyone Makes
At the end of the winter season, many owners simply run their snowblower until the tank is empty. While this seems logical, it’s a common mistake. An empty fuel tank exposes the bare metal interior to air and moisture, leading to rust and corrosion. Furthermore, it can cause gaskets and seals to dry out and crack.
The best practice for off-season storage is to fill the tank with stabilized fuel and run the engine for about five minutes. This circulates the treated fuel through the entire system, including the fuel lines, shut off valve, and carburetor, protecting them from degradation. This method keeps all components lubricated and shielded from corrosion, ensuring a quick start next winter. Similar principles apply to other seasonal equipment, as outlined in guides like the one for the Gas Shut Off Valve on Craftsman Snowblower.
Troubleshooting After Valve Replacement
In most cases, replacing the fuel shut off valve will resolve your leak or no-start issue. However, if problems persist, there may be other underlying issues within the fuel system that need to be addressed. Don’t get discouraged; a systematic approach will help you find the root cause.
A persistent fuel leak after replacement could indicate a cracked fuel line or a problem with the carburetor’s float needle, which is designed to stop fuel flow when the carburetor bowl is full. If the engine still refuses to run properly, it’s likely that the carburetor itself is clogged from old, untreated fuel and requires a thorough cleaning.
Engine Surges or Won’t Start?
If your engine starts but then surges or runs rough, it’s a classic sign of a partially clogged carburetor jet. The new valve has restored fuel flow, but existing debris or varnish is now restricting it inside the carburetor. A can of carburetor cleaner can sometimes resolve minor clogs, but a full disassembly and cleaning may be necessary.
A complete no-start condition could point to a fuel filter that has become clogged with debris dislodged during the valve replacement. Always check this inexpensive part before moving on to more complex carburetor work. These symptoms can be frustratingly similar to other issues, like a faulty valve causing a gas stove hot when off, highlighting how a small component can create significant problems.