Toto Washlet Wand Clogged? The Ultimate DIY Cleaning Guide
There are few home luxuries as satisfying as a Toto Washlet. It provides superior hygiene, comfort, and a touch of modern sophistication to your bathroom. But what happens when the water pressure weakens to a frustrating trickle, or the wand doesn’t spray at all? A clogged Toto Washlet wand can disrupt your daily routine and diminish the experience.
Fortunately, this is a common issue that homeowners can often resolve without a costly service call. This comprehensive guide will walk you through everything you need to know to diagnose the problem, safely clean the components, and get your Washlet back to perfect working order. We’ll explore the hidden causes of clogs and provide a step-by-step solution to restore that powerful, clean spray.
You'll Learn About
Why Your Toto Washlet Wand is Clogged (The Hidden Culprits)
Understanding the root cause of the clog is the first step toward a lasting solution. While it may seem like a sudden failure, the problem has likely been developing for some time. Several factors can contribute to a blocked or poorly performing Washlet wand.
The #1 Cause: Hard Water and Mineral Buildup
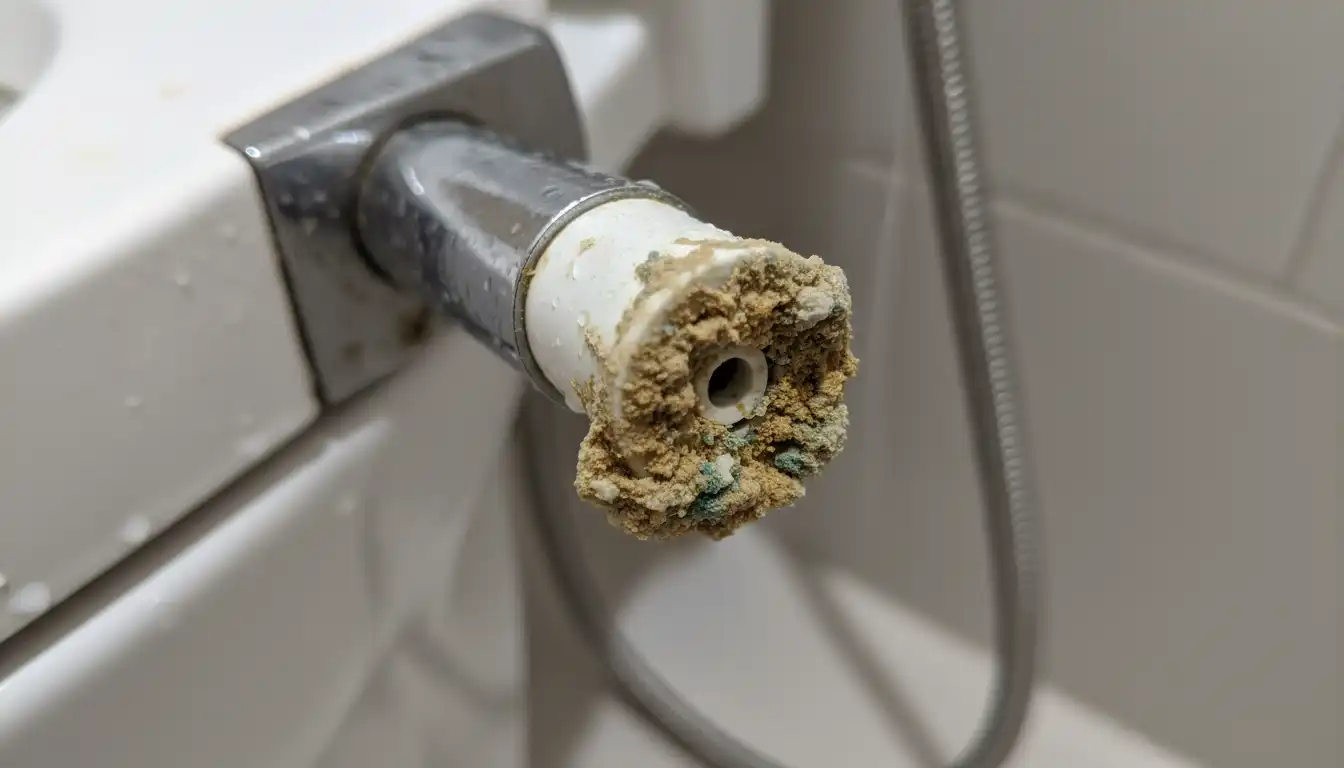
The most frequent cause of a clogged wand is hard water. Hard water contains high concentrations of dissolved minerals like calcium and magnesium. Over time, these minerals precipitate out of the water and form a hard, crusty deposit known as limescale or scale.
This limescale accumulates on and inside the tiny, precision-engineered nozzles of the Washlet wand. As the deposits grow, they restrict and eventually block the flow of water, leading to weak pressure or a complete stoppage. If you live in an area with hard water, this is the most likely culprit.
Debris from Your Water Supply
Your home’s plumbing isn’t always pristine. Small particles of sediment, rust from older pipes, or sand can travel through your water lines. While the Toto Washlet has a built-in filter to catch most of this, some microscopic debris can still get through and become lodged in the wand’s nozzles.
This is more common in areas with older municipal water infrastructure or homes with well water. A sudden drop in pressure could indicate a small piece of debris has found its way into the system. Taking care of your home’s systems, from the plumbing to the engine of your snowblower, is key to longevity. For instance, proper maintenance of a predator snow blower engine ensures it starts when you need it most.
Biofilm and Mold Growth
The interior of the Washlet wand is a warm, moist environment, which is ideal for the growth of biofilm. Biofilm is a slimy layer of microorganisms that can form inside plumbing components. While not as common as mineral buildup, it can contribute to blockages and is an important hygiene consideration.
Regularly using your Washlet’s self-cleaning functions can help minimize this, but a manual deep clean is sometimes necessary to fully remove any potential buildup.
Before You Begin: Essential Tools and Safety Precautions
Before you start working on your Washlet, gathering a few simple tools will make the process much smoother. You likely have most of these items around your home already. Safety should always be your top priority.
Recommended Tools:
- Soft microfiber cloths
- A soft-bristle toothbrush (used only for cleaning)
- A small bowl or container
- Distilled white vinegar
- Gloves (optional, but recommended)
Crucial Safety Steps:
- Unplug the Washlet: To prevent any risk of electric shock or accidental activation, always unplug your Toto Washlet from the electrical outlet before you begin cleaning.
- Turn Off the Water Supply: Locate the shut-off valve for the toilet, which is typically on the wall behind or beside it. Turn the valve clockwise until it is fully closed to stop the flow of water to the Washlet.
Step-by-Step Guide to Unclogging Your Toto Washlet Wand
With your tools gathered and safety precautions taken, you are ready to tackle the clog. This process is straightforward and designed to be gentle on your Washlet’s components while being tough on buildup. Follow these steps in order for the best results.
Step 1: Activate the Wand Cleaning Mode
First, you need to extend the wand to access it for cleaning. Even with the power off, many Toto models have a manual wand extension or “Wand Cleaning” mode. Check your remote or the unit’s manual for a button that allows you to extend the wand without it spraying water. This gives you full access to the nozzles.
If your model doesn’t have a manual extension button, you may need to plug it in briefly, extend the wand with a regular function, and then quickly unplug it once the wand is out. Be prepared with a cloth for any drips.
Step 2: Gentle Surface Cleaning
Once the wand is extended, start with a basic cleaning of the exterior. Dampen a soft microfiber cloth with warm water and a drop of mild soap. Gently wipe down the entire length of the wand to remove any surface grime. Do not use harsh or abrasive cleaners, as they can damage the plastic finish.
This initial wipe-down prepares the wand for the more focused deep cleaning of the nozzles.
Step 3: Deep Cleaning the Nozzles (The Clog Buster)
This is the most critical step for clearing the blockage. The goal is to dissolve the mineral deposits that are clogging the tiny spray holes. White vinegar is the perfect tool for this job, as its mild acidity is highly effective at breaking down limescale.
First, dip your soft-bristle toothbrush in white vinegar. Gently scrub the tip of the wand, focusing on the nozzle holes. This will dislodge any external buildup. For more stubborn internal clogs, a vinegar soak is necessary. You can do this by filling a small bowl with vinegar and carefully positioning it so the wand nozzle is submerged. Let it soak for 30-60 minutes.
Step 4: Flushing and Final Checks
After soaking, use the toothbrush again to gently scrub away any loosened deposits. Remove the bowl of vinegar and wipe the wand with a clean, damp cloth to remove any vinegar residue. Now, it’s time to see if your work paid off.
Ensure everything is clear, turn the water supply valve back on, and plug the Washlet back in. Operate the spray functions to flush out any remaining debris from the nozzles. You should see a significant improvement in water pressure and spray pattern.
Advanced Troubleshooting for Stubborn Clogs
If the basic cleaning didn’t fully restore the water pressure, don’t worry. There are a couple of other key areas to check that are often overlooked but are common sources of flow restriction. These steps address deeper issues within the Washlet’s water supply system.
Checking and Cleaning the Water Filter
Every Toto Washlet is equipped with a water filter or strainer screen to protect its internal components from debris. Over time, this filter can become clogged, severely restricting water flow to the entire unit. Cleaning this filter is a crucial maintenance step that can solve many pressure-related problems.
The filter is typically located where the main water supply hose connects to the Washlet body. After turning off the water and unplugging the unit, disconnect this hose. You will see a small screen filter inside the inlet. Carefully remove it with tweezers or a small screwdriver, clean it thoroughly under running water with a soft brush, and reinstall it.
When to Suspect a Deeper Problem
If you have thoroughly cleaned both the wand nozzles and the main water filter and still experience issues, the problem may be more complex. If you hear unusual noises, notice any leaks from the unit itself, or if the wand fails to extend or retract properly, it could indicate a problem with an internal valve or the electronic controls.
In these situations, it is best to avoid further disassembly and consult with Toto’s customer support or a qualified plumber. Attempting complex internal repairs without the proper expertise can lead to further damage.
Proactive Maintenance: How to Prevent Future Clogs
The best way to deal with a clogged Washlet wand is to prevent it from happening in the first place. A simple and consistent maintenance routine will ensure your investment continues to perform flawlessly for years, much like how routine care prevents issues with your garden plants, such as knowing how to transplant Solomon’s seal at the right time for healthy growth.
Regular Cleaning is Key
Make it a habit to use the wand’s self-cleaning function regularly, if your model has one. Additionally, perform a manual cleaning of the wand nozzles with a soft cloth or brush at least once a month. This prevents mineral deposits from hardening into a major blockage. Keeping your garden thriving, for example by training climbing roses on a chain link fence, also requires consistent, proactive care.
For homes with very hard water, a monthly 30-minute vinegar soak can work wonders. This small amount of preventative effort will save you from the hassle of dealing with a fully clogged system down the road.
| Frequency | Maintenance Task | Purpose |
|---|---|---|
| Weekly | Run Self-Cleaning Cycle | Rinses the wand before and after each use to minimize immediate buildup. |
| Monthly | Manual Wand Cleaning & Vinegar Soak | Removes developing mineral deposits and biofilm from nozzles. |
| Bi-Annually (Every 6 Months) | Clean the Main Water Inlet Filter | Ensures consistent water flow to the entire unit and prevents internal clogs. |
| As Needed | Wipe Down Exterior Surfaces | Maintains the overall cleanliness and hygiene of the Washlet unit. |
The Ultimate Solution: An External Water Filter
For homeowners in areas with extremely hard water, the most effective long-term solution is to address the problem at its source. Installing a small, in-line water filter on the supply line leading to your Washlet can dramatically reduce the amount of minerals reaching the unit. These filters are specifically designed to capture sediment and reduce scale buildup, offering an extra layer of protection for the delicate internal components of your bidet seat.
This proactive step is often overlooked but provides the highest level of protection against future clogs, ensuring your Washlet maintains powerful and consistent pressure for its entire lifespan.
When to Call a Professional Plumber
While most common issues with a clogged Toto Washlet wand can be resolved with the DIY methods outlined above, there are certain situations where it is best to call for professional help. Recognizing these signs can save you from causing more significant damage to your unit.
Contact a professional plumber or Toto-certified technician if you encounter any of the following:
- Persistent Leaks: If you notice water dripping from the unit itself (not just the connections you worked on), it could indicate a cracked internal component or a failed seal.
- Electrical Malfunctions: If the Washlet is completely unresponsive, trips the circuit breaker, or if functions other than the wand are failing, the issue is likely electronic and requires expert diagnosis.
- Wand Fails to Extend or Retract: If the wand is physically stuck and will not move even after a power reset, the motor or gear mechanism may be damaged. Forcing it can cause permanent breakage.
- No Water Flow After All Cleaning: If you have thoroughly cleaned the wand nozzles and the main water filter and there is still no water flow whatsoever, it may point to a malfunctioning internal solenoid or valve.
Maintaining a high-tech appliance like a Toto Washlet is a rewarding part of homeownership. By following this guide, you are empowered to handle the most common maintenance task yourself, keeping your bathroom’s best feature in perfect condition. A clean, fully functional Washlet is a luxury you can and should enjoy every day.