Toilet Seat Paint Coming Off? Your Ultimate Guide to a Flawless Fix
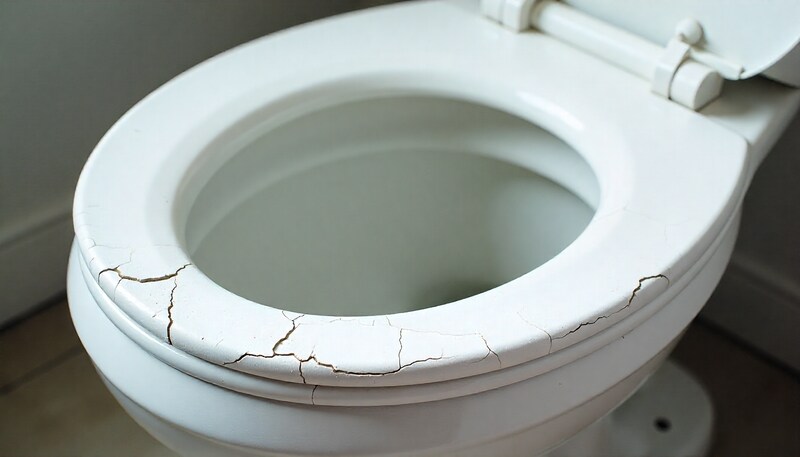
It’s an eyesore that’s hard to ignore. You keep your bathroom sparkling clean, yet the chipped, peeling paint on your toilet seat makes the whole space feel shabby and unhygienic. This common household problem is not just frustrating; it can also be a sign of underlying issues that, if not addressed, will lead to the same problem again and again.
Whether you’re dealing with a wooden, MDF, or enameled seat, the constant cycle of wear and tear can make you want to give up and buy a new one. But before you do, understand that with the right knowledge and techniques, you can achieve a durable, long-lasting finish that looks brand new. This comprehensive guide will explore the hidden causes of peeling paint and provide a detailed, step-by-step solution for a permanent fix.
You'll Learn About
Why Is the Paint on Your Toilet Seat Peeling? Uncovering the Causes
To solve the problem for good, you must first understand why it’s happening. Several factors, often working in combination, contribute to the breakdown of your toilet seat’s finish. Identifying the root cause is the first step toward a successful repair.
The Impact of Harsh Cleaning Chemicals
One of the most common culprits behind peeling paint is the use of harsh cleaning agents. Products containing bleach, ammonia, or other abrasive chemicals can be incredibly effective at disinfecting, but they are equally effective at stripping away the protective top layer of your toilet seat’s paint. Over time, these chemicals weaken the paint’s bond to the surface, leading to cracking, bubbling, and eventually, peeling.
Constant Moisture and High Humidity
Bathrooms are, by nature, high-humidity environments. Steam from hot showers and daily moisture can penetrate microscopic cracks in the paint. This is especially problematic for wooden or Medium-Density Fiberboard (MDF) seats, as the underlying material can absorb this moisture, causing it to swell and push the paint away from the surface from underneath.
Age and Material Degradation
Like any other fixture in your home, a toilet seat has a finite lifespan. Years of use, temperature fluctuations, and exposure to light can cause the paint and the material itself to degrade. Cheaper toilet seats made from pressed wood or low-quality plastic are particularly susceptible to this kind of wear and tear, as their factory finish is often thin and less resilient.
Physical Wear and Friction
Daily use creates constant friction that slowly erodes the paint’s surface. Scratches from clothing rivets, accidental bumps, or the lid slamming shut can create small breaches in the finish. Once the protective seal is broken, moisture and cleaning agents can easily get underneath, accelerating the peeling process significantly.
The Hidden Culprit: Urine Acidity
A factor that is rarely discussed but plays a significant role is the corrosive nature of urine. Uric acid is a powerful solvent that can slowly break down even durable enamel and acrylic paints. This type of damage is most common on the underside of the seat and around the hinges, where drips and splashes may not be immediately wiped away, allowing the acid to sit on the surface for extended periods.
To Repair or Replace? Making the Right Decision
Faced with a peeling toilet seat, the immediate question is whether to invest the time in a repair or simply buy a replacement. While replacing is quicker, repairing can be a cost-effective and sustainable option, especially if the seat itself is a high-quality model. A good rule of thumb is to consider the material; a solid wood seat is almost always worth repairing, while a heavily damaged, cheap plastic or MDF seat might be better off replaced.
Repairing gives you complete control over the quality of the finish. By using superior paints and sealants, you can create a surface that is far more durable than the original factory coating. This not only saves money but also prevents a perfectly functional item from ending up in a landfill.
The Definitive Guide to Repainting Your Toilet Seat
Repainting a toilet seat is a straightforward project, but success lies in the details. Skipping steps, especially during preparation, will lead to a finish that peels just as quickly as the old one. Follow this guide carefully for a durable, professional-quality result.
Step 1: Gathering Your Materials
Choosing non-toxic materials is crucial for a healthy home. For a project like a toilet seat—a high-contact, high-moisture area—the key is to use a system of products that are safe, low-odor, and still provide the necessary durability and water resistance.
You will need safety gear (a mask is still wise, even with low-VOCs, to avoid dust), a screwdriver, and painter’s tape. For the finishing materials, you’ll be replacing traditional paints with a modern, eco-conscious system.
For sanding, you’ll still need a medium grit (around 120) and a fine grit (220 or higher) sandpaper to prepare the surface.
Your choice of paint system is the most important decision. You need a paint that contains zero or very low VOCs, is free of harsh chemical solvents, and can be sealed effectively to withstand cleaning and moisture.
| Eco-Friendly System | Durability | Best For | Eco-Friendly Profile |
| High-Performance Zero-VOC Enamel | Excellent | The most durable and straightforward eco-friendly option for any seat material. | Zero-VOC, water-based, low odor, often Green Seal or SCS Indoor Advantage Gold certified. |
| Milk or Chalk Paint + Sealer | Good to Very Good | Achieving a unique, non-toxic finish, especially on wood seats. Durability depends entirely on the top coat. | Made from natural ingredients (milk protein, lime) or water-based formulas. Zero or very low VOC. |
| Hardwax Oil Finish | Good | Bare wood seats only. Creates a beautiful, natural, and repairable finish. | Made from natural plant-based oils and waxes. Zero-VOC and penetrates the wood rather than forming a plastic film. |
A Deeper Look at Your Eco-Friendly Options:
-
High-Performance Zero-VOC Enamel: This is your best all-around choice. Companies like ECOS Paints and AFM Safecoat specialize in high-performance, non-toxic paints for chemically sensitive people.
-
How it works: These are water-based acrylic enamels formulated without the toxic solvents found in traditional paints. They are designed for trim, cabinets, and doors, so they cure to a hard, scrubbable finish.
-
Recommended Product: ECOS Paints Interior Semi-Gloss Trim and Furniture Paint. It’s specifically designed for this type of application.
-
Process: Prime with a compatible non-toxic primer (like ECOS’s own), apply 2-3 coats of the enamel, and let it cure fully.
-
-
Milk Paint or Chalk Paint System: This is a fantastic option if you want a more natural or matte finish.
-
How it works: Milk paint (like The Real Milk Paint Co.) is a zero-VOC powder you mix with water. Chalk paint (like Annie Sloan) is a very low-VOC water-based paint. By themselves, they are not durable or waterproof. Their success depends entirely on the sealant.
-
Process: Paint with 2-3 coats. Crucially, you must seal it with at least 3-4 coats of a heavy-duty, water-based, non-toxic sealer. Look for a polyurethane top coat that is rated “toy-safe” or “food-safe,” like The Real Milk Paint Co.’s Dead Flat Varnish or General Finishes High Performance Water Based Topcoat.
-
-
Hardwax Oil Finish (For Bare Wood Only): If you are refinishing a solid wood seat and can strip it completely to bare wood, this is the most natural and beautiful option.
-
How it works: Products like Osmo Polyx-Oil or Rubio Monocoat are made from oils and waxes that penetrate the wood fibers and cure to a hard, durable, water-resistant finish from within. It feels like natural wood, not plastic.
-
Benefit: It doesn’t chip or peel and can be easily spot-repaired by sanding the area lightly and wiping on more oil.
-
Process: Apply a very thin coat, work it into the wood, and wipe off all the excess. Let it cure.
-
The Eco-Friendly System Essentials:
-
Primer: A bonding primer is still essential for previously painted or plastic surfaces. A great, more natural option is a shellac-based primer like Zinsser B-I-N. Shellac is a natural resin secreted by the lac bug, so it’s not a synthetic plastic. It has an alcohol solvent that evaporates quickly, but it is excellent at blocking stains and creating a bondable surface.
-
Sealant (Top Coat): This is the most important step for durability, especially with milk or chalk paint. Use a high-quality, non-yellowing, water-based polyurethane or polycrylic. Look for products labeled “Low-VOC” or “Zero-VOC” to complete your eco-friendly system.
Step 2: Removing and Prepping the Seat
Begin by using a screwdriver to detach the toilet seat from the bowl. Most seats are held on by two plastic bolts at the back. Once removed, take the seat to a well-ventilated area, like a garage or an outdoor space, to work.
Start sanding with your medium-grit sandpaper. Your goal is to remove every trace of loose and peeling paint and to “feather” the edges of the remaining intact paint so there are no visible lines. Once all the peeling paint is gone, switch to the fine-grit sandpaper to smooth the entire surface, creating a uniform, slightly dulled finish that the primer can grip onto.
Step 3: The Crucial Cleaning Process
This step is absolutely critical and often overlooked. After sanding, the seat will be covered in fine dust that will prevent the primer from adhering properly. Wipe the entire seat thoroughly with a tack cloth or a damp microfiber cloth to remove all sanding residue.
Next, clean the seat with a degreasing agent, such as denatured alcohol or a dedicated surface prep cleaner. This removes any oils, waxes, or residues from household cleaners that could interfere with paint adhesion. Allow the seat to dry completely before moving on.
Step 4: Priming for a Lasting Finish
Primer is the foundation of a durable paint job. It serves two main purposes: it seals the underlying material (especially important for porous wood or MDF) and provides an ideal surface for the paint to bond to. Apply a thin, even coat of high-quality, moisture-resistant primer.
Using a spray primer is often the easiest way to achieve a smooth, even layer without brush marks. Hold the can 6-10 inches from the surface and use light, sweeping motions. Allow the primer to dry completely according to the manufacturer’s instructions, which may take anywhere from 30 minutes to a few hours.
Step 5: Applying the Paint
Now it’s time to apply your chosen color. As with the primer, thin coats are far better than one thick coat. A thick coat of paint is more likely to drip, bubble, and take an extremely long time to cure properly.
Apply two to three light coats of your epoxy or enamel paint, allowing adequate drying time between each application as specified on the can. Patience here is key. Rushing this step will compromise the durability of the final finish.
Step 6: Sealing the Deal with a Top Coat
For ultimate protection against moisture, cleaning chemicals, and daily wear, a final clear top coat is highly recommended. A water-based polyurethane or a marine-grade varnish will create an impermeable barrier over the paint. This extra layer is what transforms a good paint job into a great one that will last for years.
Apply two to three thin coats of your sealant, lightly sanding with very fine-grit (400+) sandpaper between coats for the smoothest possible finish. After the final coat, allow the seat to cure for at least 24-72 hours before reattaching it to the toilet. This curing period allows the paint and sealant to fully harden into a resilient, durable shell.
Preventing Future Peeling: Proactive Maintenance Tips
Once you’ve restored your toilet seat, a few simple changes to your routine can prevent the problem from recurring. Proper care is essential to maintaining the new finish.
Choose the Right Cleaning Products
Switch to milder, pH-neutral cleaning products for daily wipe-downs. A simple solution of warm water and a small amount of dish soap is effective for regular cleaning without damaging the paint. Avoid abrasive pads or harsh chemicals, reserving them only for the inside of the toilet bowl.
Control Bathroom Humidity
Make a habit of using the bathroom exhaust fan during and for 15-20 minutes after every shower. This simple action drastically reduces the amount of moisture that settles on surfaces. Wiping the toilet seat down with a dry cloth after a shower can also help prevent moisture from seeping into any imperfections.
The Soft-Close Advantage
Consider upgrading to a soft-close toilet seat. These models prevent the seat and lid from slamming shut, which is a common cause of small cracks and chips in the paint. This small investment can significantly extend the life of the seat’s finish.
Knowing When to Buy New
While repainting is an excellent solution for surface-level peeling, some toilet seats are beyond saving. If the core material of the seat is cracked, deeply gouged, or swollen from extensive water damage, a replacement is the most practical choice. Fortunately, modern toilet seats are relatively inexpensive and come with features like slow-close hinges and quick-release mechanisms for easier cleaning.
Ultimately, restoring a peeling toilet seat is a rewarding project that can make a big difference in the look and feel of your bathroom. Fixing this small detail is a project that makes a big impact, much like solving other common household dilemmas. Whether it’s tackling a bathroom fixture or figuring out how to fit a 30-inch range in a 36-inch space, the right approach can restore both function and beauty to your home. While the seat is removed, it also provides a unique opportunity to assess the entire toilet area for other potential upgrades. Understanding the cost to install an electrical outlet behind the toilet, for instance, can help you plan for future enhancements like a bidet seat. Using the wrong chemicals can cause more problems than they solve, not just on a toilet seat but throughout your home. A strong chemical smell can sometimes be mistaken for other household dangers, so it’s crucial to know what a gas smell is supposed to be like to ensure your home’s safety.