Toilet Flapper Disintegrating? Here’s the Nasty Truth Why
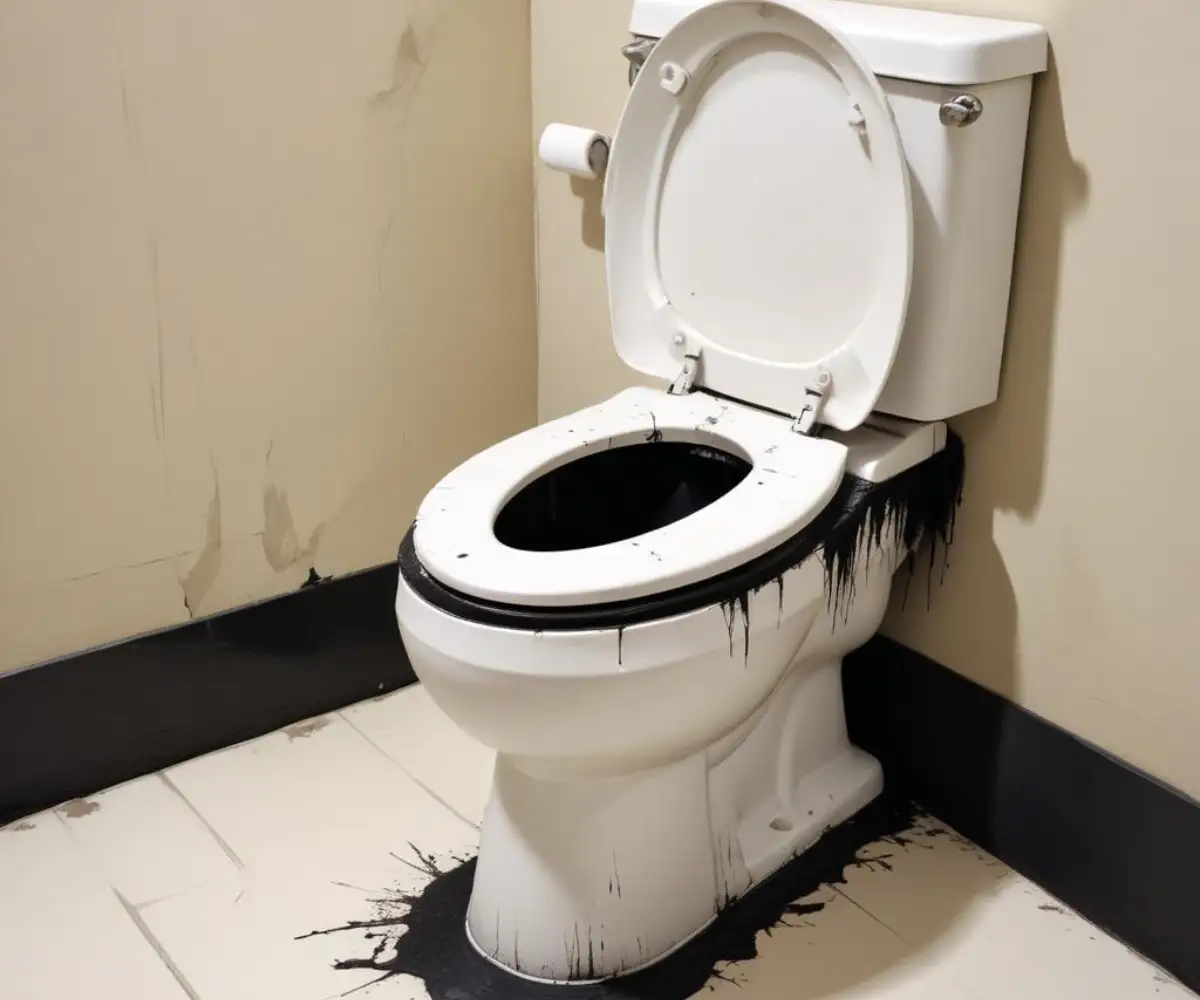
You go to clean your toilet, and you notice them: small, mysterious black flakes floating in the otherwise clean water. You might scrub the bowl, but after a few flushes, they reappear. If you’re brave enough to lift the tank lid, you may find a horror scene—a black, gooey substance covering the rubber flapper and leaving a sticky, tar-like residue on your fingers.
This isn’t just a sign of a dirty toilet. It’s a clear signal that your toilet flapper is disintegrating, a common household problem that can lead to bigger issues like constant running, phantom flushing, and surprisingly high water bills. Ignoring it won’t make it go away; it will only get worse.
You'll Learn About
Why Is Your Toilet Flapper Turning Into Black Slime?
A toilet flapper should typically last about three to five years, but certain conditions can drastically shorten that lifespan. Understanding the root cause is the first step toward a permanent solution. The culprit is almost always a chemical reaction breaking down the rubber.
The #1 Culprit: In-Tank Chemical Cleaners
Those convenient drop-in tablets that promise to keep your bowl sparkling clean are the primary enemy of your toilet’s internal parts. Most of these tablets contain bleach or chlorine, powerful chemicals that are highly corrosive to rubber and plastic. While they sanitize the bowl, they sit in the tank water 24/7, constantly attacking the flapper and other seals.
This continuous chemical exposure causes the rubber to lose its integrity, becoming soft, spongy, and eventually breaking apart into the black flakes you see in the bowl. Manufacturers of both toilets and cleaning supplies often warn against using these in-tank tablets, as they can void your toilet’s warranty and cause premature failure of its components.
Age and Simple Wear and Tear
Even without the use of harsh chemicals, toilet flappers don’t last forever. Over years of use, the constant exposure to water and the mechanical stress of flushing will eventually cause the rubber to harden, crack, or become waterlogged. An old flapper will no longer create a perfect seal, leading to slow leaks.
If you can’t remember the last time the flapper was changed, it’s likely past its prime. This natural degradation is a common reason for a toilet to start running intermittently or flushing on its own, often called “phantom flushing.”
Municipal Water Additives and Hard Water
The water that flows into your home isn’t just pure H2O. Municipal water treatment facilities use chemicals like chlorine and chloramine to disinfect the water supply. While safe for consumption, these chemicals are abrasive to rubber and can accelerate the breakdown of your toilet flapper over time.
Furthermore, if you live in an area with hard water, mineral deposits like calcium and magnesium can build up on the flapper and the flush valve seat. This buildup can prevent the flapper from creating a watertight seal, causing it to leak. The rough mineral surface can also physically damage the soft rubber, contributing to its decay.
The Hidden Dangers of a Failing Flapper
A disintegrating flapper is more than just an aesthetic issue with black flakes. It’s a direct cause of a leaking toilet, which can waste hundreds of gallons of water per month. This “silent” leak happens when the flapper no longer seals properly, allowing water to constantly trickle from the tank into the bowl.
This forces the fill valve to turn on periodically to refill the tank, wasting both water and money. A significantly degraded flapper can fail completely, leading to a toilet that runs nonstop and potentially causing an overflow if other components fail.
Your Step-by-Step Guide to Replacing a Disintegrating Flapper
The good news is that replacing a toilet flapper is one of the easiest and most affordable DIY plumbing repairs. You don’t need to be a professional plumber to tackle this job. With the right part and about 15 minutes, you can solve the problem and restore your toilet to perfect working order.
Step 1: Gather Your Tools and New Flapper
You won’t need much for this task. Before you begin, make sure you have a new toilet flapper, a pair of rubber gloves (to handle the sticky old flapper), a sponge or old towel, and possibly a pair of scissors. Most modern toilets use a universal 2-inch or 3-inch flapper, but it’s always best to check your specific model if you’re unsure.
Step 2: Turn Off the Water and Drain the Tank
Locate the water supply valve on the wall behind your toilet. Turn the knob clockwise until it stops to shut off the water flow to the tank. Once the water is off, flush the toilet and hold the handle down to drain as much water as possible from the tank.
Step 3: Remove the Old, Gunky Flapper
With the tank empty, you can now remove the old flapper. It’s connected in two places: the ears of the flapper clip onto pegs on the side of the overflow tube, and a chain connects the top of the flapper to the flush handle lever. First, unhook the chain from the lever. Then, gently flex the rubber ears of the flapper to unhook them from the pegs.
Be prepared for a mess. The old flapper will likely be slimy and covered in black residue. This is where your gloves come in handy. Set the old flapper aside on a towel.
Step 4: Clean the Flush Valve Seat
Before installing the new flapper, take a moment to clean the flush valve seat—the round opening at the bottom of the tank that the flapper covers. Wipe it with your sponge or a cloth to remove any remaining black residue or mineral buildup. A smooth, clean surface is essential for the new flapper to create a perfect seal.
Step 5: Install the New Flapper
Installing the new flapper is simply the reverse of removal. Clip the two ears of the new flapper onto the pegs on the overflow tube. Next, attach the new chain to the flush handle lever. It is crucial that the chain has just a little bit of slack—about 1/2 inch. If the chain is too tight, it will hold the flapper slightly open, causing a leak. If it’s too loose, it can get caught under the flapper, also preventing a proper seal. Sometimes, if the flapper isn’t seated correctly, it might seem like the whole toilet flapper comes off its hinges, but adjusting the chain often solves this.
Step 6: Turn the Water On and Test Your Work
Turn the water supply valve counter-clockwise to turn the water back on. Allow the tank to fill completely. Listen carefully to ensure the water stops running once the tank is full. If it does, you’ve successfully installed the flapper. Give the toilet a test flush to ensure everything is working correctly. Watch as the flapper lifts and then reseals tightly.
Choosing the Right Flapper: A Pro’s Guide
Not all toilet flappers are created equal. Choosing a high-quality, durable flapper can save you from having to repeat this job in just a few years. The material and design of the flapper play a significant role in its longevity, especially if you have chemically treated or hard water.
| Flapper Type | Material | Pros | Cons | Best For |
|---|---|---|---|---|
| Standard Rubber | Flexible Rubber | Inexpensive, widely available, flexible seal. | Susceptible to chemical and mineral damage. | Homes with untreated well water. |
| Chemical-Resistant | Treated Rubber, Silicone | Durable, resists chlorine and bleach damage. | Slightly more expensive. | Homes with city water, or if you use bowl cleaners. |
| Rigid Frame | Plastic Frame, Silicone Seal | Prevents warping, ensures a consistent seal. | Can be less forgiving on irregular valve seats. | Newer, high-efficiency toilets. |
| Adjustable | Varies | Allows you to fine-tune flush volume for water savings. | Can require more initial adjustment. | Optimizing water usage in any toilet. |
How to PREVENT Your New Flapper from Disintegrating
Now that you have a new flapper installed, the goal is to make it last as long as possible. A few simple changes in your maintenance routine can protect the rubber and plastic components inside your toilet tank and prevent premature failure.
Ditch the In-Tank Tablets Immediately
The single most effective way to protect your new flapper is to stop using corrosive in-tank cleaning tablets. If you want the convenience of an automatic cleaner, switch to products that are applied directly to the toilet bowl, such as cleaning gels or under-the-rim hangers. These products clean the bowl effectively without subjecting your tank’s components to a constant chemical bath.
Perform Regular Maintenance Checks
Proactive maintenance can prevent small issues from becoming major headaches. It’s wise to inspect your toilet’s internal components at least once a year. This mindset of preventative care applies to other systems in your home as well. Just as you’d want to know if you should replace your HVAC before it breaks, regular checks on your plumbing can save you from costly emergency repairs.
Catching a failing part early is always better. A toilet flapper that’s starting to show wear is much like a furnace blower motor that’s slow to start—it’s a warning sign that shouldn’t be ignored. A quick visual inspection can tell you if the flapper is still pliable and sealing correctly.
Frequently Asked Questions (FAQs)
Many homeowners face similar issues with their toilets. Here are answers to some of the most common questions about disintegrating flappers and related problems.
What are these black flakes in my toilet bowl?
The black flakes or specks you see are almost certainly pieces of a deteriorating rubber toilet flapper or gasket from inside your toilet tank. As the rubber breaks down due to age or chemical exposure, small particles are flushed from the tank into the bowl.
How long should a toilet flapper last?
Under normal conditions, a toilet flapper should last between 3 to 5 years. However, using in-tank chlorine or bleach cleaners can cause a flapper to fail in as little as six months. Choosing a chemical-resistant flapper can help extend its lifespan in homes with treated city water.
Can a disintegrating flapper cause my toilet to run?
Absolutely. This is the most common symptom of a bad flapper. As the rubber warps or breaks down, it can no longer form a watertight seal over the flush valve, allowing water to leak from the tank into the bowl. This causes the fill valve to run constantly or intermittently to replace the lost water.