Tiling Behind Bathroom Vanity: The #1 Mistake You Can’t Afford
You’re standing in your newly gutted bathroom, the air thick with the dust of demolition and the promise of a fresh start. The new vanity is picked out, the faucet is gleaming in its box, but a critical question stops you in your tracks: what do you do about the wall behind the vanity?
Do you tile the entire wall, floor to ceiling, before the vanity goes in? Or do you install the vanity first and just add a small tile backsplash later to save a few dollars? This single decision can be the difference between a professional, waterproof finish and a future riddled with costly repairs and design regrets.
Making the wrong choice can lead to hidden moisture damage, create an aesthetic that falls flat, and lock you into your current vanity choice forever. Before you move another inch on your renovation, it’s crucial to understand the stakes and the professional’s approach to this common dilemma.
You'll Learn About
Why Tiling the Entire Wall is the Professional Standard
When weighing the options, experienced designers and contractors almost universally recommend tiling the entire wall before installing the vanity. While it may seem like you’re paying for tile that no one will ever see, the benefits far outweigh the initial cost. The reasons are rooted in durability, aesthetics, and long-term value.
This approach isn’t about wasting material; it’s about building a bathroom that is truly complete and protected from the unique challenges of a wet environment. Think of it as an investment in the room’s longevity and your own peace of mind.
Unbeatable Moisture Protection
The number one reason to tile the full wall is superior water resistance. Bathrooms are high-humidity zones, and the area around the sink is constantly subjected to splashes. A fully tiled wall creates a continuous, sealed barrier that protects the underlying drywall from moisture intrusion.
When you only install a small backsplash, you leave a critical seam between the countertop and the start of the tile. Even with caulk, this area can fail over time, allowing water to seep behind the vanity, leading to mold, mildew, and rotting drywall—a hidden disaster that can cost thousands to repair.
Future-Proofing Your Design
Tastes and trends change. The vanity you love today might not be the one you want in ten years. If you only tile a backsplash, you are effectively “trapped” by the footprint of your current vanity. Should you ever decide to replace it with a smaller model, a pedestal sink, or a trendy floating vanity, you’ll be left with an unsightly patch of untiled wall.
Tiling the entire wall first gives you ultimate flexibility. It ensures a finished surface that can accommodate any future vanity style or size without requiring a major tile repair job. This is a significant selling point for future buyers, who will appreciate the attention to detail and remodeling freedom.
Achieving a Flawless, High-End Look
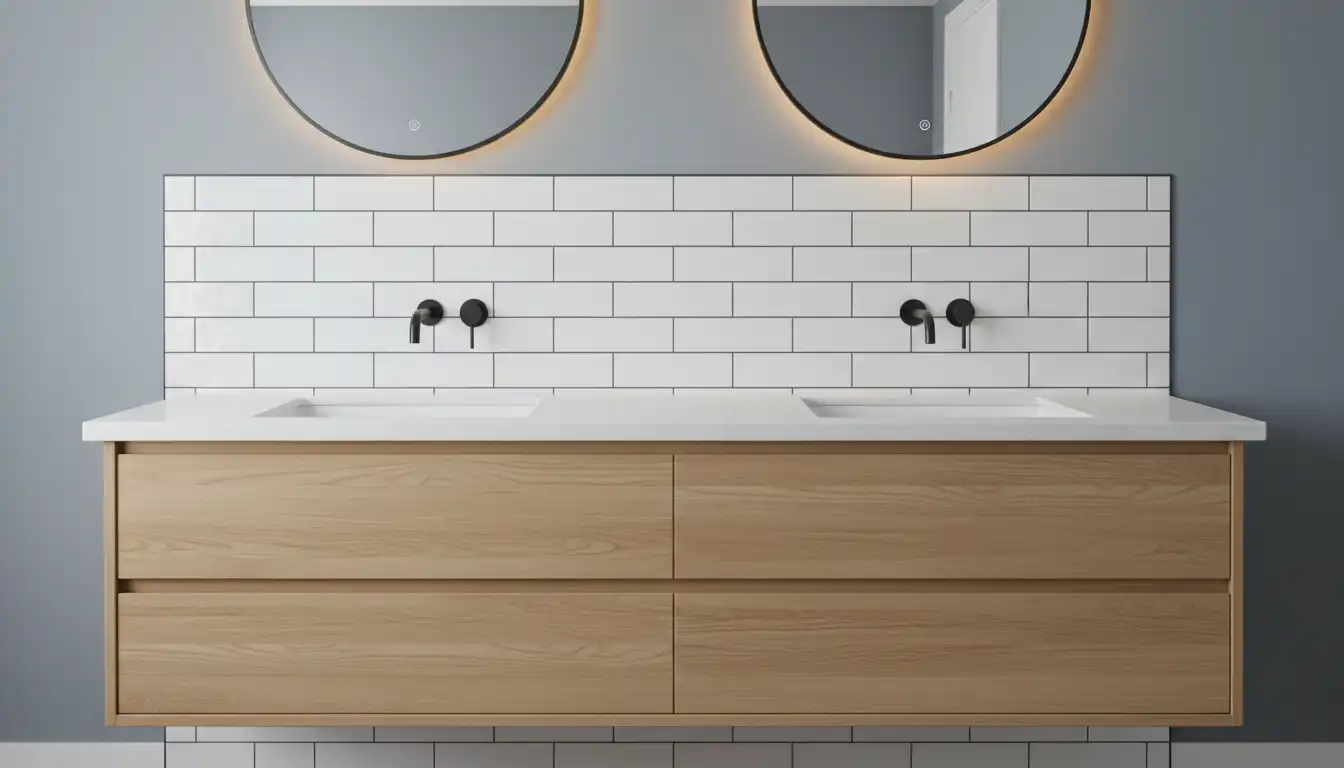
A fully tiled wall provides a seamless, uninterrupted finish that elevates the entire bathroom’s aesthetic. It makes the vanity look like a carefully chosen piece of furniture placed against a beautiful feature wall. This approach is non-negotiable for floating or open-shelf vanities, where any untiled portion of the wall below or around the unit would be immediately visible.
Conversely, tiling *around* a pre-installed vanity often results in awkward cuts and a less integrated appearance. A continuous tiled surface simply looks more professional, intentional, and luxurious, which is a key consideration in a well-designed bathroom layout.
The Great Debate: Full Wall Tile vs. Backsplash Only
To make an informed decision, it’s essential to weigh the pros and cons of each method. While one approach is professionally preferred, budget and specific circumstances can influence your choice. Understanding both sides of the argument is key.
Here, we break down the two primary strategies for tiling behind a bathroom vanity, helping you see the short-term savings versus the long-term benefits.
Method 1: Tiling the Entire Wall Before Vanity Installation (Recommended)
This is the gold-standard method. The process involves preparing the wall, tiling the entire surface from floor to ceiling (or to your desired height), grouting, and sealing. Only after the wall is completely finished is the vanity installed against the tiled surface.
This ensures that what’s behind the vanity is just as durable and protected as what’s visible, creating a truly complete and resilient space.
Method 2: Installing the Vanity First, Then a Backsplash
In this budget-driven approach, the vanity is installed directly against the bare drywall. Afterward, a small backsplash—typically 4 to 6 inches high or up to the mirror—is tiled onto the wall above the countertop. This saves on the cost of tile and the labor required to install it.
However, this method requires meticulous sealing at the countertop-to-wall joint to prevent water damage and can severely limit future design changes. It’s often seen as a corner-cutting measure that can lead to problems down the road.
| Feature | Full Wall Tiling (Before Vanity) | Backsplash Only (After Vanity) |
|---|---|---|
| Water Protection | Excellent: Continuous waterproof barrier protects drywall. | Poor to Fair: Relies heavily on a single bead of caulk; high risk of leaks. |
| Future Flexibility | High: Allows for easy replacement of the vanity with any size or style. | Very Low: Locks you into the current vanity’s footprint. |
| Aesthetics | Professional, seamless, and high-end finish. | Can look tacked-on; visible seam between wall and vanity. |
| Installation | Simpler tiling process on a flat, open wall. | Requires precise, awkward cuts to tile around an installed vanity. |
| Upfront Cost | Higher due to more materials and labor. | Lower initial cost, saving on tile and installation time. |
| Long-Term Value | High: Prevents costly repairs and adds to resale value. | Low: Can lead to expensive moisture damage and remodeling challenges. |
The Pro’s Guide: How to Tile the Wall Behind Your Vanity
Tackling this project the right way ensures a beautiful and durable result. Following a systematic approach from preparation to sealing is critical. This step-by-step guide outlines the professional method for creating a fully tiled feature wall ready for any vanity.
Step 1: Wall Preparation is Non-Negotiable
A successful tile job begins with a perfect substrate. Start by removing the old vanity, mirror, and any light fixtures. Carefully inspect the drywall for any signs of water damage, holes, or imperfections. Patch any issues with a joint compound, sand smooth, and prime the entire wall.
Ensure the wall is perfectly clean, dry, and plumb before you begin. If you’re working in a high-moisture area, applying a liquid waterproofing membrane over the drywall provides an extra layer of defense.
Step 2: Plan Your Layout Like a Pro
Never start tiling from a corner. Find the horizontal and vertical center of the wall and snap chalk lines to create a guide. Do a “dry lay” by placing a row of tiles with spacers on the floor along the wall’s length to see how the pattern will end at the corners.
Your goal is to avoid ending with tiny, awkward slivers of tile in visible areas. Adjust your starting centerline as needed to ensure the cuts at both ends are a half-tile or larger for a balanced, professional look.
Step 3: Mix and Apply Thin-Set Mortar
Mix your thin-set mortar according to the manufacturer’s instructions until it reaches a smooth, peanut-butter-like consistency. Let it “slake” or rest for 5-10 minutes, then give it a final mix. Apply the mortar to a small section of the wall using the flat side of a notched trowel.
Then, comb over the mortar with the notched side of the trowel, holding it at a 45-degree angle to create uniform ridges. This ensures an even bed of adhesive for the tiles to bond to.
Step 4: Setting the Tiles
Starting at the intersection of your layout lines, press the first tile into the mortar with a firm, even pressure and a slight back-and-forth twist. This collapses the mortar ridges and ensures full coverage. Place tile spacers at each corner and continue setting the surrounding tiles.
Work in small, manageable sections to prevent the mortar from drying out. Use a level every few rows to check that your lines are remaining straight and true.
Step 5: Grouting and Sealing for a Final Finish
After the mortar has fully cured (typically 24-48 hours), remove all the spacers. Mix your grout and apply it diagonally across the tiles with a grout float, pressing it firmly into the joints. Remove the excess grout from the tile surfaces with the float held at a sharp angle.
After about 15-30 minutes, use a damp grout sponge to clean the remaining haze from the tiles. Once the grout has cured for the time specified by the manufacturer, apply a quality grout sealer with a small brush. This crucial final step protects the grout from moisture, stains, and mildew.
The Floating Vanity Factor: A Critical Consideration
The rise of the floating vanity has made the decision to tile the entire wall more critical than ever. Unlike traditional cabinet-style vanities that sit on the floor, floating vanities are mounted directly to the wall, leaving the floor underneath completely exposed. This design choice has significant implications for your tiling strategy.
With a floating vanity, there is simply no hiding an untiled wall. The space between the bottom of the vanity and the floor is fully visible, meaning any attempt to save money by stopping the tile behind the unit will be immediately obvious and look unfinished. More importantly, it highlights the connection between the floor and wall tile, a detail covered in the discussion on whether to tile under a vanity.
Furthermore, installing a floating vanity requires robust structural support within the wall. This support, known as blocking, must be installed between the studs *before* drywall and tile go up. Tiling the entire wall first ensures that you are mounting the vanity brackets onto a solid, waterproofed, and beautifully finished surface, providing both the structural integrity and the seamless aesthetic these modern designs demand.
The Verdict: A Worthwhile Investment in Your Home
While the allure of saving a few hundred dollars by installing a vanity first and adding a small backsplash is tempting, the long-term risks and aesthetic compromises make it a poor choice for most bathroom renovations. The professional standard of tiling the entire wall first is not about extravagance; it’s about building a durable, flexible, and visually stunning bathroom that will stand the test of time.
This method provides a superior waterproof shield, future-proofs your design against changing tastes, and delivers a high-end finish that simply cannot be replicated by tiling around fixtures. By investing in a fully tiled wall, you are protecting your home from hidden water damage and ensuring your bathroom remains a source of pride and value for years to come.