Tile Under Vanity? The #1 Mistake That Wrecks Floors
You’re standing in your demolished bathroom, dust swirling in the air, and a critical decision looms. It seems minor, but it’s a choice that separates a professional, long-lasting renovation from a future disaster: do you tile under the new vanity or tile around it? This single question can dictate the future of your bathroom’s durability, waterproof integrity, and even your flexibility for future remodels.
Making the wrong call doesn’t just look sloppy; it can lead to hidden water damage, create an uneven floor, and lock you into your current layout forever. Before you or your contractor lay a single piece of tile, understanding the massive implications of this choice is essential. One path leads to a seamless, protected, and future-proofed space, while the other is a shortcut that can cost you dearly down the road.
You'll Learn About
The Core Debate: Why This Choice Matters More Than You Think
At its heart, the “tile under vanity” debate is a question of short-term savings versus long-term value. Tiling around a vanity that’s already in place seems faster and cheaper because you use less tile. However, this approach creates immediate problems and significant future risks.
Conversely, tiling the entire floor before the vanity is installed is the undisputed professional standard. It provides a continuous, waterproof surface and allows for flexibility in the future. Let’s break down the two opposing methods to see why one is clearly superior.
Method 1: Tiling the Entire Floor First (The Professional Standard)
This method involves preparing the subfloor and laying tile across the entire bathroom from wall to wall. Only after the tile and grout have fully cured is the vanity installed on top of the finished floor. This creates a clean, continuous plane.
This is the universally recommended approach by seasoned tile setters and bathroom remodelers. It ensures a complete waterproof barrier and a level surface for the vanity installation, preventing future headaches.
Method 2: Installing the Vanity Then Tiling Around It (The Risky Shortcut)
Here, the vanity is installed directly onto the subfloor. The tile is then cut and fitted around the base of the cabinet. This is often done to save a few square feet of tile and potentially a small amount of labor time.
However, this method creates a permanent “footprint.” If you ever want to replace the vanity with a different size or style—like switching from a cabinet to a pedestal sink—you’ll be left with an ugly, untiled patch of subfloor that’s nearly impossible to fix seamlessly.
| Factor | Tiling Under Vanity (Recommended) | Tiling Around Vanity (Not Recommended) |
|---|---|---|
| Water Protection | Creates a continuous, sealed surface that protects the subfloor from leaks. | Leaves the subfloor under the vanity exposed and vulnerable to hidden water damage from plumbing leaks. |
| Future Flexibility | Allows you to change the vanity’s size, style, or location at any time without redoing the floor. | Locks you into the exact footprint of the current vanity. Replacing it requires patching the floor. |
| Installation Ease | Tiling an open, square room is faster and requires fewer complex cuts. | Requires tedious, precise cuts to fit tile perfectly around the vanity base, increasing labor time and risk of error. |
| Vanity Height | Vanity sits at the correct, standard height on top of the finished floor. | Vanity sits lower than standard, reducing the toe-kick space and creating an awkward counter height. |
| Aesthetics | Provides a clean, high-end look, especially with floating vanities or those with legs. | The seam between the tile and vanity can look unfinished and collect dirt and grime. |
The Professional Standard: Why Tiling Under the Vanity Wins
The verdict among professionals is clear: always tile the entire bathroom floor before installing the vanity. The long-term benefits far outweigh the minor upfront cost of a few extra tiles. It’s the mark of a quality job that prioritizes durability and function over cutting corners.
This approach isn’t just about looks; it’s about building a bathroom that is robust, water-resistant, and adaptable to future changes. By creating a single, unbroken tiled surface, you are fundamentally improving the room’s longevity.
Superior Water Damage Protection
Bathrooms are wet environments. Sink overflows, dripping P-traps, and supply line failures are common issues. When the tile runs wall-to-wall, it creates a crucial waterproof barrier that protects your subfloor from moisture.
If you tile around the vanity, any leak inside the cabinet will seep directly into the exposed subfloor. This can lead to wood rot, mold growth, and structural damage that goes unnoticed for years until the problem is catastrophic.
Future-Proofing Your Investment
Design trends change. What you love today, you might want to update in ten years. Tiling the entire floor gives you the ultimate flexibility.
If you decide to replace your bulky cabinet vanity with a sleek floating model or a classic pedestal sink, the flooring is already complete. There’s no need for a complicated and expensive flooring patch job. This simple foresight saves you from a major renovation headache in the future.
A Cleaner, Simpler Installation Process
Tiling an empty, rectangular room is far easier and faster than cutting intricate shapes to fit around an installed cabinet. Laying full tiles wall-to-wall minimizes waste and reduces the labor involved in making difficult cuts.
Furthermore, installing the vanity on a perfectly flat, tiled surface is much simpler than trying to level it on an uneven subfloor. The vanity will be stable and sit at the proper ergonomic height from the finished floor.
Step-by-Step: The Right Way to Tile Under a Vanity
Following the correct order of operations is critical for a successful bathroom renovation. Here is the professional-grade process for tiling your bathroom floor before the vanity installation.
- Complete Demolition: Remove the old vanity, toilet, and any existing flooring completely. You need a clean slate down to the subfloor.
- Subfloor Preparation: Inspect the subfloor for any damage or rot and make necessary repairs. Ensure it is clean, level, and structurally sound. Screw down any loose sections to prevent flexing.
- Install Underlayment: Install a cement backer board or a waterproofing membrane system over the entire subfloor. This is a non-negotiable step for proper tile installation and moisture protection.
- Lay the Tile: Plan your tile layout, starting from the center of the room. Lay the tile across the entire floor, from wall to wall, using a high-quality thin-set mortar. Use tile spacers for consistent grout lines.
- Grout and Seal: After the mortar has cured (typically 24-48 hours), apply grout to all the joints. Once the grout has cured, apply a grout sealer to protect against stains and moisture.
- Install the Vanity: Carefully place your new vanity in its desired location on top of the finished tile floor. Check that it is level, shimming if necessary. Secure the vanity to the wall studs, not the floor. This is especially important if you are managing plumbing that comes through the floor, as a solid, tiled base simplifies sealing around the pipes.
- Install the Toilet and Trim: With the vanity in place, you can now install the toilet (using a new wax ring) and attach baseboard molding around the room.
What About Different Vanity Types?
The rule to tile the entire floor first applies to almost every situation, but it becomes even more critical with certain vanity styles. How you approach this can make or break the final look of your bathroom.
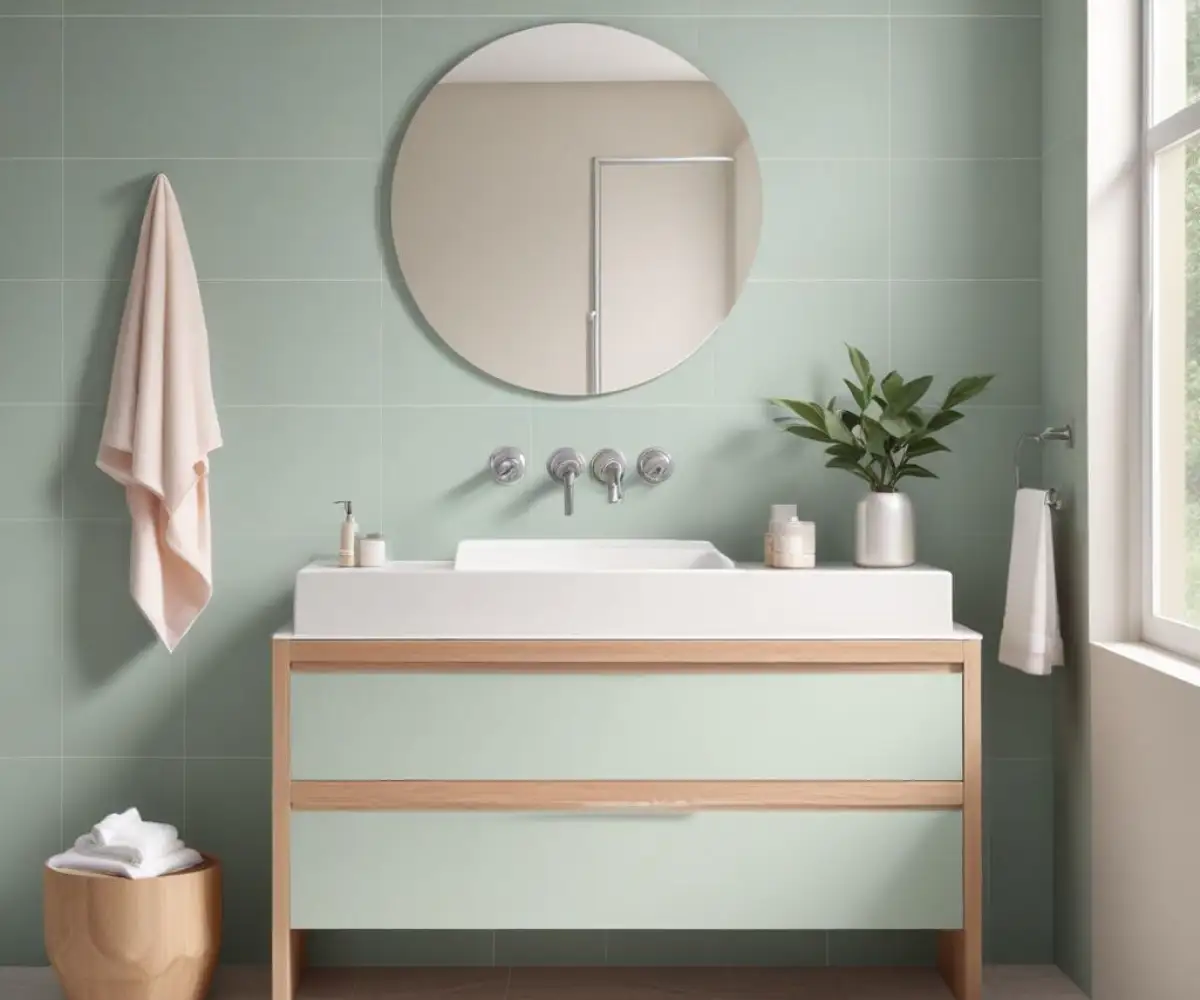
Floating Vanities
For a floating or wall-mounted vanity, tiling the entire floor and the wall behind the vanity is absolutely essential. Since the floor is completely visible underneath, any untiled patch would be immediately obvious and ruin the clean, modern aesthetic. The seamless transition from floor to wall is the entire point of this design.
Vanities with Legs
Much like floating vanities, vanities with legs (often called furniture-style vanities) expose the floor beneath them. It is non-negotiable to have a continuous, finished floor running underneath. Tiling around a vanity with legs would look unprofessional and unfinished.
Standard Cabinet Vanities
Even for a standard cabinet vanity that sits flat on the floor, tiling underneath is the best practice. It provides the crucial waterproofing and future-proofing benefits. While the tile under the cabinet isn’t visible day-to-day, its protective function is working 24/7.
The Cost Factor: Is Tiling Under a Vanity More Expensive?
One of the main arguments for tiling around a vanity is cost savings. While it’s true that you will use slightly more tile by going wall-to-wall, the difference is often minimal and represents a tiny fraction of the overall renovation budget.
Consider a standard 36-inch by 21-inch vanity. This represents only 5.25 square feet of floor space. Even with expensive tile, the additional material cost is often negligible compared to the thousands you are already spending. When you factor in the added labor for the complex cuts required to tile around a vanity, the total cost difference may shrink even further. Don’t let a few dollars in material savings today lead to thousands in repair costs tomorrow. Thinking about the full scope of your renovation, from the cost of installing a new vanity to other major expenses, helps put this minor material difference in perspective.
Frequently Asked Questions (FAQs)
Do you have to remove the vanity to tile the bathroom floor?
Yes, for a professional and durable result, you should always remove the vanity. This allows you to properly prepare the subfloor and create a continuous, waterproof tiled surface. Tiling around an existing vanity is a shortcut that leads to future problems.
Is it harder to install a vanity on top of tile?
No, it is generally easier. A properly tiled floor provides a flat, level surface for the vanity. The only consideration is that you should not drill into the floor tiles to secure the cabinet; it should be anchored securely to the studs in the wall.
What if my floor is not level?
If your subfloor is not level, this should be addressed *before* tiling using a self-leveling compound. Installing a vanity on an uneven tiled floor can be done using shims to level the cabinet, but it’s always best to start with a level foundation.
Does tiling under the vanity make it too high?
No, it places it at the correct height. Standard vanity height is measured from the finished floor. Installing the vanity on the subfloor and then tiling around it actually makes the vanity shorter than standard, which can feel uncomfortable and look strange.