Your Tile to Tub Transition Is a Ticking Time Bomb—Here’s the Fix
That seemingly simple line where your beautiful wall tile meets the bathtub is one of the most critical joints in your entire home. Get it wrong, and it’s not just an ugly, cracked eyesore. It’s a slow-motion invitation for water damage, black mold, and repairs that cost thousands.
Many homeowners see a cracked or peeling seal and simply apply another layer of caulk over the top. This is a temporary cosmetic fix that masks a much deeper problem. Understanding the forces at play and the correct structural approach is the only way to create a waterproof seal that lasts.
You'll Learn About
Why Most Tile to Tub Transitions Fail
The failure of the tile-to-tub joint is rarely sudden. It’s a gradual breakdown caused by powerful, invisible forces and common installation shortcuts. Ignoring the root causes means you’ll be repairing this joint year after year.
The Hidden Movement You Can’t See
Your bathroom is in constant, subtle motion. The most significant movement happens when you fill a bathtub. A standard tub can hold over 300 pounds of water, causing it to flex and sink slightly under the weight. This creates a powerful shearing force on the joint between the stationary wall tile and the tub deck.
Additionally, materials expand and contract with temperature changes from hot showers. Tile, mortar, wood studs, and an acrylic or cast iron tub all expand and contract at different rates. Grout is a cement-based product with almost no flexibility; it is designed to be rigid. When used in a joint that needs to move, it will always crack and crumble over time.
The Waterproofing Mistake Everyone Makes
A surprising number of people—including some installers—believe that tile and grout are waterproof. This is incorrect. Water can and does pass through grout, which is why a waterproofing membrane behind the tile is non-negotiable in a shower or tub surround.
The number one mistake is failing to properly integrate this waterproofing layer with the tub’s flange (the upward-facing lip around the edge of the tub). If the backer board is simply placed on top of the flange, a direct path for water is created. This allows moisture to bypass the seal and seep directly into your wall cavity, leading to wood rot and mold.
The Wrong Sealant for the Job
Any joint where two different planes or materials meet requires a flexible sealant, not rigid grout. However, not all sealants are created equal. Using a cheap acrylic latex caulk or “painter’s caulk” in a wet environment is a recipe for disaster.
These products lack the elasticity and robust mold inhibitors needed to survive in a shower. They shrink, harden, and quickly become a breeding ground for mildew, ultimately pulling away from the joint and breaking the seal completely.
The Anatomy of a Bulletproof Tile to Tub Joint
Creating a transition that lasts a lifetime requires thinking from the studs outward. It’s not about the final bead of caulk, but about building a system where every layer works together to manage water and movement.
Step 1: A Rock-Solid Foundation
Excessive tub movement is the primary killer of this joint. Before any waterproofing or tile, you must ensure the bathtub is immovably secure. An unsupported tub will flex every time you use it, guaranteeing sealant failure.
For acrylic and fiberglass tubs, this often means setting the base in a bed of mortar to eliminate any bounce or instability. The tub must also be perfectly level. A noticeable slant can indicate framing issues or a more serious problem, similar to how a dip in a bathtub can signal underlying support failure.
Step 2: Bridging the Gap—Waterproofing the Flange
This is the most critical and often overlooked step for a truly waterproof system. The tile backer board (such as cement board or a foam board like Kerdi-Board) should be installed so it stops about 1/4 inch above the tub’s horizontal deck, overlapping the vertical tub flange without touching the deck.
The key is to then create an unbreakable waterproof seal over this transition. This involves applying a generous bead of sealant behind the bottom edge of the board against the flange, and then applying a waterproofing membrane band (like Kerdi-Band) embedded in thin-set mortar, covering the joint where the board and flange meet. This forces any water that gets behind the tile to drain harmlessly into the tub.
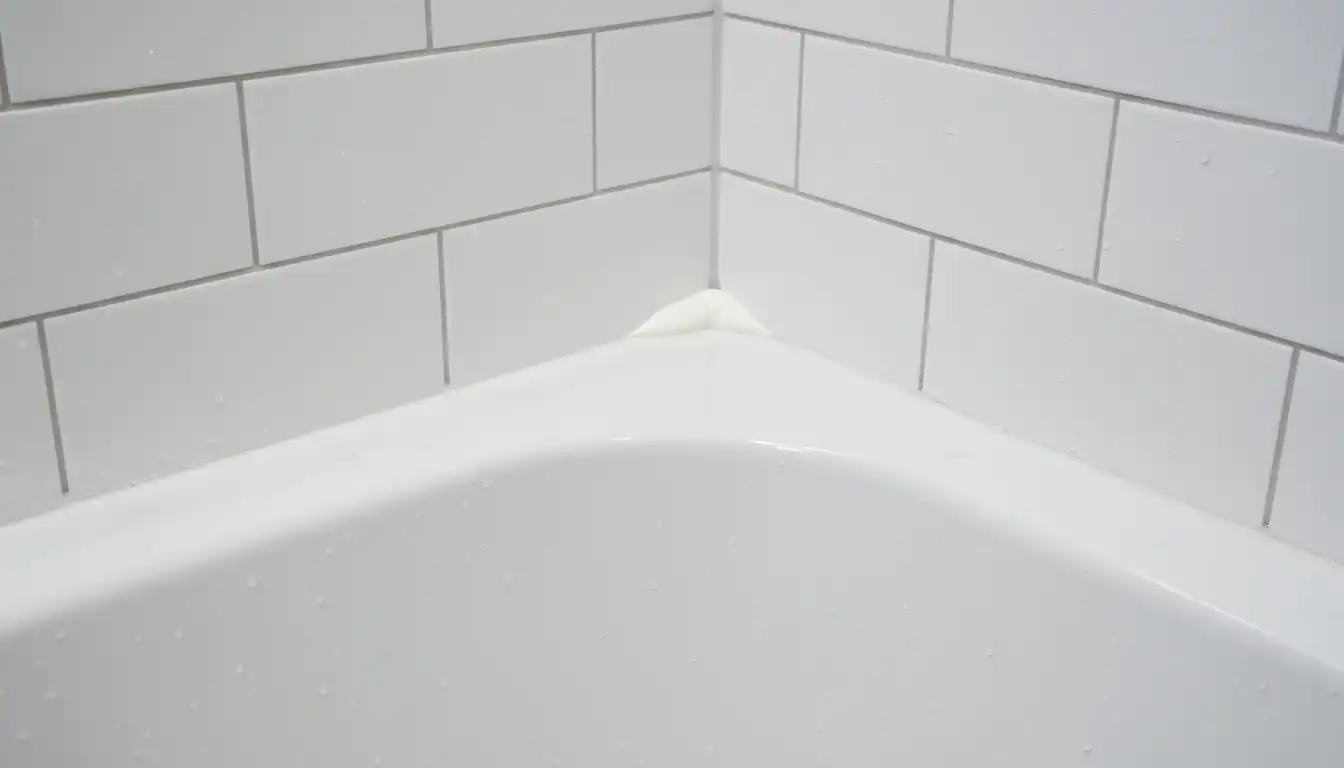
Step 3: Tiling with the Right Spacing
When setting the first course of tile, it is crucial that the tiles do not rest directly on the tub deck. Use 1/8-inch spacers to maintain a consistent gap between the bottom of the tiles and the tub surface.
This gap is not for grout. This space is essential for creating a sealant joint of the proper depth and width to handle movement. The planning for this gap is especially important with large format tiles, where the visual impact of the layout, such as choosing a 12×24 tile in a vertical or horizontal pattern, needs to account for this critical space at the bottom.
The Definitive Guide to Sealing the Joint
With the underlying structure built correctly, the final seal becomes the flexible, waterproof “first line of defense.” Executing this step with professional precision ensures both longevity and a clean, aesthetic finish.
Choosing Your Champion: The Best Sealant
For the tile-to-tub joint, there is only one choice recommended by tile industry standards: 100% silicone sealant. It offers maximum flexibility and superior adhesion in wet environments. While other products exist, they represent a compromise in performance for this specific, high-movement application.
| Sealant Type | Flexibility | Waterproofing | Mold Resistance | Paintable | Best Use Case |
|---|---|---|---|---|---|
| 100% Silicone | Excellent | Excellent (100% Waterproof) | Excellent (Inhibitors built-in) | No | Tub/Tile Joints, Shower Corners, Sinks |
| Siliconized Acrylic Latex | Good | Good (Water-resistant) | Good | Yes | Baseboards, window/door trim outside of shower |
| Polyurethane | Excellent | Excellent | Fair | Yes | Windows, doors, exterior joints (strong adhesion) |
The Secret to a Perfect Caulk Line: Preparation is Everything
The most expensive silicone in the world will fail if applied to a dirty or improperly prepared surface. Meticulous prep work is not optional; it is the most important part of the job.
First, remove every trace of old caulk and grout from the joint using a utility knife or a specialized caulk removal tool. Next, deep clean the joint with denatured alcohol on a clean rag. Do not use water or household cleaners, as they can leave behind a soap film that prevents the new sealant from adhering properly.
For joints wider or deeper than 1/4 inch, you must use a foam backer rod. This flexible foam strip is pressed into the gap before caulking. Its purpose is to create a two-point adhesion (to the tile and the tub) instead of three-point adhesion (tile, tub, and wall). This allows the sealant bead to stretch like a rubber band; without it, the sealant is torn apart by movement.
Finally, apply painter’s tape to both the tile and the tub deck, leaving a clean, crisp gap of about 1/8 inch for the sealant bead. This is the professional’s secret to perfectly straight lines.
Application Technique for a Flawless Finish
Cut the nozzle of the silicone tube at a 45-degree angle, making an opening just large enough to fill the taped-off gap. Apply the sealant in a smooth, continuous motion, pushing the bead into the joint ahead of the nozzle. This ensures the silicone is forced deep into the gap for a complete seal.
Immediately after applying the sealant, tool the bead by lightly running a wet finger or a caulk finishing tool along the joint to create a smooth, concave surface. Do not press too hard; the goal is to smooth the bead, not remove the sealant. While the sealant is still wet, carefully remove the painter’s tape by pulling it away from the joint at a 45-degree angle to reveal a perfect, sharp line.
Design Considerations for a Seamless Look
A properly executed tile-to-tub transition shouldn’t just be functional; it should be an integrated part of your bathroom’s design. Paying attention to a few final details elevates the finish from workmanlike to outstanding.
Matching Sealant to Your Grout
Gone are the days of being limited to clear or white silicone. Major grout manufacturers now offer 100% silicone sealants that are color-matched to their entire grout palette. Using a sealant that perfectly matches your grout color makes the flexible joint visually disappear, creating a seamless and high-end look.
The Role of the Tub Itself
The type of bathtub you choose can impact the nature of this transition. Alcove tubs with an integral tile flange are specifically designed for a tiled surround and provide the most straightforward path to a waterproof installation. The design of these flanges can vary, which is a key consideration when comparing models like the Kohler Underscore vs Archer, as each presents a slightly different profile for the tile backer to meet.
For undermount or drop-in tubs with a stone or solid surface deck, the principle remains the same: the joint between the tile wall and the deck is a change of plane that requires a flexible sealant, not grout.
The Final Word on a Leak-Proof Seal
The joint where tile meets tub is far more than a simple caulk line. It is a dynamic, high-stakes intersection that must be engineered to withstand constant movement and moisture. Success is built on a foundation of solid tub support, a correctly integrated waterproofing membrane, and meticulous preparation.
By respecting the forces of movement, leaving the proper gap for a flexible sealant, and using 100% silicone, you can finally stop the endless cycle of repairs. This approach ensures your tile-to-tub transition remains a clean, beautiful, and—most importantly—permanently waterproof component of your bathroom for years to come.