Thresholds Between Rooms: The Tiny Detail Ruining Your Floors
The perfect flooring transition is an unsung hero of home design. It’s a detail so small that when it’s done right, you barely notice it. But when it’s wrong, it creates a visual disruption that can undermine your entire design, introduce a dangerous tripping hazard, and even lead to costly damage to your beautiful floors.
Many homeowners invest thousands in stunning hardwood, tile, or vinyl planking, only to be stopped in their tracks by a single question: how do you properly bridge the gap between rooms? An ugly, poorly chosen, or improperly installed threshold can make expensive flooring look cheap and unfinished.
You'll Learn About
Why the Wrong Threshold Is More Than Just an Eyesore
A threshold between rooms does more than just cover a gap. It’s a critical component that serves several vital functions. Getting it wrong can lead to a host of problems that go far beyond aesthetics.
The most immediate issue is safety. A threshold that sits too high, has a sharp edge, or is not securely fastened creates a significant tripping hazard. This is especially dangerous in homes with children, the elderly, or anyone with mobility challenges. A smooth, gradual transition is essential for preventing falls and ensuring safe passage between rooms.
Beyond safety, thresholds protect the integrity of your flooring. Different flooring materials expand and contract at different rates with changes in temperature and humidity. A transition strip provides the necessary expansion gap, preventing buckling, warping, and cracking that can ruin hardwood or laminate floors. It also protects the vulnerable edges of materials like carpet from fraying and tile from chipping.
The Core Problem: Mismatched Heights and Materials
The primary challenge in selecting a threshold comes from transitioning between two different types of flooring. It’s rare for two materials to have the exact same thickness. A plush carpet next to a slim vinyl plank, or a thick ceramic tile meeting engineered hardwood, will almost always result in an uneven floor level.
Simply placing a flat strip over this height difference is a recipe for disaster. It creates an abrupt lip that is easy to trip on and puts undue stress on the flooring materials. Choosing the correct type of transition piece is crucial for navigating these height discrepancies safely and effectively.
Choosing Your Perfect Transition: A Guide to Threshold Types
To solve the problem of uneven and unsightly transitions, you must first understand the different types of thresholds available. Each is specifically designed for a particular scenario, ensuring a professional and secure finish. The right choice depends on the heights of your two floors and the materials you are connecting.
Making the correct selection ensures your floors are not only beautiful but also functional and safe for years to come. Thoughtful consideration of your specific needs, such as whether you are transitioning to a wet area like a bathroom, is key. A specialized transition like a shower curb serves a similar purpose in a more demanding environment.
The Four Main Types of Interior Thresholds
From connecting floors of the same height to bridging significant level changes, there is a specific solution for every situation. Understanding the function of each type is the first step toward a flawless finish. Consider these common options for your home.
These options cover the vast majority of flooring transitions you will encounter in a typical home renovation. Selecting the right one is a matter of measuring your height difference and matching the style to your decor.
| Threshold Type | Best Use Case | Common Materials | Key Advantage |
|---|---|---|---|
| T-Molding | Connecting two hard floors of the same height (e.g., hardwood to tile). | Wood, Metal, Vinyl | Hides the expansion gap while providing a smooth, level surface. |
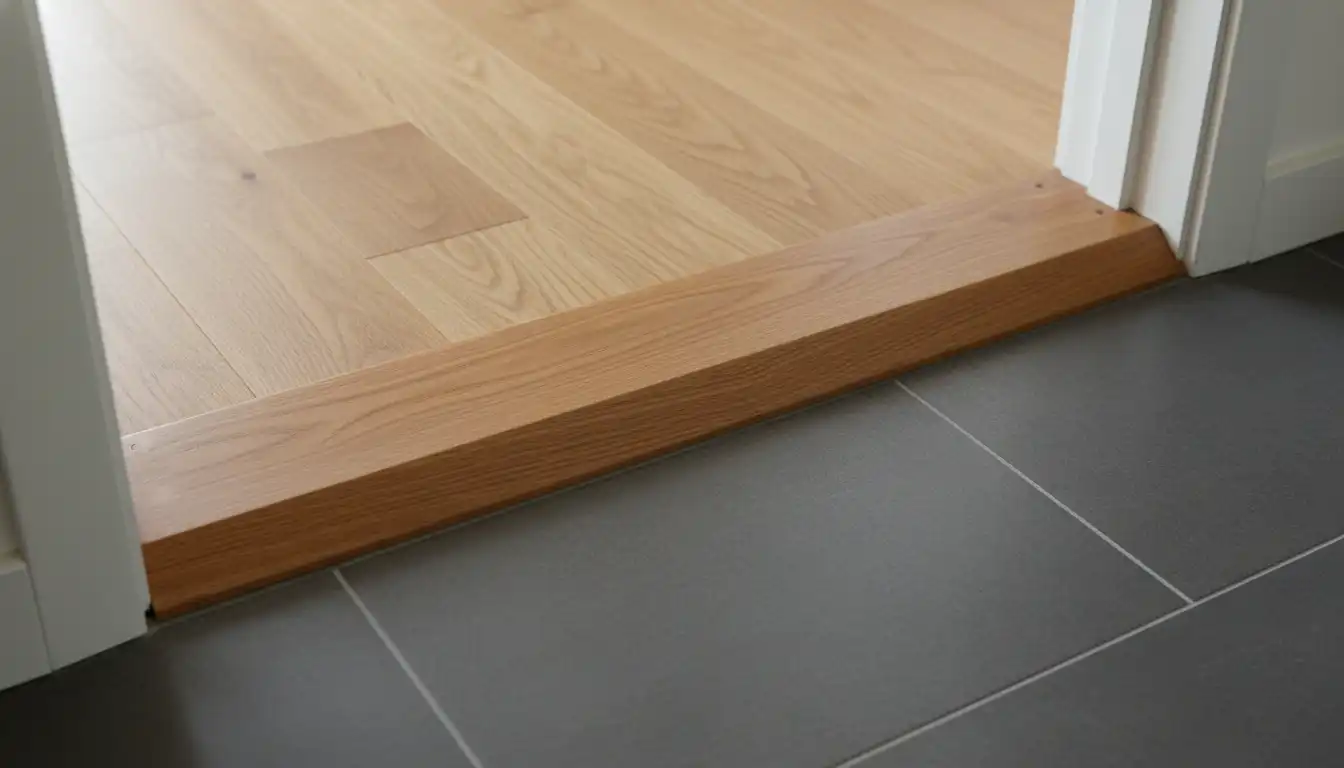
| Reducer | Connecting two floors of unequal height (e.g., tile down to vinyl). | Wood, Metal, Vinyl | Creates a gentle, sloped transition, preventing trips. |
| End Cap (Threshold) | Finishing the edge of a floor where it meets a doorway, fireplace, or sliding door. | Wood, Metal | Provides a clean, finished edge and protects the flooring from damage. |
| Carpet Transition Strip | Connecting carpet to a hard surface like tile, wood, or vinyl. | Metal, Vinyl | Features teeth or a gripper to securely hold the carpet edge and prevent fraying. |
Installation Done Right: A Step-by-Step Guide
Once you’ve selected the perfect threshold, proper installation is critical. A poorly installed transition strip can become loose, creating a new set of hazards. While specific instructions may vary by product, the fundamental steps remain consistent.
Taking your time and focusing on precision will ensure a secure and long-lasting result. Rushing this final detail can undo all the hard work of laying a new floor.
Step 1: Measure and Cut Precisely
Measure the width of the doorway from jamb to jamb at the floor level. Transfer this measurement to your threshold strip and mark your cut line with a pencil. It’s often wise to measure twice to ensure accuracy before making a cut.
Use a miter saw for a clean, straight cut on wood or vinyl thresholds. For metal strips, a hacksaw with a fine-toothed blade is the best tool. Always wear safety glasses during this step to protect your eyes from debris.
Step 2: Secure the Mounting Track (If Applicable)
Many modern thresholds use a metal or plastic track that is first secured to the subfloor. This track allows the visible top piece to snap into place without any visible screws. Place the track in the center of the gap between the two floors.
Drill pilot holes into the subfloor through the holes in the track. Use the included screws or appropriate fasteners to secure the track firmly to the floor. Ensure it is straight and level before moving on.
Step 3: Fasten the Threshold
If your threshold has a snap-in track, position one edge of the strip into the track and use a rubber mallet or a block of wood to gently tap it into place. Work your way across the length of the threshold until it is fully seated and secure.
For direct-glue or screw-down types, apply a bead of construction adhesive to the underside of the threshold. Press it firmly into place, ensuring it makes solid contact with the subfloor. If using screws, drill pilot holes first to prevent splitting the wood, then drive the screws until they are flush with the surface.
Beyond Function: The Design Impact of Thresholds
While the primary role of a threshold is functional, its impact on your home’s design should not be underestimated. This small detail can either tie two spaces together harmoniously or create a jarring visual break. The choice of material and color plays a significant role in the final aesthetic.
A threshold can act as a subtle connector or a deliberate design statement. For example, using a bold metal strip between wood and tile can create a modern, industrial feel. Conversely, a wood threshold stained to match the hardwood floor creates a seamless, continuous look.
The Psychology of Transitions
A floor threshold does more than separate flooring; it psychologically separates spaces. A distinct, raised threshold can signal a transition to a different type of room, such as moving from a public hallway to a private bedroom. This is different from the transitions needed for exterior doors, where products like low threshold patio doors are designed to balance weather sealing with accessibility.
In modern, open-concept homes, the goal is often to create a feeling of continuous flow. In these cases, a very low-profile T-molding that perfectly matches the flooring color can make the transition nearly invisible, enhancing the sense of a single, unified space.
Accessibility and ADA Compliance
A crucial but often overlooked aspect of interior thresholds is accessibility. For individuals using wheelchairs, walkers, or canes, even a small change in floor height can present a significant barrier. According to the Americans with Disabilities Act (ADA), interior thresholds should not exceed 1/4 inch in vertical height.
If the height change is between 1/4 inch and 1/2 inch, the threshold must be beveled with a slope no steeper than 1:2. By selecting ADA-compliant reducers or ramp thresholds, you ensure your home is safe and accessible for everyone. This proactive approach to design creates a more welcoming and functional living environment for family and guests of all ages and abilities.