Tankless Water Heater in Cabinet: The Ultimate Guide to Hiding Your Heater Safely
The modern home celebrates clean lines and uncluttered spaces. This minimalist aesthetic has driven a desire for integrated, invisible appliances, leading many to ask: can a tankless water heater be installed inside a cabinet? The answer is a resounding yes, but the path to a safe, efficient, and long-lasting installation is filled with critical details that are often overlooked.
Simply placing a powerful heating appliance inside a small, enclosed box without proper planning is a recipe for disaster. It can lead to overheating, moisture damage, reduced efficiency, and even create a serious safety hazard. This guide provides a comprehensive roadmap to correctly and safely installing a tankless water heater in a cabinet, ensuring you get all the benefits of instant hot water without compromising your home or your peace of mind.
You'll Learn About
Why Hide a Water Heater? The Allure of the Invisible Appliance
The primary motivation for a cabinet installation is aesthetics. Hiding the water heater preserves the clean, intentional design of a modern kitchen or bathroom. It eliminates visual clutter, allowing statement pieces and carefully chosen finishes to take center stage.
Beyond looks, it’s an ingenious space-saving solution. In smaller homes, apartments, or accessory dwelling units (ADUs), every square inch counts. Placing a compact, point-of-use (POU) tankless unit directly under the sink where it’s needed most frees up valuable closet or wall space for other uses.
The Critical Mistake Most Homeowners Make Before Installation
The most common error is assuming that if the unit fits physically, the installation is viable. This ignores the two most crucial factors for placing any heat-generating appliance in an enclosed space: clearance and ventilation. Failure to address these properly can lead to premature unit failure and significant safety risks.
It’s Not Just About Space: Understanding Clearance and Ventilation
Every tankless water heater has specific clearance requirements detailed by the manufacturer—the minimum empty space needed around the unit for safe operation. These clearances are not suggestions; they are essential for allowing heat to dissipate. Without adequate airflow, the unit can overheat, which drastically shortens its lifespan and can damage the internal electronics.
For a cabinet, this means choosing a unit specifically designed for tight spaces, often labeled as “zero clearance” on the sides. However, even these units typically require space at the top, bottom, and front for proper function and future maintenance access. Always consult the manufacturer’s installation manual for exact clearance dimensions before purchasing a unit.
Gas vs. Electric: The Non-Negotiable Choice for Cabinet Installs
When installing in a sealed cabinet, the choice is simple: you must use an electric tankless water heater. Gas-powered units require extensive venting to safely exhaust combustion byproducts like carbon monoxide. While some direct-vent models can be installed in confined spaces, they require dedicated intake and exhaust pipes running to the exterior of the home, which is often impractical and defeats the purpose of a simple cabinet installation.
Electric models, on the other hand, produce no exhaust, making them the only safe option for this application. However, they have significant electrical requirements. Most point-of-use units need a dedicated 120V or 240V circuit, so it’s crucial to consult with a licensed electrician to ensure your home’s electrical panel can handle the load.
Your Step-by-Step Guide to a Safe and Seamless Installation
A successful installation hinges on careful planning and execution across three key stages: selecting the right unit, preparing the cabinet, and ensuring professional utility connections.
Step 1: Choosing the Right “Cabinet-Ready” Unit
The market is full of compact electric models designed for point-of-use applications like under a sink. Look for units that are lightweight, have minimal side clearance requirements, and have dimensions that comfortably fit within your cabinet while respecting all required clearances. Pay close attention to the unit’s flow rate (measured in gallons per minute or GPM) and temperature rise capabilities to ensure it can meet the demands of the fixture it will serve.
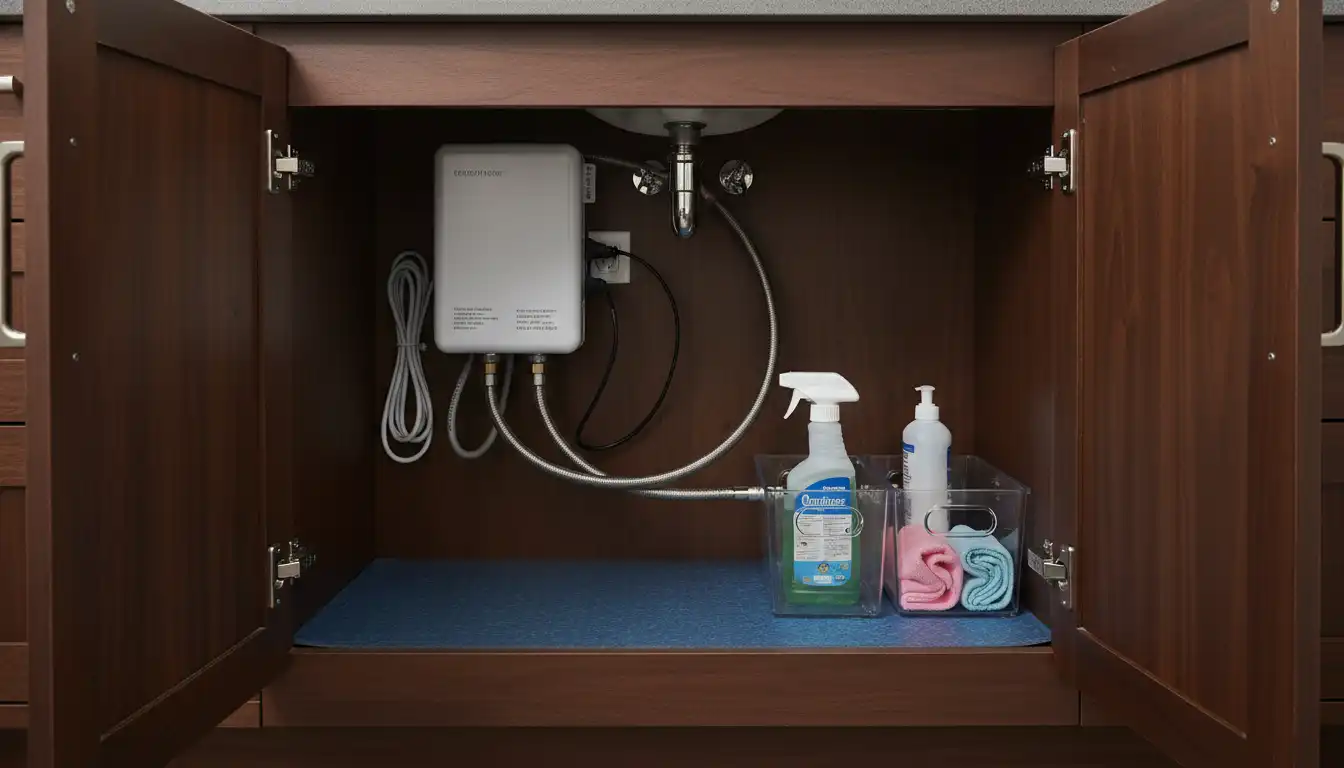
Step 2: Preparing the Cabinet – Beyond Just Clearing a Shelf
Proper cabinet preparation is vital. You may need to reinforce the back wall or base of the cabinet to securely support the weight of the water heater. Precision is key when drilling access holes for the plumbing and electrical lines. Just as careful measurement is essential for a flawless result in projects like installing cabinet doors, as detailed in our IKEA hinge guide, the same meticulous approach is needed here to ensure a clean and functional setup.
You must also plan for future access. Ensure the unit can be easily reached and, if necessary, removed for maintenance or repairs without having to dismantle the entire cabinet.
Step 3: Mastering Water and Electrical Connections
This is not a DIY job for most homeowners. Hire a licensed plumber and a licensed electrician to handle the final connections. An electrician will ensure the unit is wired to a dedicated circuit with the correct gauge wire and breaker, preventing electrical overloads. A plumber will connect the water lines securely using high-pressure flexible stainless steel hoses, ensuring a leak-proof installation.
The Hidden Dangers No One Talks About (And How to Prevent Them)
Beyond the basics of clearance and connections, several often-overlooked issues can arise from placing a water heater in a cabinet. Addressing these proactively will ensure the longevity and safety of your installation.
The Silent Threat: Humidity and Moisture Damage
Even a tiny, slow leak or normal condensation can be catastrophic inside a wooden cabinet. Over time, this moisture will lead to wood rot, warping, and mold growth, destroying the cabinet from the inside out. The absolute minimum protection is a high-quality drip pan placed directly under the unit.
For superior protection, consider installing a smart leak detector. These small devices can be placed in the drip pan and will send an alert to your phone and sound an alarm the moment moisture is detected. Some advanced systems can even trigger an automatic shut-off valve on your water line, preventing a major flood.
The Annoying Hum: Managing Noise in an Enclosed Space
Tankless water heaters are not silent; their heating elements often produce a humming or buzzing sound during operation. When placed inside a cabinet, this sound can be amplified, creating a noticeable and annoying noise. This can be easily mitigated by using sound-dampening materials.
Adhering acoustic dampening mats to the interior walls of the cabinet can absorb much of the sound. Additionally, mounting the unit with rubber grommets or washers between the mounting bracket and the cabinet wall will reduce the transfer of vibrations, further quieting the operation.
Efficiency Sabotage: How a Hot Cabinet Kills Performance
An often-unrecognized issue is the impact of ambient temperature on the unit’s performance and health. A completely sealed cabinet can trap heat, raising the internal temperature. This can potentially interfere with the unit’s temperature sensors and cause the electronics to run hotter than designed, which can reduce its operational lifespan.
To prevent this, promote passive airflow. A simple solution is to install a small, decorative vent or grille in the cabinet’s toe-kick or on the cabinet door. This allows cooler ambient air to enter and warmer air to escape, keeping the internal temperature stable.
Integrating Your Hidden Heater into Your Home Design
A properly installed, invisible tankless water heater is a triumph of form and function. By hiding the appliance, you enable a seamless and elegant design throughout your kitchen or bathroom. This allows other high-end finishes and features to become the focal point.
With plumbing neatly tucked away, you can fully appreciate the beauty of your countertop selection, such as the durable and stylish options found in these Manor House Quartz reviews. It also provides more design freedom for other fixtures, making it easier to implement creative solutions for challenges like an off-center vanity light without a bulky heater competing for under-sink real estate.
Final Checklist: Is a Cabinet Tankless Water Heater Right for You?
Before committing, run through this final checklist. Do you have adequate electrical capacity for a dedicated circuit? Is your chosen cabinet strong enough to support the unit and large enough to accommodate all clearance requirements? Have you planned for ventilation and moisture protection? Finally, have you budgeted for professional installation by licensed tradespeople?
If you can answer yes to these questions, then a tankless water heater in a cabinet is an excellent choice. It provides the luxury of instant hot water while supporting a modern, minimalist, and highly functional home design.
| Feature | Point-of-Use (POU) Electric Models | Whole-Home Electric Models |
|---|---|---|
| Typical Use | Single fixture (e.g., sink, shower) | Multiple fixtures simultaneously |
| Avg. Flow Rate (GPM) | 0.5 – 2.5 GPM | 4.0 – 8.0+ GPM |
| Electrical Needs | 120V or 240V, 20-60 Amps | 240V, 100-160 Amps (often requires panel upgrade) |
| Avg. Dimensions | Compact (Approx. 12″ x 8″ x 4″) | Larger (Approx. 18″ x 16″ x 5″) |
| Suitability for Cabinets | Excellent. Designed for this application. | Poor. Generally too large and require too much clearance. |