Sunroom Wall Panel Replacement: Your Ultimate DIY Guide to a Fresh, New Space
There’s nothing quite like basking in the gentle sunlight of your sunroom. It’s a space for relaxation, quiet mornings, and cherished family time. But that peaceful feeling can quickly fade when you notice a problem: a warped, water-stained, or cracked wall panel. Suddenly, your serene retreat feels compromised, and a wave of questions hits. What caused this? How serious is it? Can I fix this myself?
A damaged sunroom wall panel isn’t just an eyesore; it can be a sign of underlying issues that compromise your comfort and your home’s energy efficiency. From subtle drafts to visible moisture damage, these problems demand attention. Ignoring them can lead to more significant structural concerns, mold growth, and skyrocketing energy bills, turning your beloved sunroom into a source of stress. This guide is here to put you back in control, providing a comprehensive, step-by-step approach to diagnosing the problem and executing a flawless sunroom wall panel replacement.
You'll Learn About
How to Tell It’s Time for a Sunroom Wall Panel Replacement
Before you can tackle the solution, you need to be certain about the problem. Some signs of panel failure are obvious, while others are more subtle. A thorough inspection is the first step toward restoring your sunroom to its former glory. Pay close attention to these key indicators to determine if a full replacement is necessary.
Obvious Signs of Damage: Cracks, Holes, and Warping
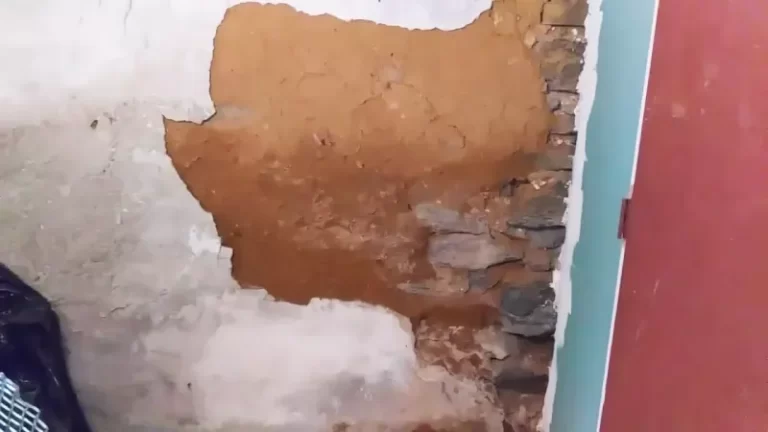
The most straightforward signs of panel failure are those you can see and feel. Physical impacts, whether from a stray baseball or moving furniture, can cause distinct cracks and holes. Over time, exposure to fluctuating temperatures and humidity can cause panels, especially older wood or composite types, to warp, bow, or buckle. Run your hand over the panel’s surface; if it feels uneven, wavy, or separated from the frame, it’s a clear indication that its structural integrity is compromised.
The Sneaky Threat of Water Damage and Mold
Water is the number one enemy of a sunroom. Leaks can originate from failing roof seals, clogged gutters, or compromised window caulking, allowing moisture to seep into the wall structure. Telltale signs include dark stains or discoloration on the panel’s surface, a musty odor that won’t go away, or paint that is peeling, bubbling, or blistering. If you spot any fuzzy, speckled growth—typically black, green, or white—you’re looking at active mold, which poses health risks and must be addressed immediately by replacing the affected panel and resolving the moisture source.
Poor Insulation and Skyrocketing Energy Bills
Is your sunroom uncomfortably hot in the summer and frigid in the winter? This is often a symptom of failing insulation within the wall panels. Older panels can lose their insulating properties over time, or the seals around them can degrade, creating drafts that let outside air in. An unexpected spike in your heating or cooling costs is a major red flag. If you feel a noticeable temperature difference when standing near the wall panels, it’s a strong sign they are no longer providing an effective thermal barrier.
Outdated Aesthetics and Decreased Home Value
Sometimes, a panel replacement is less about damage and more about modernization. Faded, yellowed, or simply outdated wall panels can make your entire sunroom feel old and uninviting. Upgrading your panels is a powerful way to refresh the space, improve its aesthetic appeal, and ultimately increase your home’s overall value. A bright, clean, and well-maintained sunroom is a significant selling point, making new panels a worthwhile investment.
Understanding Your Existing Sunroom Wall Panels
Before you can choose a replacement, you need to know what you’re working with. Sunroom construction varies, and identifying your current panel type is crucial for a successful project. This knowledge will guide your material selection and replacement strategy, ensuring you buy the right products and use the correct techniques.
Identifying the Material: Vinyl, Aluminum, Wood, or Composite?
Most sunroom wall panels are made from one of a few common materials. Aluminum panels are lightweight, often have a slightly metallic finish, and may have a textured or smooth surface. Vinyl panels are also lightweight, typically have a plastic-like feel, and are very low maintenance. Wood panels, such as cedar or pine, offer a traditional look but are more susceptible to rot and require regular upkeep. Many modern sunrooms use Structural Insulated Panels (SIPs), which consist of an insulating foam core sandwiched between two structural facings, like oriented strand board (OSB).
Structural vs. Non-Structural Panels
It’s vital to determine if your wall panels are part of the sunroom’s support system. Structural panels, like SIPs, are integral to holding up the roof and maintaining the room’s rigidity. Non-structural panels, on the other hand, are primarily cosmetic and serve as infill below windows. If your panels are thick (typically 3 inches or more) and seem to be a core part of the wall system, they are likely structural. Thinner, more flexible panels are often non-structural. Misidentifying this can lead to serious safety issues, so if you are unsure, consult a professional.
Measuring for Success: How to Get the Right Dimensions
Accurate measurements are non-negotiable. Using a reliable tape measure, record the height and width of the panel you need to replace. Measure in at least two different places for both height and width to account for any slight variations in the frame. You also need to measure the panel’s thickness, which is especially important for ensuring a snug, weatherproof fit. Write down these dimensions clearly and take them with you when shopping for materials.
Choosing Your New Wall Panels: A Material Showdown
With your old panels identified and measured, it’s time for the exciting part: choosing the new material. Your decision will impact your sunroom’s appearance, energy efficiency, durability, and maintenance requirements. This is your opportunity to upgrade, so consider all the options carefully.
The material you choose will define the future of your sunroom. To help you decide, the table below compares the most common options based on key factors.
| Material | Average Cost (per sq. ft.) | Durability | Insulation (R-Value) | Maintenance Level |
|---|---|---|---|---|
| Vinyl | $4 – $8 | High (Resists dents, scratches, moisture) | Moderate | Very Low |
| Aluminum | $5 – $10 | High (Resists rust, insects) | Low (unless thermally broken) | Low |
| Wood | $6 – $15+ | Moderate (Prone to rot, insects) | Moderate | High (Requires sealing/painting) |
| Insulated Panels (SIPs) | $10 – $20+ | Very High (Structural strength, moisture resistant) | Very High | Low |
Insulated Panels (SIPs): The Energy-Efficient Choice
If your top priority is creating a true four-season room, Structural Insulated Panels (SIPs) are the gold standard. These panels offer superior thermal performance, keeping your sunroom comfortable year-round and reducing your energy consumption. They are incredibly strong, durable, and resistant to moisture, making them an excellent long-term investment for both comfort and structural integrity.
Vinyl and Aluminum: Low-Maintenance Champions
For homeowners who value ease of ownership, vinyl and aluminum panels are fantastic choices. Both materials are highly resistant to moisture, rot, and insects, meaning they won’t warp or degrade like wood. They require little more than occasional cleaning to keep them looking new. Modern aluminum panels often feature thermal breaks—a piece of less conductive material separating the interior and exterior surfaces—to improve their insulating properties.
Wood and Composite: For a Natural Aesthetic
If you desire a classic, warm aesthetic, wood or wood-composite panels can be beautiful options. Wood offers unmatched natural charm but demands the highest level of maintenance, including regular painting or sealing to protect it from the elements. Wood composites can provide a similar look with slightly better durability and lower maintenance, but they still don’t match the resilience of vinyl or aluminum in a high-exposure environment like a sunroom.
The Ultimate DIY Sunroom Wall Panel Replacement Guide
With your new panel chosen, it’s time to get to work. This replacement process is manageable for a DIYer with basic carpentry skills, but it requires patience and precision. Following these steps carefully will ensure a professional-quality result that is secure, weatherproof, and looks fantastic.
Step 1: Safety First – Gear and Precautions
Before you begin, prioritize your safety. Wear safety glasses to protect your eyes from debris and work gloves to guard your hands. If you’re working with materials that create dust, a dust mask is essential. Ensure your work area is clear of clutter and that any pets or small children are kept at a safe distance.
Step 2: Gathering Your Tools and Materials
Having everything you need on hand will make the process smoother. Your toolkit should include a drill with various bits, a pry bar, a utility knife, a caulking gun, and a tape measure. You will also need your new wall panel, exterior-grade screws, high-quality exterior caulk or sealant, and potentially some spray foam insulation for gaps.
Step 3: Carefully Removing the Old, Damaged Panels
The removal process begins with exposing the fasteners. You may need to cut through old caulk lines with a utility knife and use a pry bar to gently remove any interior or exterior trim pieces holding the panel in place. Look for screws securing the panel to the sunroom’s frame and carefully remove them. Work slowly to avoid damaging the surrounding frame, especially if it’s aluminum or vinyl.
Step 4: Inspecting the Framing and Addressing Hidden Issues
Once the old panel is out, you have a crucial opportunity to inspect the underlying structure. Check the framing for any signs of water damage, rot, or pest infestation. If you find damp or soft wood, it’s critical to let it dry out completely. Any rotted sections must be repaired or replaced before proceeding. This is also when you should confirm the source of any leaks has been fixed. Sometimes, persistent moisture issues can be linked to broader household systems; investigating the details of a Maytag water treatment system price could be a step towards ensuring your home’s water is managed effectively, preventing future problems.
Step 5: Preparing the Opening for the New Panel
Clean the opening thoroughly, removing any old caulk, sealant, or debris. This ensures the new panel will sit flush and the new sealant will create a strong, watertight bond. Test-fit your new panel to make sure it slides into place without being forced. If it’s too tight, you may need to trim it slightly; if it’s too loose, you’ll need to be prepared to fill larger gaps later.
Step 6: Installing the New Wall Panel
Apply a continuous bead of high-quality exterior sealant around the inside edge of the frame where the panel will sit. Carefully slide the new panel into place, pressing it firmly against the sealant to create a good seal. Secure the panel to the frame using exterior-grade screws, being careful not to overtighten them, which could crack the panel or warp the frame.
Step 7: Sealing and Insulating for a Watertight Finish
The final step is arguably the most important for long-term durability. Apply a generous bead of sealant around the entire perimeter of the panel on the exterior, tooling it with your finger for a smooth, clean finish. This is your primary defense against water intrusion. On the inside, you can fill any small gaps between the panel and the frame with spray foam insulation before reinstalling your interior trim pieces. Re-caulk the interior trim for a clean, finished look.
DIY vs. Hiring a Professional: Making the Right Call
While replacing a single panel can be a rewarding DIY project, it’s important to be honest about your skill level and the scope of the job. Making the wrong call can lead to costly mistakes, further damage, and a great deal of frustration. Knowing when to hand the job over to an expert is just as important as knowing how to do it yourself.
When to Tackle it Yourself
A DIY approach is best suited for replacing one or two non-structural panels where the damage is straightforward and contained. If you are comfortable with basic carpentry, have the necessary tools, and the underlying frame is in good condition, this project is well within your reach. The satisfaction of completing the job yourself—and the money saved on labor—can be significant.
Red Flags That Mean You Should Call a Pro
There are several situations where calling a professional is the wisest course of action. If you discover extensive rot or structural damage to the sunroom’s frame, a professional is needed to ensure the repair is safe and stable. If the panel is structural, or if multiple panels need replacement, the job becomes much more complex. Similarly, if you’re unsure about the source of a leak or if the replacement involves custom-sized panels, an expert will have the experience and equipment to do the job correctly.
How to Find and Vet a Qualified Contractor
If you decide to hire a professional, do your homework. Seek out contractors who specialize in sunroom construction and repair. Ask for references from recent jobs and look at their online reviews and portfolio of work. Ensure they are licensed and insured, and get a detailed, written estimate that outlines the scope of work, materials to be used, and a projected timeline before signing any contracts.
Beyond the Walls: Holistic Sunroom Maintenance
Replacing a wall panel is a great start, but true peace of mind comes from proactive, ongoing maintenance. A sunroom is a complete system, and protecting your investment means paying attention to all of its components. Regular care can help you catch small issues before they become major headaches.
Regular Inspections to Prevent Future Damage
At least twice a year—once in the spring and again in the fall—perform a thorough visual inspection of your entire sunroom. Look for cracked seals around windows and doors, signs of peeling paint on the frame, and any discoloration on the walls or ceiling that could indicate a new leak. This proactive approach ensures you’re never caught off guard. While you’re inspecting the panels, don’t forget to look at the glass. Damage to the glass is a separate but equally important issue; understanding the process for a sunroom curved glass replacement can be helpful if you spot any problems there.
Maintaining Seals and Gutters
The seals and gutters are your sunroom’s first line of defense against water. Clean your gutters regularly to prevent clogs and ensure proper drainage away from the sunroom’s foundation. Check the caulking around all window and wall panel seams. If it appears cracked, brittle, or is pulling away, carefully remove the old caulk and apply a fresh bead of high-quality, exterior-grade silicone sealant.
What About Other Parts of My Home?
Thinking about your sunroom’s health can often lead to considering other aspects of your home’s maintenance and functionality. A well-maintained home is a system where every part works together. For instance, planning home improvements might involve unconventional ideas about space utilization, like considering the electric water heater in bedroom closet pros and cons to free up space elsewhere. It’s all part of a holistic approach to home ownership, where one project can inspire improvements in another.
Frequently Asked Questions (FAQ)
How much does it cost to replace sunroom wall panels?
The cost can vary widely based on the material and whether you DIY or hire a pro. For a DIY project, materials for a single panel can range from $50 to over $200. Professional installation will add labor costs, which could range from $200 to $600 or more, depending on the complexity of the job.
Can I just repair the panel instead of replacing it?
Minor cosmetic issues like small scratches or scuffs can often be repaired with patch kits or paint. However, for problems like water damage, warping, or large cracks, replacement is almost always the better long-term solution. A repair might be a temporary fix, but it won’t address the underlying loss of integrity or insulation.
How can I improve my sunroom’s insulation during replacement?
Upgrading to a high-R-value insulated panel (SIP) is the most effective way to boost insulation. During the installation process, you can also use expanding foam insulation to fill any gaps between the new panel and the frame. Ensuring a perfect seal with high-quality caulk will also prevent drafts and significantly improve the room’s energy efficiency.
A Renewed Space to Enjoy
Replacing a damaged sunroom wall panel is more than just a repair; it’s an opportunity to reclaim and enhance your favorite space. By following this guide, you can confidently tackle the project, armed with the knowledge to do it right. Whether you choose the DIY path or enlist a professional, the end result will be a secure, beautiful, and comfortable sunroom that you and your family can enjoy for years to come.
Don’t let a faulty panel detract from your home’s sanctuary of light. Take action, restore your space, and get back to enjoying the peaceful, sun-filled moments your sunroom was designed for.